Headlight

Carlos840

Junior Member
Joined
Jul 8, 2013
Messages
734
Reaction score
8
Points
18
Location
Belgium
Visit site
Hey man, really nice setup, glad it worked out OK!

You probably are one of the only American with what looks like a stock European bike now.

Regarding the bulbs, on the stock euro bike the top small hole is filled by the auxiliary light, it is a small 12v 5w bulb, that turns on when you put the contact on, and always stays on. It also goes on when your put your key on the "parking" mode.

The main bulb is a H4 bulb. The bulb turns on in low beam mode with the engine, there is no way to have it stay off. All you can control is the Low/High, not the on/off. That's why it has two filaments, one turns on in Low beam mode, both in high beam.

I wonder if you can modifie the wiring to have it work as it does on a euro bike. Right now, it appears you would be using your high beams 24/7.
Regarding the cover that doesn't sit flush, have you tried shaving the little prongs on the inside part? could help!


Also, the horn is mounted on a bracket on the sides of the frame, you can see it on this picture, just over the radiator:

url_zps69d20636.jpg


The bracket sometimes comes up on ebay:

http://www.ebay.co.uk/itm/Yamaha-FZ...pt=UK_Motorcycle_Parts_13&hash=item335e95d917

And this company sells a cool replacement:

http://www.deprettomoto.com/en/motorcycle-accessories/race/yamaha/fz6-600-0407/175/

But they are useless, the site is crap and i have never been able to talk to someone who spoke English to help me sort it out!
 
Last edited:

mountaincycle

Junior Member
Joined
Nov 22, 2013
Messages
118
Reaction score
0
Points
0
Location
South Carolina USA
Visit site
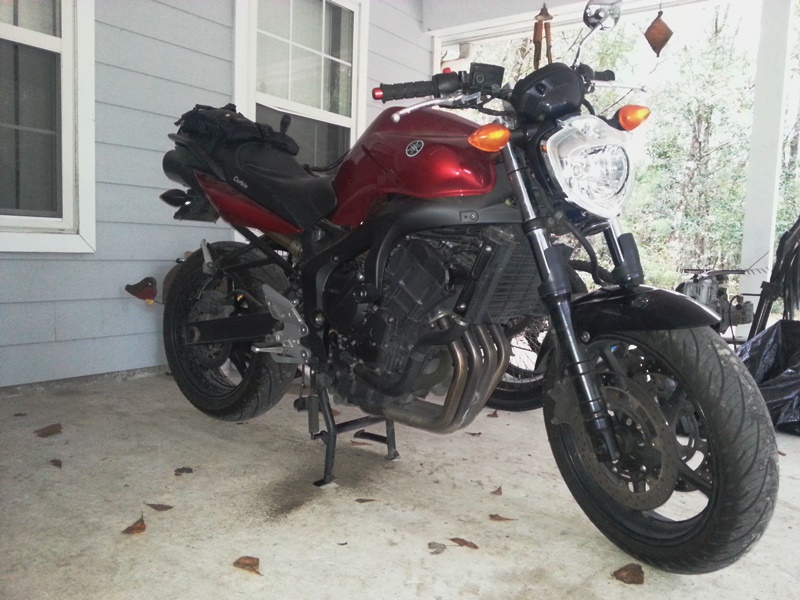
Great job, :thumbup: I totally love the naked look! In my opinion, I have no clue why Yamaha used such a LARGE fairing! :spank:

I’m also doing the same conversion on my 2006 blue Fz6..... sorry to say but it sounds like I had better luck with delivery.

I ordered a VS02 kit from Vishnu Sharma (contact below) Tuesday of Wednesday before Thanksgiving and received it 4 or 5 day later and very happy with the quality. :Flash:

The kit comes in two versions. VS01 & VS02 RED, BLACK, SILVER. They are exactly the same except the shape of the side fairings.
It is mechanically directly plug and play and requires absolute no mechanical modifications. It comes with everything you need to install and you don’t even have to buy a single bolt. The kit also includes two mirrors (not Yamaha), mirror mounts (not Yamaha), and Yamaha turn signals. The kit also includes a speedometer bracket that allows any year speedo installation (04-06 round, 07-09 rectangle)
If I had any questions, and I did, I emailed or called/text Vishnu on his cell phone. He is great to work with! :thumbup:

Vishnu Sharma
423-383-4914
[email protected]
 

JONJONsocal

UNKNOWN HOON
Joined
May 6, 2013
Messages
238
Reaction score
4
Points
18
Location
Always Sunny Socal
Visit site
I figured out with motogino.. wire the running ligth to the signals and he also has a pretty good idead of how to wire the headlight too. Enjoy your vacations!

Sent from my SPH-D710 using Tapatalk
 

Koozi

Junior Member
Joined
Aug 30, 2007
Messages
51
Reaction score
0
Points
0
Location
Tallahassee
Visit site
I just installed this kit yesterday. Wish I had seen this post first because it would have made figuring out the puzzle of mounting the bracket a bit easier.

Mine did not include any instructions and was confusing. Once I bolted that bottom spacer on it was clearer. Sandwiching the speedo mount between the gauge and the back cover was another Aa-haa moment.

I have an 06 with the round speedo and needed the 2 included spacers between the gauge and the cover to make it line up right. Then I had to find two more for the headlight mounting brackets. Is that how you did it?

For the headlight plug I used the plug from the low beam side. But I pulled the high beam wire out of the high beam plug and slid it into the top hole of the low beam plug. High and low beam works correctly with the switch.

A pic:

201.jpg
 

Koozi

Junior Member
Joined
Aug 30, 2007
Messages
51
Reaction score
0
Points
0
Location
Tallahassee
Visit site
It is a Kriega US10 pack. I used to ziptie a small backpack to the grab bars but this is much easier to put on and off and a little bigger.
 

Koozi

Junior Member
Joined
Aug 30, 2007
Messages
51
Reaction score
0
Points
0
Location
Tallahassee
Visit site
What you do about you right side mirror?
I drilled and tapped the spot by the brake master. A 2 minute job after I bought the correct tap.

The mirrors that came with the kit did not show anything except my shoulders. I am trying a set of Renthals from a non-running MX bike in the garage. They are very wide, it feels strange. Haven't had a chance to ride more than around the yard yet so I don't know if they are keepers. Hopefully the extra leverage will be good.

On the plus side I can see behind me again!
 

JONJONsocal

UNKNOWN HOON
Joined
May 6, 2013
Messages
238
Reaction score
4
Points
18
Location
Always Sunny Socal
Visit site
I drilled and tapped the spot by the brake master. A 2 minute job after I bought the correct tap.

The mirrors that came with the kit did not show anything except my shoulders. I am trying a set of Renthals from a non-running MX bike in the garage. They are very wide, it feels strange. Haven't had a chance to ride more than around the yard yet so I don't know if they are keepers. Hopefully the extra leverage will be good.

On the plus side I can see behind me again!

Im gonna have to drill too.. Oh man! Lol. Got any tips ? Im also having a hard time hiding the wires.. But motogino's relay works great..

Sent from my XT1056 using Tapatalk
 

Koozi

Junior Member
Joined
Aug 30, 2007
Messages
51
Reaction score
0
Points
0
Location
Tallahassee
Visit site
I figured out with motogino.. wire the running ligth to the signals and he also has a pretty good idea of how to wire the headlight too.

What light did you end up putting in the little hole? Eventually I am going to pull the head light back off to put that on in and would like to have it ready to install.
 

Koozi

Junior Member
Joined
Aug 30, 2007
Messages
51
Reaction score
0
Points
0
Location
Tallahassee
Visit site
Im gonna have to drill too.. Oh man! Lol. Got any tips ? Im also having a hard time hiding the wires.. But motogino's relay works great..
11/32drill bit and a 10.125 tap. It is pretty soft metal so it drills out easily.
Keep the drill straight LOL

I checked my mirror about 5 times confirming it was standard threads-not reversed. Both of mine thread onto the bar mount standard and one of the mirrors is reversed. I probably have one stalk upside down, but it works.
 

JONJONsocal

UNKNOWN HOON
Joined
May 6, 2013
Messages
238
Reaction score
4
Points
18
Location
Always Sunny Socal
Visit site
What light did you end up putting in the little hole? Eventually I am going to pull the head light back off to put that on in and would like to have it ready to install.

I used one of the grommets from the speedo. It fitted really good, took apart a cheap blinker i had laying around got a really low volt lightbulb and connected it to one of the running signals.. It cane out good. Looks great..

Sent from my XT1056 using Tapatalk
 

JONJONsocal

UNKNOWN HOON
Joined
May 6, 2013
Messages
238
Reaction score
4
Points
18
Location
Always Sunny Socal
Visit site
11/32drill bit and a 10.125 tap. It is pretty soft metal so it drills out easily.
Keep the drill straight LOL

I checked my mirror about 5 times confirming it was standard threads-not reversed. Both of mine thread onto the bar mount standard and one of the mirrors is reversed. I probably have one stalk upside down, but it works.

Im gonna go buy one today. So its a 10mm x 1.25mm tap and 11/32 bit.. ? I might also order some mirror extenders too. I couldn't finish last night.. Need to figure out how to hide the wires better but everything plugged in and worked fine. The relay makes the headlight switch properly.. High/low.. Running bulb looks good to. Ill post pictures when done.. Thanks

Jon

Sent from my XT1056 using Tapatalk
 

Koozi

Junior Member
Joined
Aug 30, 2007
Messages
51
Reaction score
0
Points
0
Location
Tallahassee
Visit site
That is the size mine was.

It is probably safest to go to the nut and bolt section and double check the size and rotation.

The package the tap comes in will tell you what size drill bit to use.

You will need something to turn the tap with too. The square end of a socket for a 1/4 inch drive ratchet wrench worked perfectly for me.

Definitely pics when you're done, although we are taking over xCROv's thread.
 

Motogiro

Vrrroooooom!
Staff member
Moderator
Elite Member
Site Supporter
Joined
May 8, 2008
Messages
14,989
Reaction score
1,156
Points
113
Location
San Diego, Ca.
Visit site
Im gonna have to drill too.. Oh man! Lol. Got any tips ? Im also having a hard time hiding the wires.. But motogino's relay works great..

Sent from my XT1056 using Tapatalk


I think one of the mirrors if I remember has a left hand thread. I did a naked conversion for a friend on his FZ6 and I drilled with the minor diameter drill size and used a left hand tap. You must be careful to drill straight and it would be better to have someone with tapping experience tap the hole. Preferably a 2 flute tap as apposed to a 4 flute. Cut a little thread and then back out to break the chip. Then cut a little more and back out to break the chip. Sometimes backing the tap all the way out and blow the loose chips out. I like using a light lubricant when tapping aluminum because it can tends to be gummy when tapping.

Or just come down to SD! :p
 

JONJONsocal

UNKNOWN HOON
Joined
May 6, 2013
Messages
238
Reaction score
4
Points
18
Location
Always Sunny Socal
Visit site
I think one of the mirrors if I remember has a left hand thread. I did a naked conversion for a friend on his FZ6 and I drilled with the minor diameter drill size and used a left hand tap. You must be careful to drill straight and it would be better to have someone with tapping experience tap the hole. Preferably a 2 flute tap as apposed to a 4 flute. Cut a little thread and then back out to break the chip. Then cut a little more and back out to break the chip. Sometimes backing the tap all the way out and blow the loose chips out. I like using a light lubricant when tapping aluminum because it can tends to be gummy when tapping.

Or just come down to SD! :p

Bike is in pieces lol. Im changing the clutch cable and handlebar (fz1) this week.. I bought the bike last year from a guy in oceanside lol ill love to ride down to SD, It would be a while for the bike to be ready. My dad is pretty good drilling :) ill see if he is up to it..lol thanks for the help...

Thanks xCROv for this thread it really helped me with my install.. I love the headlight. Im doing the same to mine with the same set up.. I cant say i dig the chrome mirrors but they do shine pretty nice.. Thumbs up to you and thanks for the huge pictures lol..

Jon

Sent from my XT1056 using Tapatalk
 
Top