
DefyInertia
Former '04 FZ6 Rider
I completed my front end RachTech modification this past weekend (04/22/2007 ? 2004 Yamaha FZ6). In preparation for the mod I had to do a lot of searching in different places for the information I needed, so I figured I?d put everything I learned into one comprehensive thread?
The mod is not very hard but the thought of modifying something as important as your front suspension can be intimidating for the uninitiated?so hopefully this helps.
The Mod, step by step (what I did, not necessarily what you should do) ?
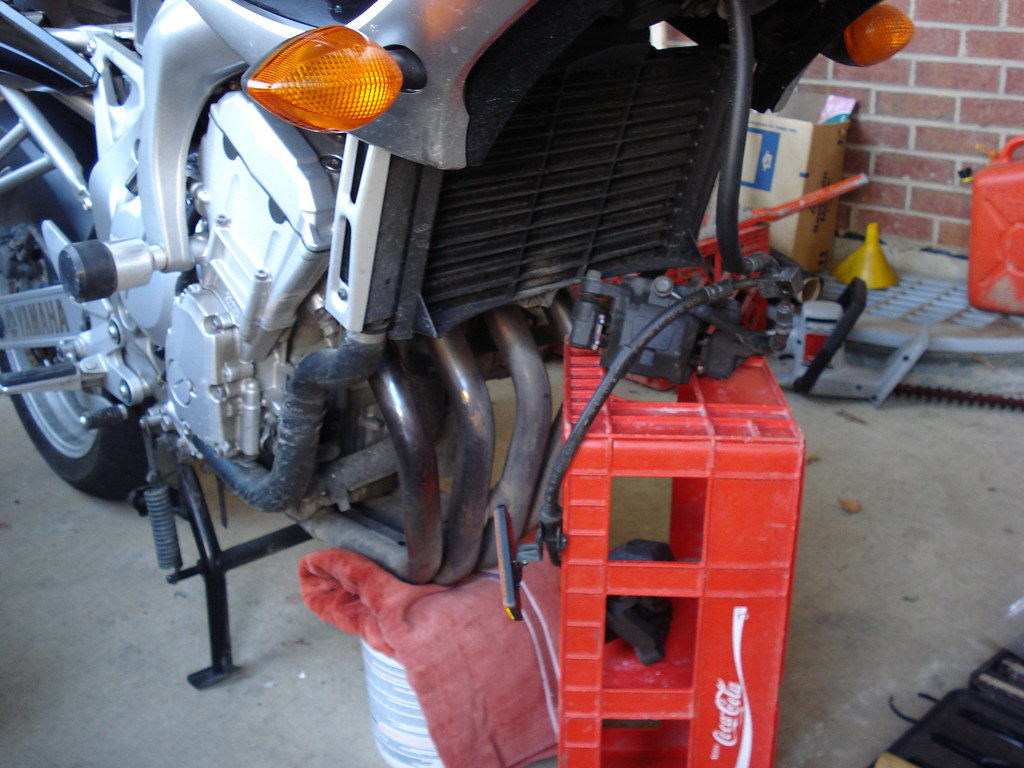
You need to elevate your front wheel. I put my bike on the center stand and placed some weight in my rear top case (see picture) so that the front wheel was lifted off the ground. I also but a can with a towel on top (see picture) under the headers for stability.
Remove the brakes, front fender and front wheel. I supported the heavy brakes using a Coca-Cola crate so that they were not hanging by the brake lines (see picture). Loosen the clamps holding the forks in place and slide them out (cut/clip the zip ties). Be sure to loosen the fork caps before you loosen and remove the forks from the bike for obvious reasons. Don't totally remove the caps until the forks are removed, or you will spill old fork oil everywhere.
Once you remove the fork caps, the spacer (metal tubing) will pop out a couple inches (with only minimal force so don?t be worried). Pull those out along with the stock washer and springs. Dump out the oil into a container. You should compress/extend the shocks a few times while upside down to get all the grey quickcrete-looking oil out.
Next, cut your spacers using the RaceTech provided pipe and decide how many if any RaceTech provided washers you?re going to use. The length of your spacers and the amount of washers you use will impact your initial sag and suspension characteristics. You?ll have to figure this out on your own but 7 3/8? and one washer on top [EDIT - I've cut them down to ~6.75" for sag of ~30mm w/ gear on] gave me what I wanted (I?m 170lb. with no gear, do the occasional track day and ride two-up every now and then).
The hardest part was getting the spacers cut completely straight and equal to each other. I had to do a fair amount of filing by hand. In hindsight, a large handheld tubing cutter (mine was too small) or a handheld hacksaw (I used a large electric one) is probably the best way to go.
The service manual will tell you exactly how much oil to dump in (I went with 0.467L of 15wt per fork). Once you have the oil in, put the fork springs in, then the stock washer, next the RaceTech spacers you cut, finally any RaceTech washer(s), and finally screw on the cap most of the way.
Slide the forks back in the clamps and tighten the top clamps just enough to keep the forks from dropping, install fender, wheel and then brakes. Now that the forks are tied together by the wheel and the fork clamps you can finish tightening the fork caps and set the forks exactly where you want them in the clamps (I dropped my front end about 10mm or so). I used blue locktite on everything except the front axle and the fork caps.
Cost/Tools ?
(1) $18 (shipped) or so for the 15wt Belray oil (FZ6 Dude hooked me up on the cheap). You can use whatever brand or weight you want (stock is 5wt).
(2) $95 for RaceTech springs, 0.95 kg/mm (stock are 0.80kg/mm). Again, you can use whatever spring you want. The RaceTech website has a calculator that generates a recommended spring for your weight and riding style. Race Tech Inc.
(3) Various metric ratchets, adjustable wrench, locktite, container with ml measurements, tool for the front wheel axle, various allen keys, large tube cutter or hack saw, file, and a measuring tape. A torque wrench should be used but is not required.
Spring Size -
I?ve seem some discussion about how the RaceTech springs are shorter than the stock springs. Well, if you look at the stock springs you will notice that a good portion of the springs looks like completely compacted coil that allows for no movement.(see picture).
Results ?
Night and Day?.
In short, I feel much more planted in turns. The bike does not wallow like it used to and reacts much better to mid-corner adjustments (it is impossible to overstate the importance of this). And then there are the much needed braking related improvements! I feel much more confident getting on the brakes hard. The excessive dive is gone and you simply do not notice the front end struggling so much as you ease off the brakes. I also had a chance to ride two-up?.much smoother?my passenger was happy.
When I first sat on the bike I noticed the front end felt noticeably higher due to the reduction in sag. This bothered me at first but I quickly forgot it and can be adjusted several ways. I need to do some more testing but may end up dropping the front slight farther?not sure yet.
In any event, I have not been this excited about my bike since I first bought it. I can?t wait to hit the track next month!
________
Web shows
The mod is not very hard but the thought of modifying something as important as your front suspension can be intimidating for the uninitiated?so hopefully this helps.
The Mod, step by step (what I did, not necessarily what you should do) ?
You need to elevate your front wheel. I put my bike on the center stand and placed some weight in my rear top case (see picture) so that the front wheel was lifted off the ground. I also but a can with a towel on top (see picture) under the headers for stability.
Remove the brakes, front fender and front wheel. I supported the heavy brakes using a Coca-Cola crate so that they were not hanging by the brake lines (see picture). Loosen the clamps holding the forks in place and slide them out (cut/clip the zip ties). Be sure to loosen the fork caps before you loosen and remove the forks from the bike for obvious reasons. Don't totally remove the caps until the forks are removed, or you will spill old fork oil everywhere.
Once you remove the fork caps, the spacer (metal tubing) will pop out a couple inches (with only minimal force so don?t be worried). Pull those out along with the stock washer and springs. Dump out the oil into a container. You should compress/extend the shocks a few times while upside down to get all the grey quickcrete-looking oil out.
Next, cut your spacers using the RaceTech provided pipe and decide how many if any RaceTech provided washers you?re going to use. The length of your spacers and the amount of washers you use will impact your initial sag and suspension characteristics. You?ll have to figure this out on your own but 7 3/8? and one washer on top [EDIT - I've cut them down to ~6.75" for sag of ~30mm w/ gear on] gave me what I wanted (I?m 170lb. with no gear, do the occasional track day and ride two-up every now and then).
The hardest part was getting the spacers cut completely straight and equal to each other. I had to do a fair amount of filing by hand. In hindsight, a large handheld tubing cutter (mine was too small) or a handheld hacksaw (I used a large electric one) is probably the best way to go.
The service manual will tell you exactly how much oil to dump in (I went with 0.467L of 15wt per fork). Once you have the oil in, put the fork springs in, then the stock washer, next the RaceTech spacers you cut, finally any RaceTech washer(s), and finally screw on the cap most of the way.
Slide the forks back in the clamps and tighten the top clamps just enough to keep the forks from dropping, install fender, wheel and then brakes. Now that the forks are tied together by the wheel and the fork clamps you can finish tightening the fork caps and set the forks exactly where you want them in the clamps (I dropped my front end about 10mm or so). I used blue locktite on everything except the front axle and the fork caps.
Cost/Tools ?
(1) $18 (shipped) or so for the 15wt Belray oil (FZ6 Dude hooked me up on the cheap). You can use whatever brand or weight you want (stock is 5wt).
(2) $95 for RaceTech springs, 0.95 kg/mm (stock are 0.80kg/mm). Again, you can use whatever spring you want. The RaceTech website has a calculator that generates a recommended spring for your weight and riding style. Race Tech Inc.
(3) Various metric ratchets, adjustable wrench, locktite, container with ml measurements, tool for the front wheel axle, various allen keys, large tube cutter or hack saw, file, and a measuring tape. A torque wrench should be used but is not required.
Spring Size -
I?ve seem some discussion about how the RaceTech springs are shorter than the stock springs. Well, if you look at the stock springs you will notice that a good portion of the springs looks like completely compacted coil that allows for no movement.(see picture).
Tour Guide said:as far as the stock springs having different distances in the coils. they are what are called variable rate vs. the racer techs being a fixed rate. there is a lot of controversy which is better. but most racers run the fixed rate due to setting up the susension for a certian weight person. also the variable rates give you a smoother ride. most bikes come with variable rate springs.
Results ?
Night and Day?.
In short, I feel much more planted in turns. The bike does not wallow like it used to and reacts much better to mid-corner adjustments (it is impossible to overstate the importance of this). And then there are the much needed braking related improvements! I feel much more confident getting on the brakes hard. The excessive dive is gone and you simply do not notice the front end struggling so much as you ease off the brakes. I also had a chance to ride two-up?.much smoother?my passenger was happy.
When I first sat on the bike I noticed the front end felt noticeably higher due to the reduction in sag. This bothered me at first but I quickly forgot it and can be adjusted several ways. I need to do some more testing but may end up dropping the front slight farther?not sure yet.
In any event, I have not been this excited about my bike since I first bought it. I can?t wait to hit the track next month!
________
Web shows
Last edited:
")