- Joined
- May 6, 2014
- Messages
- 1,978
- Reaction score
- 1,927
- Points
- 113
- Location
- Amoungst the Twisty Roads
A few months back member EastcoastRN (Marc) noted that he had a project bike that he had not ridden in some time and being a new Dad he really didn’t have time to get the bike in sellable condition. Today I took a ride to Marc’s house with an empty trailer, and returned home with a full one.
First off it must be said that Marc is a super cool motorcyclist who like all of us older motorcyclists had to push aside a passion for the greater good of his family. I got to meet Marc’s wife and their adorable baby. I can remember those years and I know how much it probably hurt to let go of a motorcycle, but garage space is golden, and so is money.
So what’s in the trailer you ask.
First off we have a 2006 FZ6 that I would rate in good condition. While it has spent the last few years in Marc’s garage, it has a history of being an outside bike. That’s why Marc was seeking help/advice on his corroded fuel tank and non-op fuel pump a few years back. Being an outside bike it has that general dirtiness to it. It shows some signs of being a learner bike with some scuffs and scratches, but nothing broken or bent. It’s largely original with the exception of adjustable levers and frame sliders and the sliders are clean. I don’t believe that this bike has ever been picked up from the pavement.
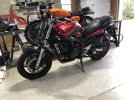
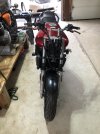
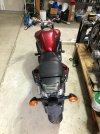
The only thing it really needs to be an operational motorcycle is tires (excellent tread wear but dry rotted) and the front end reassembled - honestly a solid Saturday (maybe 4 beer) endeavor. But anyone that knows me…knows I’m not about simply putting things back together.
When I got the bike home I put some air in the tires and rode the bike in my driveway to make sure it shifts through all of the gears…well 5 of em at least…I can only go so fast on my driveway. The bike runs fantastic. I like the quietness of the OEM exhaust. First thing I remembered is how much I hate the OEM suspension. The fork seals are shot, so while I’m in there replacing the seals the forks will get the full GVE treatment.
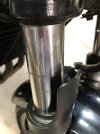
With the forks upgraded I’ll have to address the shock. Member Cocoloco has inspired me to rebuild the OEM shock rather than spend Ohlins money.
Marc included an in-tack OEM fairing as well as an aftermarket naked kit. As much as I’d like to return the bike to stock there are two things that will keep me from doing that; 1 - I despise the airflow from the OEM fairing, and 2 - Marc wanted this bike to be a naked bike, so naked it is. Watch the For Sale section for a complete fairing kit.
Speaking of extra parts - it was like Christmas morning today.
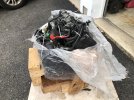

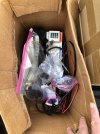
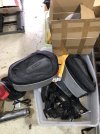
There are a lot of parts to go through. Without actually going through the boxes, here’s what I see
- The aforementioned OEM fairing, with lights, stays/brackets and hardware.
- AM Naked Kit - full kit
- An extra complete engine with a complete history. I shit you not, there is a stack of records an inch thick just for the spare engine
- Soft panniers
- An air box (could be the one that belongs on the bike)
- Carb/TB Sync (ProMotion liquid style)
- Battery Tender
- Fluids, sprays, hardware
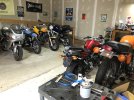
So I guess this is the beginning of a good project…and a build thread. I’m looking forward to reviving this bike. But I do have a few ahead of it.
First off it must be said that Marc is a super cool motorcyclist who like all of us older motorcyclists had to push aside a passion for the greater good of his family. I got to meet Marc’s wife and their adorable baby. I can remember those years and I know how much it probably hurt to let go of a motorcycle, but garage space is golden, and so is money.
So what’s in the trailer you ask.
First off we have a 2006 FZ6 that I would rate in good condition. While it has spent the last few years in Marc’s garage, it has a history of being an outside bike. That’s why Marc was seeking help/advice on his corroded fuel tank and non-op fuel pump a few years back. Being an outside bike it has that general dirtiness to it. It shows some signs of being a learner bike with some scuffs and scratches, but nothing broken or bent. It’s largely original with the exception of adjustable levers and frame sliders and the sliders are clean. I don’t believe that this bike has ever been picked up from the pavement.


The only thing it really needs to be an operational motorcycle is tires (excellent tread wear but dry rotted) and the front end reassembled - honestly a solid Saturday (maybe 4 beer) endeavor. But anyone that knows me…knows I’m not about simply putting things back together.
When I got the bike home I put some air in the tires and rode the bike in my driveway to make sure it shifts through all of the gears…well 5 of em at least…I can only go so fast on my driveway. The bike runs fantastic. I like the quietness of the OEM exhaust. First thing I remembered is how much I hate the OEM suspension. The fork seals are shot, so while I’m in there replacing the seals the forks will get the full GVE treatment.

With the forks upgraded I’ll have to address the shock. Member Cocoloco has inspired me to rebuild the OEM shock rather than spend Ohlins money.
Marc included an in-tack OEM fairing as well as an aftermarket naked kit. As much as I’d like to return the bike to stock there are two things that will keep me from doing that; 1 - I despise the airflow from the OEM fairing, and 2 - Marc wanted this bike to be a naked bike, so naked it is. Watch the For Sale section for a complete fairing kit.
Speaking of extra parts - it was like Christmas morning today.


There are a lot of parts to go through. Without actually going through the boxes, here’s what I see
- The aforementioned OEM fairing, with lights, stays/brackets and hardware.
- AM Naked Kit - full kit
- An extra complete engine with a complete history. I shit you not, there is a stack of records an inch thick just for the spare engine
- Soft panniers
- An air box (could be the one that belongs on the bike)
- Carb/TB Sync (ProMotion liquid style)
- Battery Tender
- Fluids, sprays, hardware
So I guess this is the beginning of a good project…and a build thread. I’m looking forward to reviving this bike. But I do have a few ahead of it.

Last edited:
