• Welcome to the Yamaha FZ6 Forums. Member registration disables ads and allows you to post and share. Register Here.

Throttle Position Sensor Issues (Are you Experiencing Poor Idle/Mileage, or Stalls?)

Quick update, found this thread https://www.600cc.org/threads/2011-xj6n-cylinder-1-4-misfire.34266/
TL;DR on hot engine ECU stops driving injectors 1&4, causing misfires and symptoms similar to mine.

I've tried bridging injectors 1 & 4 from 2 & 3, both power and switching contacts, as danny_xj6nUK did.
Confirmed all 4 injectors fire from diag code 37 (screwdriver to ear).
After trying to run bike at idle - this didn't solve my problem: exhaust headers 1 & 4 are still ~2 times colder than 2 & 3.
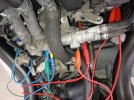
photo_2026-08-17_15-44-09.jpg

The remaining test on ECU side is ignition. I've already tried swapping coils side to side, which didn't help.
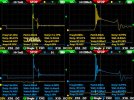
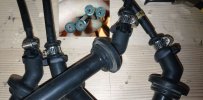
Potential issue could be with ECU driver for cyl 1-4 channel. It's a similar mosfet in ECU that can go bad just like injector one did for danny_xj6nUK. I've gotten a cheap Chinese 2 channel oscilloscope, but haven't figured out how to use it yet. Will look more into it.
​

 
An update on things done last month:
  1. Dismissed exhaust header temp difference after polishing them both: IR thermometer was lying due to different reflectivity.
  2. Got digital oscilloscope-multimeter combo gadget.
    Scoped coil primaries, look fine. Used this guide as reference wasted spark ignition system testing guide
    1789328235690.jpeg
  3. Scoped injectors, look fine as well.
  4. Measured CSPS again (on spec) and inspected reluctor teeth for dirt and damage (none).
  5. Played around with C0/C1 settings: moving either direction from default 5/6 makes bike run even worse.
  6. Cleaned, polished, tightened, electro-lubed ignition coil primary contacts/harness terminals.
  7. Measured coils, re-cut HT-leads and tightened connections to cap boots, again.
    Both Coils measured resistance on spec: caps ~10K ohm, Primary ~1.8 ohm, Secondary ~36K ohm.
    COILS_SEPT.jpg
  8. Did an extended spark plug spark test: moved all caps at least 10mm away from engine ground and inspected the spark.
    It turned yellow due to distance but all 4 still jumped properly with diag test.
  9. Installed new manual CCT, it nicely removed most slack out of cam chain, confirmed by rotating engine with a wrench clockwise and adjusting CCT bolt. Left couple mm of slack, closed up cover and ran a test for 5 minutes. Opened up again and confirmed chain doesn't chew up followers.
  10. Removed frame sliders, slackened all engine mounts, dropped engine onto jack and centered all mounting holes. Replaced upper mount bolts with nicer titanium flange ones that are closer to OEM ones.
None of that made any dent in bad vibrations 5-9K rpm. Bike is still insufferable to ride.

Current plans:
  1. Ordered a bunch of DYI stuff around Arduino for measuring vibrations. Will slap them everywhere across the bike and collect more tangible data on vibrations.
    Slop tells me characteristics of vibration can tell what and where is wrong with the bike e.g. if it's a harmonic of stiff element or some rotational imbalance somewhere that depends on RPM.
    Ordered cheap piezo contact mic for guitars as well, for same purpose.
  2. Do a hot coils test: heat them up real good with hair dryer and measure resistance, put them hot into bike and do another spark plug/distance test. They're still suspicious to me. This dude was hunting down misfire source on his FZ6 for several years, touched coils along the way to doing other stuff on the bike - and this magically fixed the problem.
    It's hilarious that he went on to own two other Yamaha bikes after FZ6, and both also had similar misfire problem.
  3. Scope coils secondary (HT leads). Need induction probes for oscilloscope, on their way.
  4. Try finding local FZ6R-F/FZ6R-N owners.
    I saw at least 5 of these bikes around with local plates.
    Maybe I can ask for a quick ECU/coils swap test for a reward.
  5. Measure more air sensors: Air pressure sensor on the throttle bodies, Air valve solenoid on the hose going to valve cover, Air temperature sensor going into airbox. Low priority and no error codes unless I remove any of them and turn bike on.
  6. Cylinder leakdown test. I don't have a compressor, not keen on getting one just for this and all 4 cylinders measured good compression (200 200 200 195 psi), so I don't expect anything wrong here, but still should do it if there is an opportunity.
  7. Previously tried bridging injectors 1&4 from 2&3 power & switching wires. Need to try the opposite: bridge 2&3 from 1&4.
  8. Tried rotating the TPS to get over 90 max throttle value but it's impossible to undo upper bolt without prying right end of throttle bodies up, or removing them entirely. TBD
  9. Not confident in new Chinese Jesben injectors. Need to do priming pressure hold (leak) test.
    Also ordered simple cleaning kit for old original ones since I was not able to find ultrasound cleaning service locally. Still a mystery why bike failed CO emission test this year and had to have C0/C1 dropped to -70 to pass it.
  10. Cam chain & sprockets replacement.
    Found more or less affordable offer, its a big job but I'm more or less confident I can do it in 1-2 days.
    Reference:
    After new CCT removed most slack on chain without any effect on vibration - not inclined to blame cam chain for vibes anymore.
 
Have you considered dropping a small camera down each of the spark plug holes and veiw the tops of each piston?
The idea I'm presenting is excess carbon on the domes of each piston:this can cause vibration,etc. in multi cylinder engines if there is an uneven amount on certain piston domes,compared to less on other pistons.
 
An update as various stuff for the bike starts to arrive.

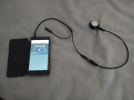
I bought a guitar piezo contact mic to try and measure frame vibrations.
It measures frequency well but not amplitude, but I've got my own body for that which says "TOO MUCH!".
1790101285996.png

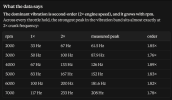
The vibration corresponds to 2×engine RPM and scales linearly with RPM.
Slop tells me this is inherent inline4 engine vibration and lack of 1-1.5 order peaks means all cylinders are contributing evenly. If one pair was underperforming (ignition or fueling) - it would show up on the data.
So now either one component is rattling, increasing amplitude of natural engine vibrations, or all cylinders run equally badly so bike vibrates more than it should.
1790101168683.png

Current plans:
  • Now I will run around the bike like a doctor with a stethoscope and record vibes from various parts.
  • Don't trust Chinese replacements so I'll clean original injectors with new kit I got and put them back in together with old O2 sensor.
  • The cam chain is shipping and I'll replace it, adjusting valve lash myself while I am at it.
  • While throttle bodies are off - I'll adjust TPS so it's max value is closer to 100.
  • Will look around cylinder heads when I take valve cover off.

Two suspicious points during recent test runs:
  1. I had a really hard time holding throttle steady around 4K RPM. Would suspect faulty range in TPS but it transitions from min to max smoothly in diag menu. IDK what to make of it. Maybe I will replace it too, found a ~90 euro one locally.
  2. After 6K RPM I can clearly hear engine "clapping" or loud bubbling sound, that doesn't sound normal.
 
  1. Dismissed exhaust header temp difference after polishing them both: IR thermometer was lying due to different reflectivity.

Omg, this makes perfect sense but did not came up to my mind as two days ago I measured #4 quite cooler than the other 3 and freaked out, I was about to try swapping injectors, I will try polishing first, thank you for this useful info.
 
Cam chain arrived so I've decided to do valve lash adjustment myself along the way and it turns out mechanics didn't do a very good job in July.
Not sure what feeler gauges they even used because the only ones I could find for sale in the country were 0.1 resolution and not enough for the bike, had to order them.
Yamaha 7.5mm shims come in 0.001 increments from factory but are only sold at 0.05 increments: you often end up near or over the specs.
This won't do so I will just gently grind off shims that came off the bike on a whetstone, holding them with a magnet probe for even distribution.
Will target 254-260 for exhaust and 180 for intake. Have a cheap Chinese micrometer so it should help some.

1790884441739.png

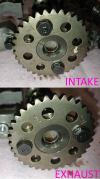
Cam shafts sprockets look fine to me, they're pricey so I don't plan to change them for now. They don't look as bad as I saw in some YT videos.
1790884645123.png

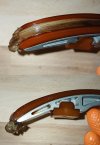
Intake side cam chain follower got messed up a bit though on the upper part that was not visible through the window. It still has some plastic on the metal so I will clean it up and install it as is.
I suppose this was caused by overtightening of manual CCT I recently installed, will be more careful with that.

1790884693847.jpeg

Yamaha wants ~30 euros for a special tool that goes into holes of reluctor wheel and allows you to unscrew it from crankshaft in order to remove cam chain.
I first tried to hold on to the holes with bent pliers, but I noticed those holes getting messed up from it so chose a different approach.
From the other side of bike taken stator cover off, dried off the shiny wheel, wrapped it with masking tape and used belt wrench braced against frame slider, and a wrench against stator bolt too.
It should be higher toque from the one I need on the right side of bike, so I thought it'd be fine to use it.
1790885175916.jpeg

I expected throttle bodies be more of a pain but aside from licking head off cyl1 clamp bolt, it was fine.
I don't have photos but I also tried loosening & rotating TPS since it's 17-90 in my diag menu, while max value should be closer to a 100.
I couldn't get it within proper range: moving it to 99 would naturally jerk starting value up to 25, so I left it at 18-91.
Maybe should replace TPS, but OEM are expensive and aftermarket not so reliable AFAIK.

Old cam chain doesn't really look stretched in comparison to new one, maybe 5mm or so.

1790884776233.jpeg

Overall, not as painful as I expected so far.
 
Last edited:
I would not re-use that chain guide, it's junk....

And if your attributing it to the manual tensioner, I strongly advise to just put an OEM one in be
done with it...

Your deep into it now, I'd finish it correctly, that damaged guide is NOT good..

And I agree, the cam sprockets look fine.. With a new chain, guides and tensioner,
you'll be good to go. (With the valves adjusted to spec).


.
 
Your deep into it now, I'd finish it correctly, that damaged guide is NOT good..
Yeah I played around with it and chain sits too deep in it. The bit about rotating the engine counter-clockwise to set OEM CCT in the manual makes more sense now that I familiarized myself with the process: CC rotation tightens intake side, then you release the CCT and it clicks through some teeth, then you rotate engine clockwise and intake side slackens, allowing CCT to assume working position. New guide will get to me in two weeks.

You don't want to compromise the case hardening.
Yeah AFAIK you shouldn't cool it with water when grinding, it could take getting hot after all. I'm getting one 185 shim so I don't have to grind down more than 0.03mm on any of them.
 
When doing the 4 degree ignition advancer replacement on my FZ6, I just used a piece of wood to stop it turning the crankshaft while I loosened the bolt.
 
When doing the 4 degree ignition advancer replacement on my FZ6, I just used a piece of wood to stop it turning the crankshaft while I loosened the bolt.

Thanks for advice, I used thick plastic butt of my least favorite screwdriver to same effect.

New intake side cam chain follower arrived, so I have redid valve lash adjustment.
Used this video series for general guidance: valve adjustment guide

Pads being sold in 0.05 increments is criminal IMO, so I got one extra 1.80 and ground ones I have to size with whetstone.
If anyone going to do it: a knife or garden whetstone brick (get a couple), a wooden board as base, water everything generously, put the pad onto the board, turn on youtube video and just slide whetstone over the pad left and right.
Cheap mechanical 0.01 micrometer served me well for this too.
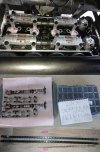
Was able to get all exhaust valve gaps into 0.254mm and intake into 0.178mm, all in spec range.
photo_2026-10-18_14-44-27.jpg
Lining up timing on all 2 cam sprockets & crank shaft took me few tries:
I discarded original automatic CCT: it overtensions the chain, looks like wire spring holding it back came loose with age.
Used this video for CCT adjustment guidance so my new follower doesn't get eaten again: manual cct installation guide

The bike still runs after putting it back together:
Regrettably, this didn't fix my vibration issue, although I didn't do a test ride yet and TBS is also in order.

What I learned:
-Mini Ratchet Wrench with 1/4 hole for bits is indispensable for tight spaces like valve cover & cam caps
-Fasteners that go around rubber boots entire intake manifold sits on, like to be supported from the opposite side for both loosening and tightening. You also need like 40cm of extensions to get the 3mm bit from the OTHER side of bike.
-Those boots need to be lubed up by motor oil or intake manifold won't go in
-The rubber gasket under valve cover, that also goes around spark plug wells, need to be silicon'd to the cover and rest a couple days. Otherwise it's impossible to get cover installed with gasket staying in place.

Next steps:
1. Run another vibration test to compare with old baseline
2. Put OEM engine mount bolts in w/o frame sliders (also got them recently)
3. Put old injectors back on + ECU reset (bat disconnected for the night)
4. Throttle body sync on fully warm bike
5. Put new TPS in (not OEM but from UK company, should be okay)
6. Hot coils resistance + scope (primary & secondary w/induction probes)
 
Last edited:
Sorry I got here late, the solution at the bottom of this post may have been good for you.
For others dealing with this in the future, trying to get shims ground down evenly without precision machinery is not really possible, the top and bottom will not come out parallel. A thousandth or two may not seem like a big deal but when the engine is turning at 200 revolutions per second, do you want to risk it? If so, after they are ground they need to be case hardened like @Motogiro mentioned (again, 200 revs per second...).

Pro-X sells shims in 0.025 mm increments. That makes it a lot easier to get proper clearance on first attempt.
 
Back
Top