Can anyone confirm if the CR9EIX is the correct spark plug for a 2009 FZ6 S2?

phario

New Member
Joined
Oct 13, 2016
Messages
14
Reaction score
0
Points
0
Location
UK
Visit site
I'm sorry for the abrupt question, but I just had a hell of an afternoon. I tried to do a spark plug change for my bike, and I'm not sure why, but after it was all installed, the idle was really rough and something was obviously wrong (the bike was jerking and misfiring, it seems). I ripped it all out and put back in my old plugs and it went back to normal.

I'm worried that I either damaged something or got the wrong set of plugs.

These are the ones I got:
https://www.ngk.com/product.aspx?zpid=9688
 

FinalImpact

2 Da Street, Knobs R Gone
Site Supporter
Joined
Mar 16, 2011
Messages
11,137
Reaction score
184
Points
63
Location
USA, OR
Visit site
Correct plug and it should work, the Gap should not exceed 0.028" as it could cause a misfire.

Also, it is possible to buy new defective plugs. Confirm gap is proper >0.024" and less than 0.028"... Use the proper tool to adjust them as damage to the surface ground pad will ruin them.

Also, thanks for filling in how re-installing used plugs brought back to normal.
 

phario

New Member
Joined
Oct 13, 2016
Messages
14
Reaction score
0
Points
0
Location
UK
Visit site
Correct plug and it should work, the Gap should not exceed 0.028" as it could cause a misfire.

Also, it is possible to buy new defective plugs. Confirm gap is proper >0.024" and less than 0.028"... Use the proper tool to adjust them as damage to the surface ground pad will ruin them.

Also, thanks for filling in how re-installing used plugs brought back to normal.

Hi thanks. I put in an order for feeler gauges so need to wait until tomorrow.

Today I tried to start the bike up with the old spark plugs that had started no problem. It would not start. I could hear the engine turning over and the battery is fine, but no ignition. What could cause this? Might I have stupidly damaged even the old ones again? It seems so unlikely...
 

FinalImpact

2 Da Street, Knobs R Gone
Site Supporter
Joined
Mar 16, 2011
Messages
11,137
Reaction score
184
Points
63
Location
USA, OR
Visit site
If it helps at all, this being a waste fire ignition, plug wires 2 and 3 can be swapped as can 1 and 4 and it will still run. From yamaha the wires are numbered. Just keep them in order. Left to right 1 - 4 from stator side to clutch side.

Might I ask, what lead you to changing plugs in the first place? Was it running 100% perfect of not?

Maybe you have some water in the fuel?

If you end up going back in there, be sure to verify the ignition high tension leads are tight into the spark plug caps. This is likely not the cause of it not running, but it can induce a vibration. Hold the lead and turn the cap clockwise. It should stop turning. i.e. should not continue to spin freely with zero resistance.
 
Last edited:

phario

New Member
Joined
Oct 13, 2016
Messages
14
Reaction score
0
Points
0
Location
UK
Visit site
If it helps at all, this being a waste fire ignition, plug wires 2 and 3 can be swapped as can 1 and 4 and it will still run. From yamaha the wires are numbered. Just keep them in order. Left to right 1 - 4 from stator side to clutch side.

I've made sure to put them in in order that they're labeled. No way to swap 1 and 4 given the location, but maybe I'll try swapping 2 and 3 to diagnose.

Might I ask, what lead you to changing plugs in the first place? Was it running 100% perfect of not?

It was up for a spark plug service, and I stupidly thought I might as well.

Maybe you have some water in the fuel?

I doubt this would be a reason, given there was no adjustment to the fuel.

If you end up going back in there, be sure to verify the ignition high tension leads are tight into the spark plug caps. This is likely not the cause of it not running, but it can induce a vibration. Hold the lead and turn the cap clockwise. It should stop turning. i.e. should not continue to spin freely with zero resistance.

I'll try. To be honest I didn't realize that the caps could be twisted and turned. I can't see much down there so I just wiggled them in and out. I mainly pushed as best as I could to seat the circular rubber cap flush against the block. Are you saying that they should also be twisted? I'll have to give this a shot.

My problem is very similar to this guy's:

Hi all,

First off, this site is great. I've learned so much valuable information and I appreciate all the help that the regulars offer.:thumbup:

On to my problem. I changed my spark plugs for the first time the other day and everything seemed to go fine. It was a pain getting to 1 and 2, but I eventually got them. The old plugs were brown and looked worn, but not abnormally worn. The new ones went in fine. I got some of the Iridium plugs that everyone seems to recommend. I reloaded the plug caps and they all seemed to click in as expected. The bike started up with out any problems and sounded great. I let it run for a couple minutes and turned it off. It was pretty late so I couldn't really take it out then, but I was happy everything seemed to work out

The next morning, I got on my bike to go to work and it wouldn't start. The starter was running but the engine wasn't firing up. I tried again with an open throttle and it seemed to come a little closer to starting but it didn't happen. I pulled the plug caps and reseated them, but still no luck. The next step, as I see it, would be to remove all the plugs and check if I cracked any of them. Before going to the trouble of working all the plugs out again, I was wondering if anyone had any suggestions as to what the problem is. I can't think of a reason why my bike would start up immediately after installing the new plugs, but wouldn't start after sitting all night. Has anyone seen a problem like this when changing plugs or does anyone have any suggestions as to what I should do next?

Thanks


There wasn't much of a resolution in that thread. He tried re-gapping one plug and then re-installed, but people were saying that it was unlikely to have been the gapping that was the issue.
 

FinalImpact

2 Da Street, Knobs R Gone
Site Supporter
Joined
Mar 16, 2011
Messages
11,137
Reaction score
184
Points
63
Location
USA, OR
Visit site
Here is a link to the caps issue and how to repair if it is needed. Basically if any spin freely upon rotating CW follow this. Trim off a section and screw it back together.

How too, tighten spark plug cap to wire

What all did you touch or remove? Leave no detail out.
Was the tank lifted? Does the pump still make the prime sound when the key is turned on?

Also, drop the two small bolts holding the radiator and let it settle on the hoses. It makes the job 1000X easier...
 

FinalImpact

2 Da Street, Knobs R Gone
Site Supporter
Joined
Mar 16, 2011
Messages
11,137
Reaction score
184
Points
63
Location
USA, OR
Visit site
Very important! Listen as you push the caps down. It should click along the threads as the cap seats. Did you hear this on all of them?

FWIW - even if two caps were off completely it should start and run on the two remaining cylinders. If the tank were lifted Id be suspect of a fuel issues vs spark issue.

By dropping the radiator a few inches (all hoses connected), the plugs can be pulled in 10". And I have big mitts.... just use 3/8 drive ratchet, a 4" extension, and 5/8" plug socket and you're set.
 

phario

New Member
Joined
Oct 13, 2016
Messages
14
Reaction score
0
Points
0
Location
UK
Visit site
Here is a link to the caps issue and how to repair if it is needed. Basically if any spin freely upon rotating CW follow this. Trim off a section and screw it back together.

Can I just make sure I understand the layout. The cap is below:

AudEeG2.jpg

When I push this into the plug hole, I have to verify that the cap rotates clockwise to a snug fit. Is this correct?

What all did you touch or remove? Leave no detail out.

  1. I removed the top bolt on the left side of the radiator in your picture here. I found that removing this one bolt was enough as I needed a bit of access space for Plug #1.
  2. I first removed all caps from 4, 3, 2, 1 in order. I was kind of rough with the caps here as I didn't realize they might be sensitive.
  3. I installed the new spark plugs, starting with 4. Pretty much all at once. And then put the caps back in. Again I might have been rough with the caps, and wasn't worried about crinking the tubes. I didn't check too much to see if they were tight in, but I tried to just visually check that the rubber cap was seated.
  4. I fired the back, and it started OK. The idle was a bit rough, but I thought that it diminished over time. I took it out for a 5 minute ride, and it was really rough. Misfiring and jerking.
  5. At this point I was worried. I ripped all the new spark plugs out and put back my old ones. The only difference here is that I put them in in a different order: 4, 1, 2, 3.
  6. The bike fired up fine, and I ran it in first just walking the bike up a metre or two. It seemed to be OK, so I turned it off and left it for the night.
  7. The next morning, it would not start. I can hear the engine turning over, and the battery is strong, but no ignition. I opened the fuel cap to peer inside, but I can hear fuel sloshing. 1 bar of fuel.
  8. Also, I want to mention that when I put the old plugs back in, I didn't keep in mind the original order.


Was the tank lifted?

No it wasn't.

Does the pump still make the prime sound when the key is turned on?

Sorry but what is the primed sound?

I think the key for me to check tomorrow morning is that the caps are tight as you say. It would be good if you could clarify which component I need to check for the rotation as well (is it the capped I highlighted?)
 

FinalImpact

2 Da Street, Knobs R Gone
Site Supporter
Joined
Mar 16, 2011
Messages
11,137
Reaction score
184
Points
63
Location
USA, OR
Visit site
No, the whole body except the actual wire is the cap. If you ever pulled on the wire vs the hard body cap assembly, you may have unseated the wire from the cap assembly. Read the link above. There are pictures....

Bottom line; drop 2 bolts from radiator - pull it off thr hanger and allow it to settle on the hoses. Remove the caps but do not pull on the wire. Listen for a click click click sound as you remove them....
With the cap and wire laying over the top of the radiator, hold the wire and gently turn the cap clockwise. If it snugs up tight, stop turning. If it spins nonstop with little resistance, unscrew cap and cut off 5 to 6mm. Fan out wires 360°, thread cap onto wire and it should snug up tight. Follow the link above for details.

Prime sound: when the engine has been off for 10" or more and the key is turned on, the fuel pump runs for maybe two seconds. Do you hear this? If no, check your fuses.

If after doing the items above and you find nothing, open the throttle 3/4 and crank it for about 7 secs. Let it rest for 3" with the throttle open, then press starter again for 5 secs. If it starts, it was flooded.

If it does not start, lift the tank and remove the air box lid. Add an equal amount of fuel to each throttle body. Say about a half of small spoon full each maybe more.

Key on and hit starter. If it fires, revs and dies, Try starter one more time and see if it starts. If it revs and dies (you can rev it a bit to keep it running) add more fuel and try one more time.

Report back...
 

phario

New Member
Joined
Oct 13, 2016
Messages
14
Reaction score
0
Points
0
Location
UK
Visit site
I report back with findings. Here is what I did.

  1. I pulled spark plugs 4 and 3. When I pulled spark plug 3, I noticed the smell of fuel on the tips (noticed that the bike had not been started for a day)
  2. At this point, I thought that it was a flooded engine. So I put the spark plugs 3 and 4 back in, and tried what was suggested: I opened the throttle and cranked it for about 6 seconds. No ignition.
  3. Then I left it for 3 seconds, still throttle held open, then tried it again. No ignition.
  4. Now I pulled all the spark plugs. I noticed a key issue: mainly that the rubber cap on spark plugs 2 and 1 were not seated correctly (see image below).

    sppap1H.jpg

  5. At this point, I've pulled all the coils and spark plugs. When I did, all four spark plugs smelled of fuel. I've left the cylinders open.

I'm not exactly sure what to do at this point, but I think it is likely to do with two issues: the engine is flooded, and my spark plug coil was not inserted fully into chambers 1 and 2. I've left it to 'breathe'.

I'm getting some differing advice about what to do for a flooded engine. Mainly it goes into two categories:

  • Leave it be for 1-2 hours. Put the spark plugs in and try again.
  • Leave it be overnight. Put the spark plugs in and try again
  • Either of the above, but then combining it with trying to start with the throttle open.

Some advice on the internet suggests that you can make it worse if you try to start it with the throttle open. Advice?
 

TownsendsFJR1300

2007 FZ6
Site Supporter
Joined
Feb 7, 2009
Messages
12,531
Reaction score
1,176
Points
113
Location
Cape Coral, Florida, USA
Visit site
With your updated info, make sure the cap to wire connection is good.

Re the rubber boot, read below and it'll help figure where it goes(most folks(myself included)
don't move the boot.

*** I strongly suspect that ridge on the cap goes in the MIDDLE of the boot/seal.. Again, read below
about dielectric grease.

With a KNOWN GOOD PLUG, pull off say cap #4, plug it in and ground the plug to metal(you may need a jumper to reach metal)

Then crank and check for spark. Repeat for the other coil.

If you have spark on all 4, You usually don't have to pull the plugs(we're talking new plugs, fuel fouled).

As you posted either let it sit some, or crank @ WOT for several seconds. Stop, let the starter cool down and repeat.
That 99% of the time should allow the engine to start..

____________________________________________________________________________________________________

First off, the iridium's do not last forever. I've worn out a set sooner than the stock plugs.
(stockers are going back in next plug change)

And the iridium TIPs are Easily damaged if gapping improperly. (IMO, get stock plugs).

Besides the caps and above info FI posted above, the rubber caps(that seal to the valve cover)
tends to get sticky and hard over time.

***You can push down hard but the cap may NOT snap onto the plug.

To make installation MUCH easier, put a little bit of preferably dielectric grease where the rubber boot
meets the valve cover. It will slip on MUCH EASIER and you'll actually HEAR the cap snap on to the plug

You now, DON'T HAVE TO FIGHT with the cap, twisting and turning and much less likely to damage the cap/wire.

*Now there's no doubt the cap IS attached to the plug..


Also, how are you getting the plugs down into the hole??? You can easily damage them if "dropping them down the hole), or similar.

What works really well is to get a rubber hose that slips snugly atop the spark plug. Then, simply sneak the plug gently down the hole with the hose and spin to tighten. There's no way to cross thread using this method. Then use a torque wrench..

Good luck and please post back.
 
Last edited:

phario

New Member
Joined
Oct 13, 2016
Messages
14
Reaction score
0
Points
0
Location
UK
Visit site
I got it working! Thanks to the great tips by FinalImpact and TownsendsFJR1300.

First off, let me fill you in on what I did after my last post.

  1. I cleaned the tips of the spark plugs thoroughly, and waited for about an hour leaving the spark plug sockets unfilled. Note that outside temperature was probably around 8-10C
  2. Threaded each plug back in as usual. Now the key is that when I press down on the coil (spark plug cap), it should click a number of times. I heard three clicks on all four spark plugs, but this is in addition to the 'click' of the rubber seal.
  3. Cranked the engine while holding the throttle open in neutral. It had a bit of a weak start, but jumped to life after about 2 seconds.

One of the key issues relates to the rubber seal I mentioned in my previous post. As was said:

*** I strongly suspect that ridge on the cap goes in the MIDDLE of the boot/seal..

I think this is correct. The ridge goes in the middle of the seal where it seems to 'click'. However, I think an important lesson is not to rely on the position of the seal at all but rather the sounds. The issue is that when you're pushing the cap back into the sockets, it's very easy to try and push on the seal. This is especially true for the plugs hardest to access. However, what happens is that the seal then gets pushed down the plastic wire casing. When I re-did it just now, I ended up pushing the seal first up past the ridge so that it was higher-up. Then I made sure to push down on the angled plastic joint until I could hear the clicks. After I was absolutely sure it was seated, I then pushed the seal down tight.

I think what happened was:
  1. When I first installed the new plugs, I probably didn't push in the caps as tightly as I could. This caused the misfiring.
  2. The engine misfiring caused the engine to flood.
  3. Then I ripped out the new plugs and put the old ones back in. Even though it's likely both the new plugs and old plugs were not seated correctly, because the engine was already quite warm, it was still able to ignite.
  4. I left bike overnight, and now with the colder temperature, wet spark plugs, flooded engine, and caps not fully inserted, it wouldn't start anymore.

Here are some lessons to take from this.
  • Don't fix what's not broken(?) To be honest, my old spark plugs were fine. I was wondering whether replacing them with new iridium ones was better for fuel consumption, and also since I had passed the recommended maintenance period for replacing spark plugs. 12k miles.
  • If you replace your spark plugs and you notice the engine misfiring or the idle being rough, don't take it for a short ride to see if the issue resolves itself. Re-install and check again.
  • Engine flooding and varying temperature conditions can cause the bike to start in some moments and not in others.
  • Make sure you push the cap in and listen for the clicks. Don't push on the rubber seal. Make sure the rubber seal is kept as high as possible until you've confirmed the spark plug cap is clicked in.

Plus some additional tips about fixing the wire-to-cap connection, that iridium plugs are not necessarily better than stock, and some tips on how to insert the plug into the socket.

Unfortunately, this was a £40 lesson as I'm holding on to the new spark plugs. I'll have to see if these can be returned, but it's unlikely.
 
Last edited:

FinalImpact

2 Da Street, Knobs R Gone
Site Supporter
Joined
Mar 16, 2011
Messages
11,137
Reaction score
184
Points
63
Location
USA, OR
Visit site
With 12k on them you should replace them. But yes, all was self induced. After the fact.

FWIW you should hear about 5+ clicks or more.

Question; when you spun the caps on the wires, were they loose? Did any require tighten of a full turn or more?

Wet plugs:
I've heated the threaded shank of the plug to 250 - 300°F with a propane torch to cook the fuel out. Slow and consistent is best as your goal is to raise the porcelain insulator to a high enough temp to burn off the fuel. But basically if they smell like gas and you warm them slowy until they begin to smoke literally and maintain that temperature and they quit smoking, let them air cool and install them.

Moral of the story; listen for many clicks, push and pull only on the spark plug caps body at the 45° bend. Verify wires are tight in the caps.... they should not turn.

Happy riding...
 

FinalImpact

2 Da Street, Knobs R Gone
Site Supporter
Joined
Mar 16, 2011
Messages
11,137
Reaction score
184
Points
63
Location
USA, OR
Visit site
Did you see this from link above?

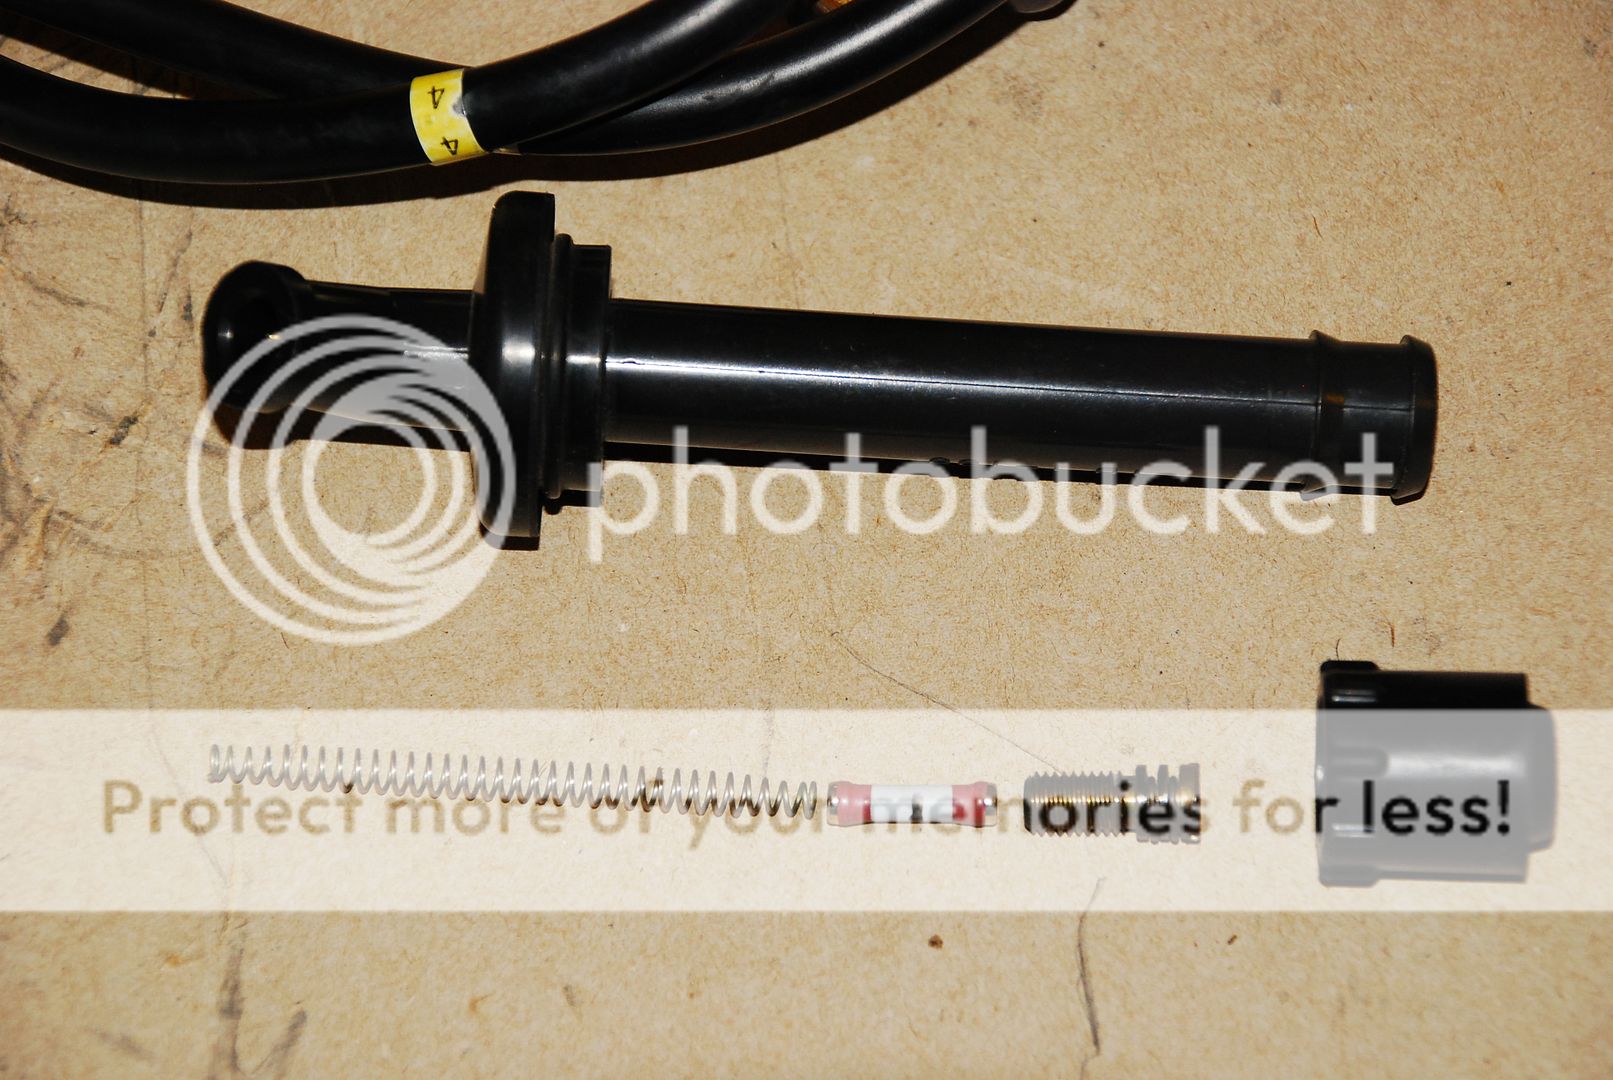
Actual components internal to cap:
Note: use a flat head screw driver to remove the locking insert.
DSC_9014_zpsd122wjmm.jpg
 

TownsendsFJR1300

2007 FZ6
Site Supporter
Joined
Feb 7, 2009
Messages
12,531
Reaction score
1,176
Points
113
Location
Cape Coral, Florida, USA
Visit site
Congrates on getting it running!

I've NEVER had to lean on that rubber seal(nor remove it), strictly the cap ONLY (either pulling up or pushing down).

**You didn't mention putting any dielectric grease on the rubber seal (or any other lubricant)**.

With the grease on there, you barely have to push the caps on as the rubber won't give you 95% of
the grief it gave you.

Each cap will slip/click on MUCH, MUCH easier with definitely hearing/feeling it...

We speak from experience and have been exactly where you were..

But next time, try just a very light coating where the rubber meets the valve cover,
it makes a big difference...
 

Soupnutz

New Member
Joined
Aug 20, 2015
Messages
60
Reaction score
1
Points
0
Location
NW Florida
Visit site
Question about the flooding. On a car I've always pulled the plugs, disconnected the fuel pump, (or pull fuse), and crank it over to blow fuel out of the cylinder. Then hit the plugs with compressed air, put it together, and start it up. Shouldn't be an issue doing that on a bike huh? I ask because I never saw it mentioned.
 

TownsendsFJR1300

2007 FZ6
Site Supporter
Joined
Feb 7, 2009
Messages
12,531
Reaction score
1,176
Points
113
Location
Cape Coral, Florida, USA
Visit site
Question about the flooding. On a car I've always pulled the plugs, disconnected the fuel pump, (or pull fuse), and crank it over to blow fuel out of the cylinder. Then hit the plugs with compressed air, put it together, and start it up. Shouldn't be an issue doing that on a bike huh? I ask because I never saw it mentioned.

You could do that, however even for the car, all that is NOT necessary.

Your car mentioned above l'd guess was carbed which is MUCH easier to flood than FI'ed engines...

If carbed (and it has an accelerator pump), every time you mash the throttle your pumping fuel into the engine making
it worse.


Holding the throttle @ WOT (do not release the throttle) and cranking for short intervals will dry out the engine
and eventually fire up. Car / bike, 99% if not all engines-the same procedure.

For the FZ, the plugs aren't the easiest to get to and the OP already replaced them (but one cap wasn't fully connected).

To pull all the plugs, when NOT needed is simply un-necessary (yes it would work).

By the time you got the plugs out, air compressor, etc, the fuel would have evaporated already..


The WOT start procedure for a flooded engine was very prevalent in the early gen FJR's(2003-2005).
If you turned off the engine while still in the "cold mode", it was somewhat common to flood it(even FI'ed).
 

FinalImpact

2 Da Street, Knobs R Gone
Site Supporter
Joined
Mar 16, 2011
Messages
11,137
Reaction score
184
Points
63
Location
USA, OR
Visit site
Like Scott says, for the most part it's not needed.
The exception list includes mechanical and electrical failures that load up an engine. I'm saying something is so wrong it can't run and you resolve the fault but the plugs are so loaded up they need drying. Like say the cams are out and the engine assembled incorrectly so the timing is off. No compression and the plugs load up.

This includes oil burners that foul plugs. This is where the propane torch litterally burns off oil, gas, carbon.
I think I've seen it all when it comes to reasons they cant run as something went erong.
 
Top