
FIZZER6
The Angry Blue Mantis
The 2004-2009 Yamaha FZ6 uses standard caged ball bearing upper and lower steering head bearings. Owners who ride in the rain, powerwash their bikes or keep their bike outdoors in humid climates may find these bearings go bad prematurely due to corrosion.
This is the procedure to replace your head bearings yourself using All Balls Item #22-1004 tapered roller bearing kit and home tools.
Steering Head Bearing Removal:
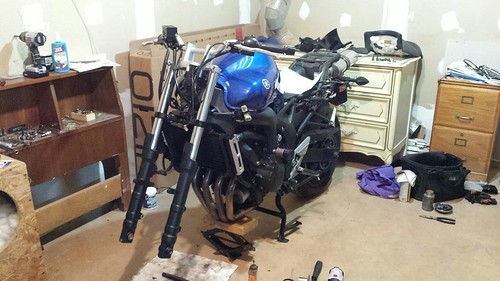
Remove the fairing, front wheel and forks to make things easy:
#1: Remove the seat. Remove the rear gas tank pivot bolt and the 2 allen bolts at the front edge of the tank, slide tank back, raise tank, support tank and replace pivot bolt.

#2: Remove inner fairing pieces (6 stainless round head allen bolts and 2 plastic screw clip under the mirror rubber bases).
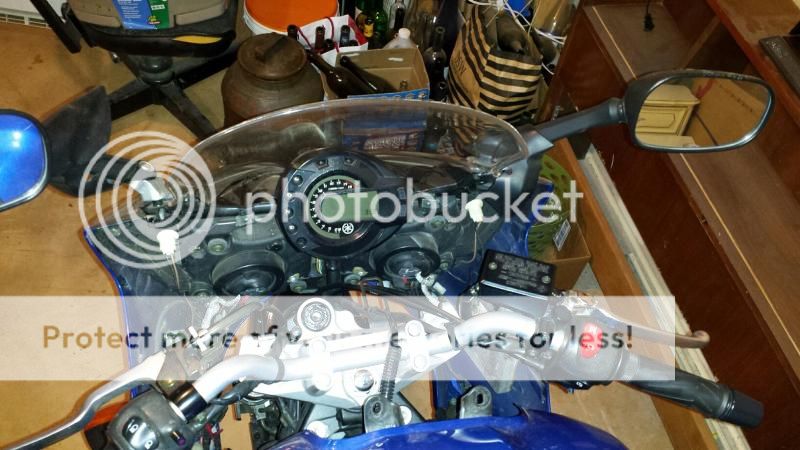
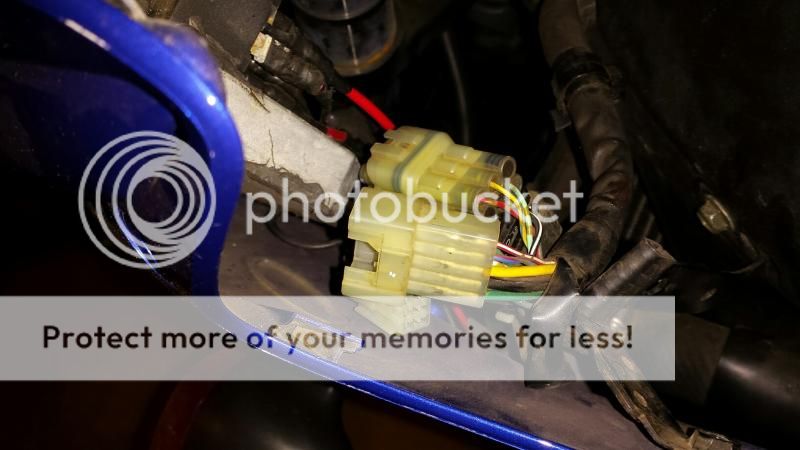
#3: Disconnect the (2) wire harnesses on the LEFT side of the fairing. Note, you may need pliers to get the smaller harness disconnected. There is only 1 tab that has to be pried up and then the 2 halves of the connector will pull apart. If it's difficult I found it easier to remove the fairing and set it on a stand to the left of the forks and then disconnect the connector.
#4: Remove the (2), 12mm bolts that hold the fairing bracket to the triple-tree mount. Carefully remove the fairing.
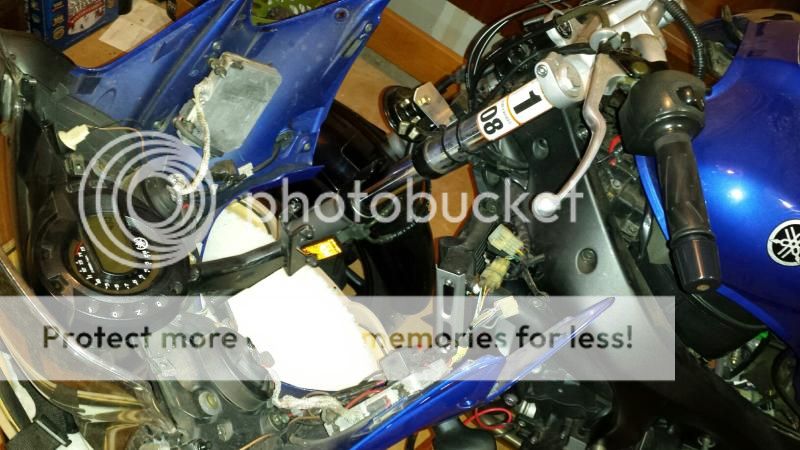
Ignore the gray boxes mounted inside my fairing. Those are my HID ballasts for my dual bi-xenon projector headlights.
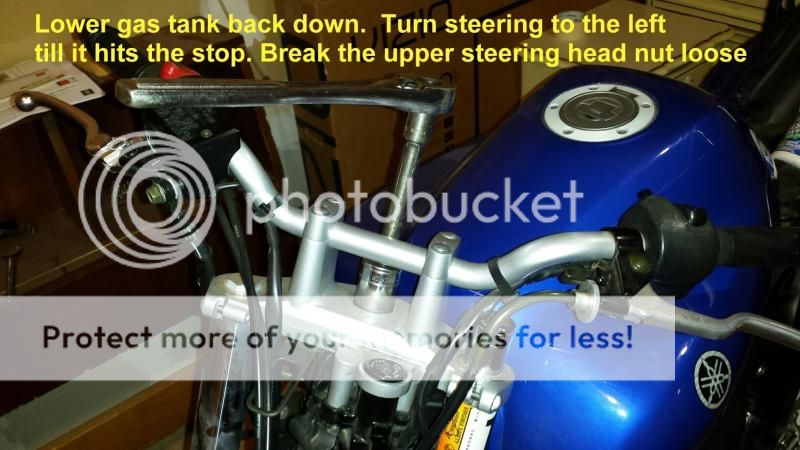
#5: ONLY IF YOU WILL BE REPLACING STEERING HEAD BEARINGS: Cut the zip ties holding the cables and brake line to the upper forks . Break the upper fork clamps bolts loose but do not remove bolts yet.
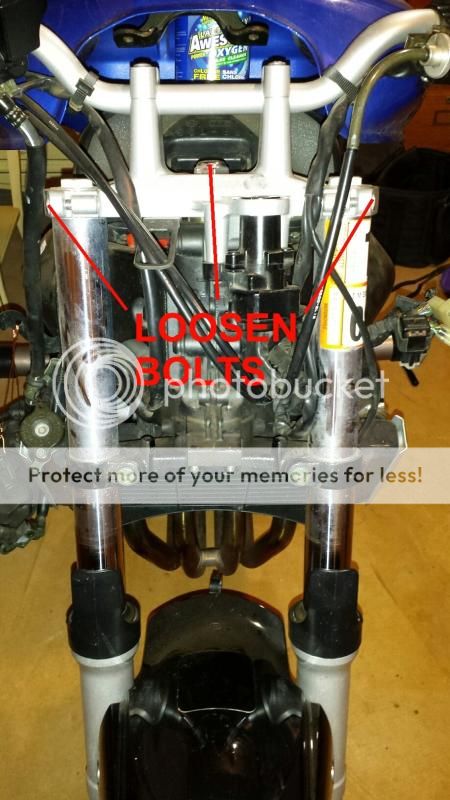
(Break the upper steering head nut loose and remove the horn only if you are replacing steering head bearings at the same time).
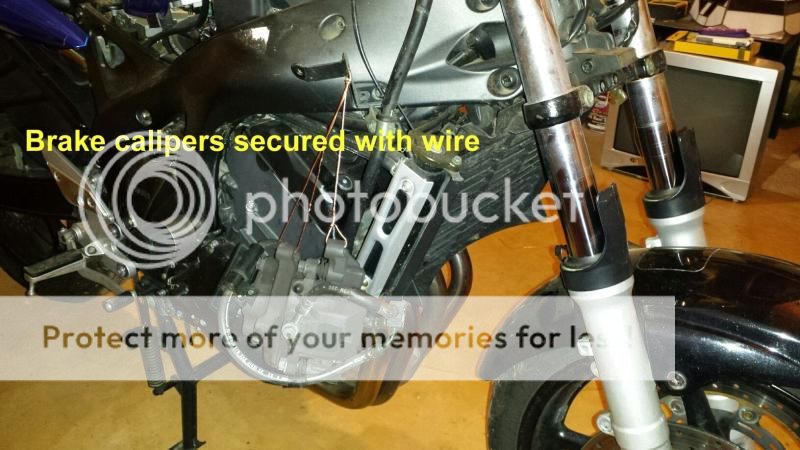
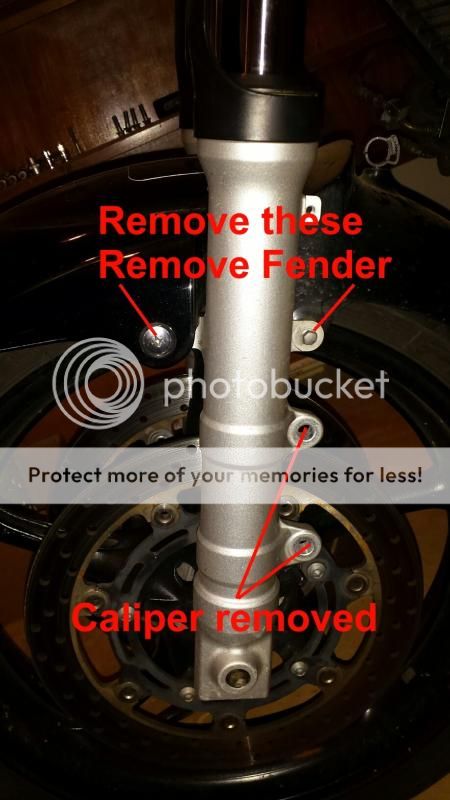
#6: Remove brake calipers by removing the (2) 12mm bolts holding each one to the forks. Hang the brake calipers on the bike using bungees or wire to keep them from hanging on the lines.
#7: Remove pinch bolt for front axle from right fork. Use a 19mm male hex drive or the back end of a 19mm spark plug socket with 19mm wrench to loosen axle. Do not remove axle or wheel until you have supported the bike under the exhaust headers!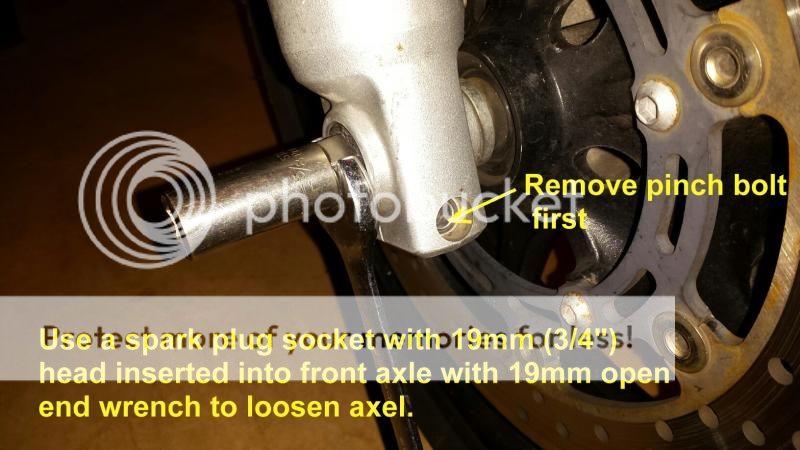
#8: Remove front fender. (1) Philips screw bolt and (1) 8mm bolt on each side. Set fender aside.
Now on the Steering head
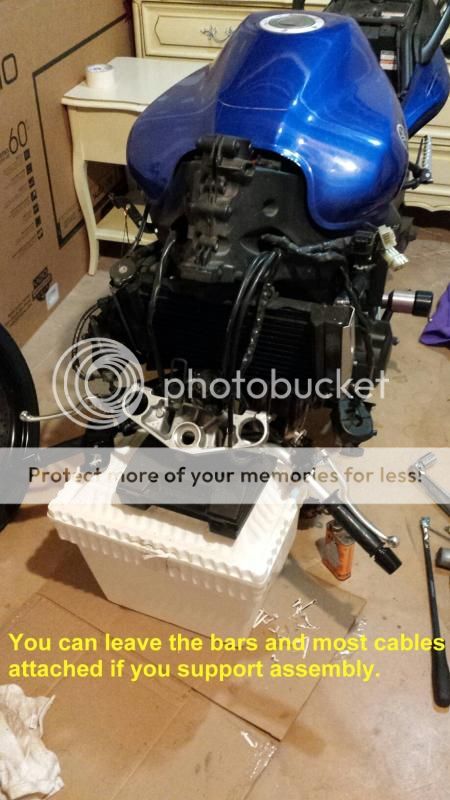
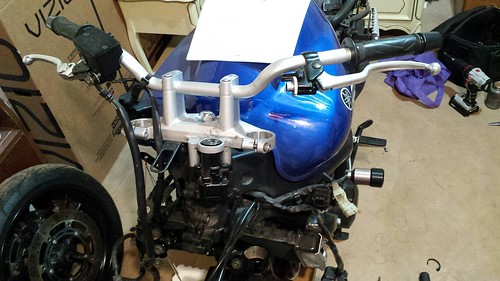
#1: If you elect not to fully disassemble the bars and cables, be sure to prop them up on something solid to prevent straining the cables or wires.
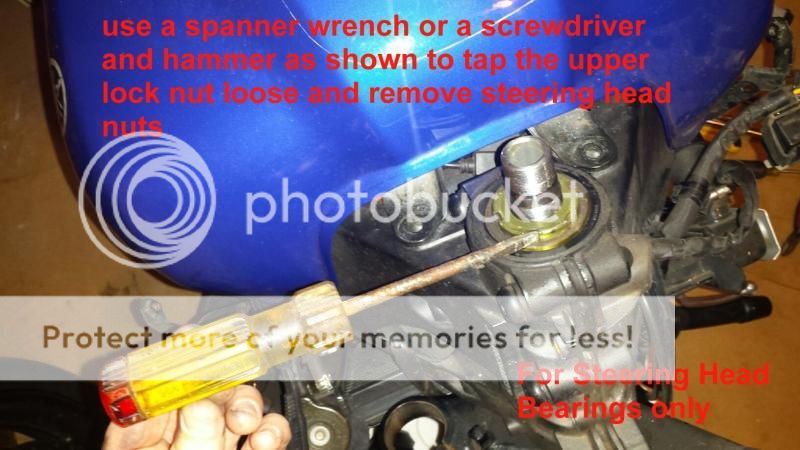
#2: With the bars removed you will expose the steering head shaft. The shaft has 2 olive green lock nuts on top. There is a chrome lock not holder that must be slid off first. The upper lock nut is probably easy to remove. The lower lock nut is the one that will be tight. Use a spanner wrench to grap the nut and turn counter-clockwise or use a large flathead screwdriver and a hammer to tap it as shown until it loosens up. BE CAREFUL as you remove this nut as the steering head shaft can fall out the bottom! Support it from under as you remove the lock nut.
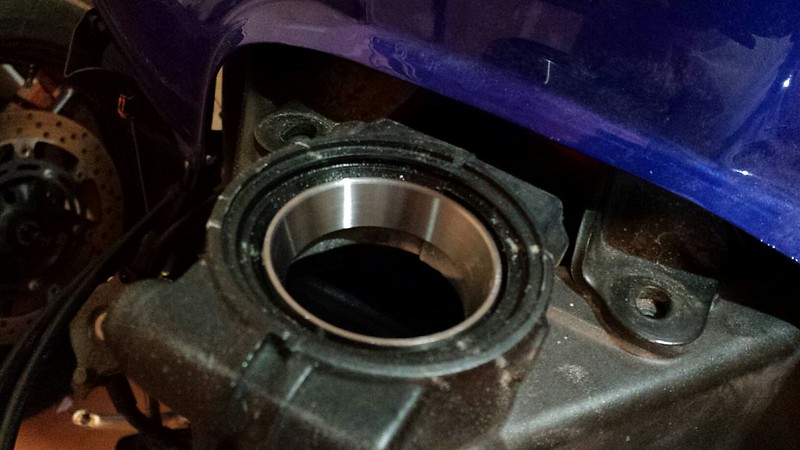
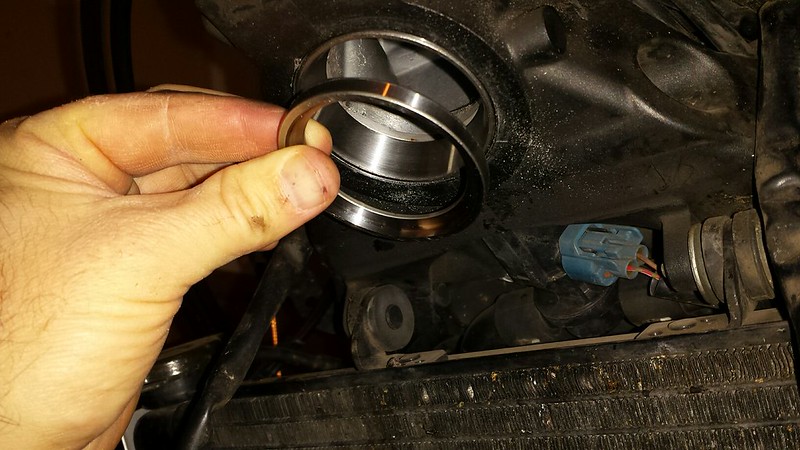
#3: With the lock nuts out of the way, carefully remove the upper dust seal from the bearings. You will want to reuse this seal! There is an inner race here that may or may not be loose. Slide it off and then you can slide the upper bearing assembly off.
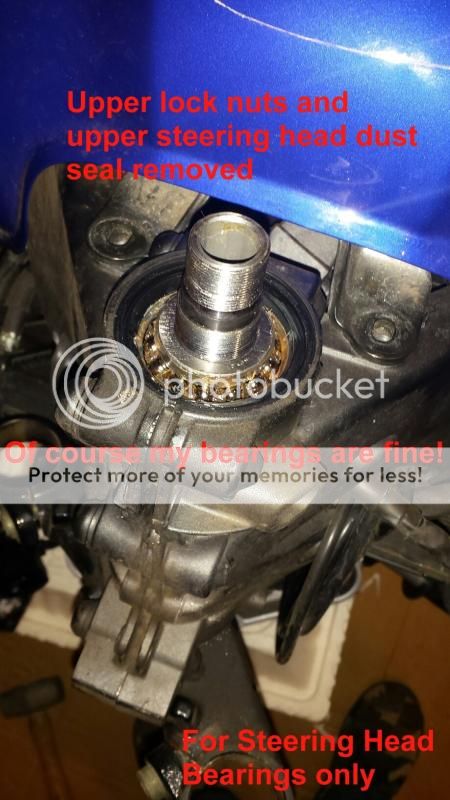
Be sure you continue to support the steering stem from below or it will fall out!
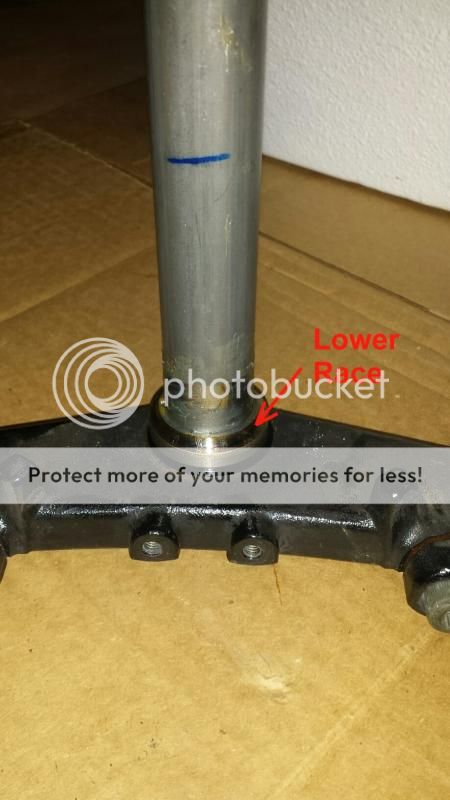
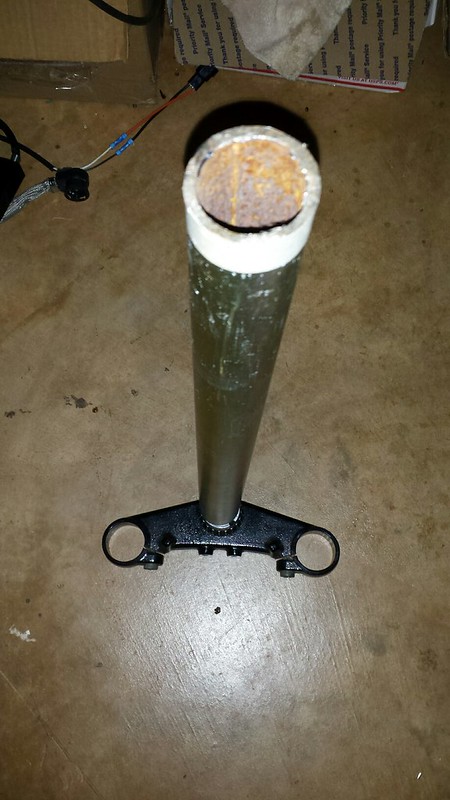
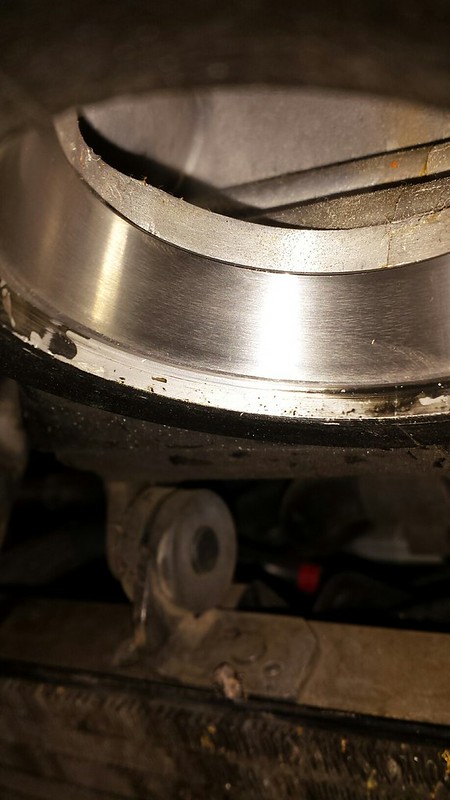
Once the bearing and inner race up top are removed, slide the steering stemp out the bottom and examine:

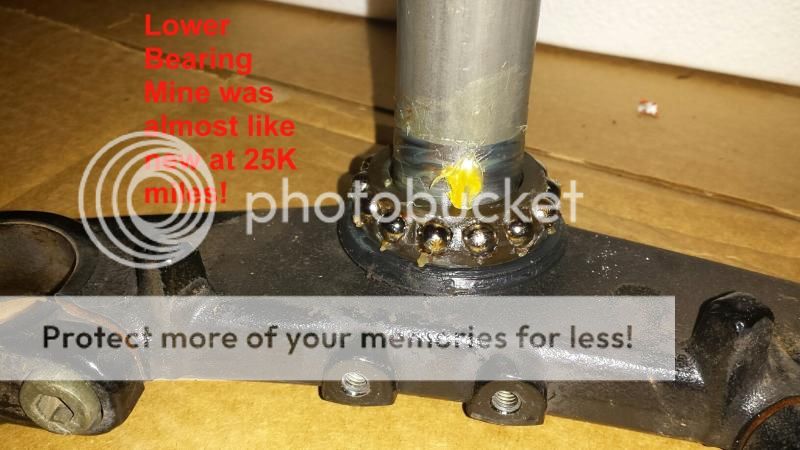
Remove the lower bearing to expose the dreaded LOWER RACE! This will likely need to be cut off with a dremel or angle grinder. If you get lucky you can hit it with a blow torch and smack it with a hammer a few times but I wasn't so lucky.
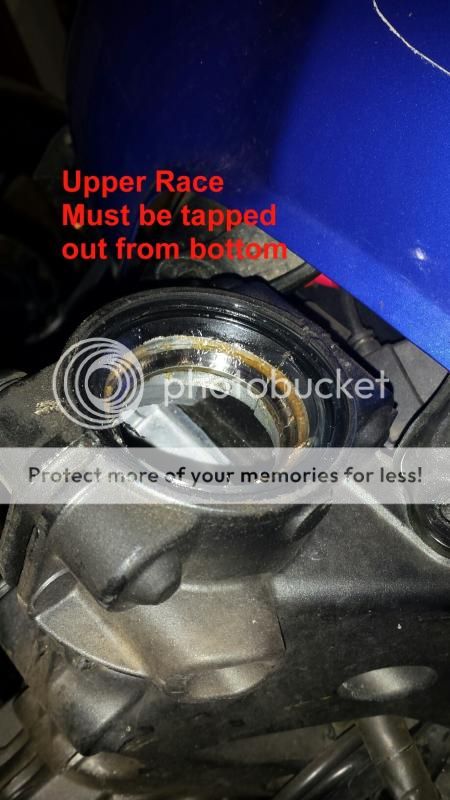
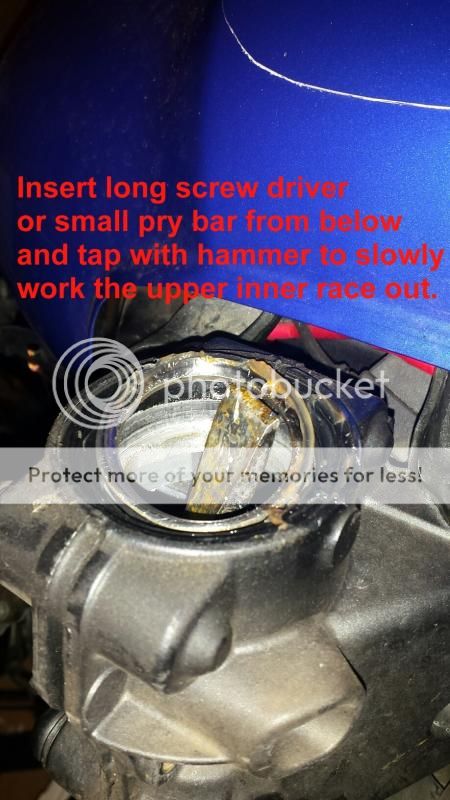
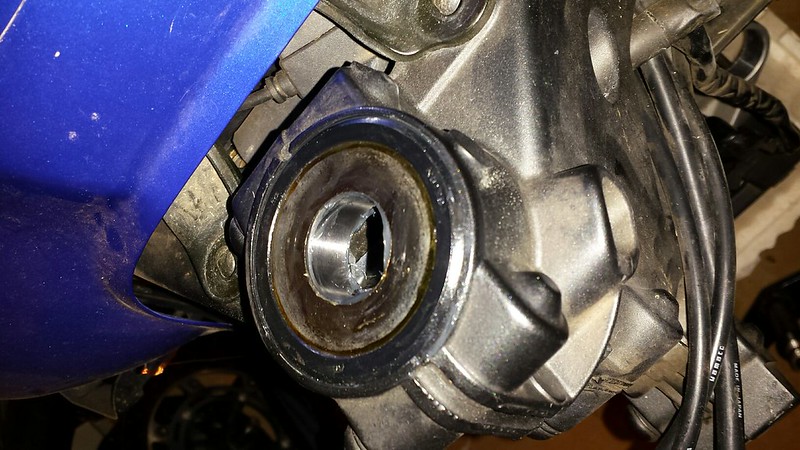
#4: Before dealing with the lower race on the stem, I decided to remove the races on the frame side of things. You will use a long flat head screwdriver or pry bar as I did, stick it through the opening in the steering headto hammer out the 2 frame races. See pictures below.

#5: Lower stem race removal. Chances are it's not coming off easily. I used a dremel and cutoff wheel to put a slice in it almost all the way through and then used a large cold chisel in the slice and a mallet to crack the race. Once cracked it should pull right off!
Once the lower stem race is off, clean the shaft well and slide the new dust seal down the shaft. make sure it's the right side up. It should match up to the bottom of the new bearings. I forgot to install the dust seal on mine as you can see. I'm not concerned enough with the lower dust seal to warrant buying a new set of bearings and re-doing the entire thing since the bottom bearing is protected from water spray on the road by the fairing and I almost never ride in the rain anyway. I put extra grease on the bottom of my bearings to serve as a sort of dust seal once the grease solidifies a bit.
Once the dust seal is in place. slide the new bearing down the stem. Narrow side up!
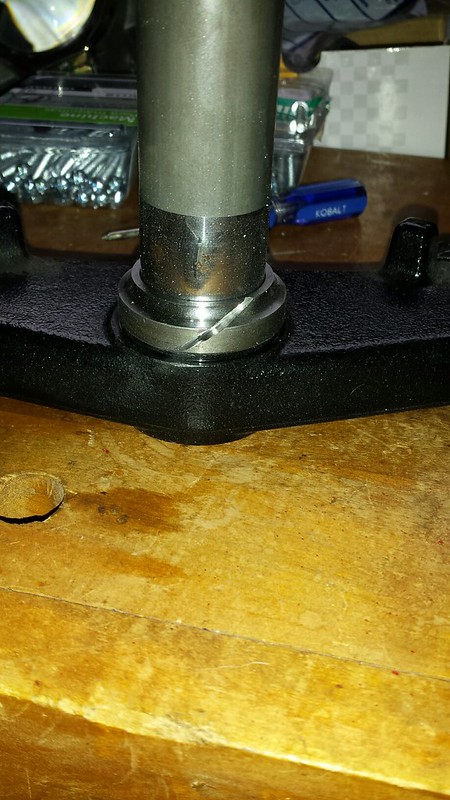
Turn the old race upside down and use it to chase the new bearing down the stem. You will then use a steel or iron rigid pipe with an Inner diameter of about 1.25" to drive the new bearing down the stem! Here's what this process should look like:
Duct Tap protects the stem from damage by the pipe
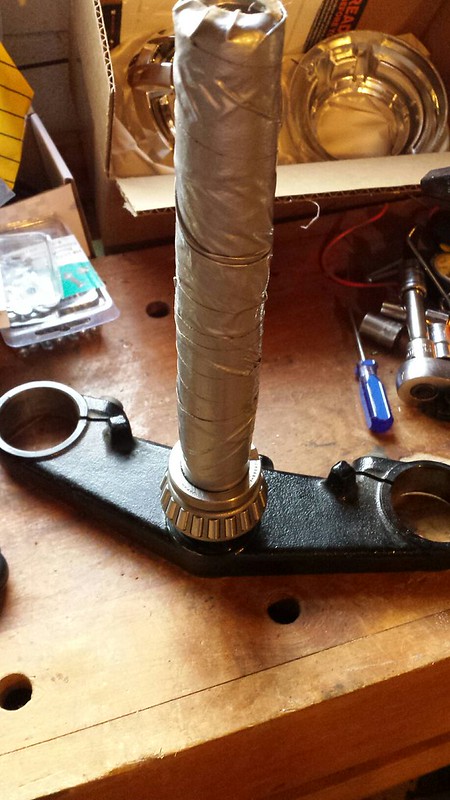
Drive the bearing down the stem using a heavy hammer and a steel pipe that is the same outer diameter as the old race. I used a sledge hammer and just tapped the pipe to slowly work the bearing down the stem. Worked great. You need to rest the steering stem on something solid (like concrete) for this to work well.
Once you get the bearing seated carefully pry the old race back off using screw drivers
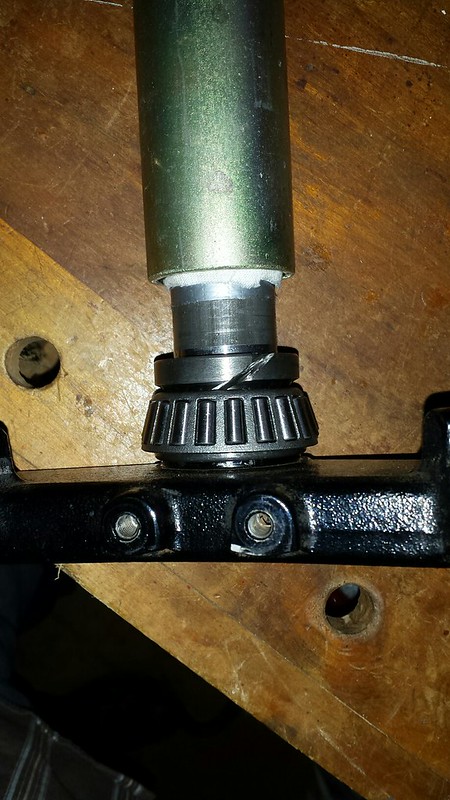
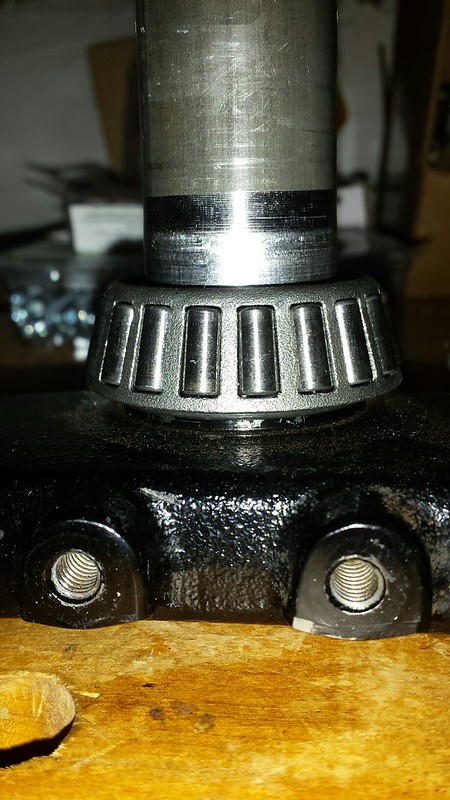
Make sure the new bearing is seated fully against the bottom of the steering stem seat!
Some people pack the bearing with grease prior to driving the stem bearing down. I don't do this because the grease attracts dirt and grit so you don't want to be hammering on a greased bearing. It's better to wait until final assembly to pack the bearings with grease after making sure they are good and clean!
Press in inner races using a draw bolt assembly or a large socket that fits exactly over the race and a hammer to slowly tap it in, going VERY slow and making sure to keep the racing going in square especially for the first bit.
I used the old races to protect the new races and a lead allow hammer to drive the races home. Be sure both races are fully seated before assembling the steering head!
Fully seated:
With upper bearing packed with grease and laid into the upper race and dust seal in place:
pack the lower stem bearing with bearing grease well and then install the steering stem through the bearings. Use one of the olive green lock nuts to hold the stem in place by hand tightening on top for now.
Tighten the lower of the 2 lock nuts on the stem using a spanner wrench. I could not find a torque spec on this lower nut so I just tightened it till I tool all play out of the steering stem and then 1/8 turn more. If you go too tight you may feel binding when you turn the steering stem by hand from lock to lock.
Next install the rubber washer, then the second lock nut and tighten snug, then install the chrome lock nut holder through the grooves in both nuts!
Make sure you put everything back on in the same order and orientation it came off!
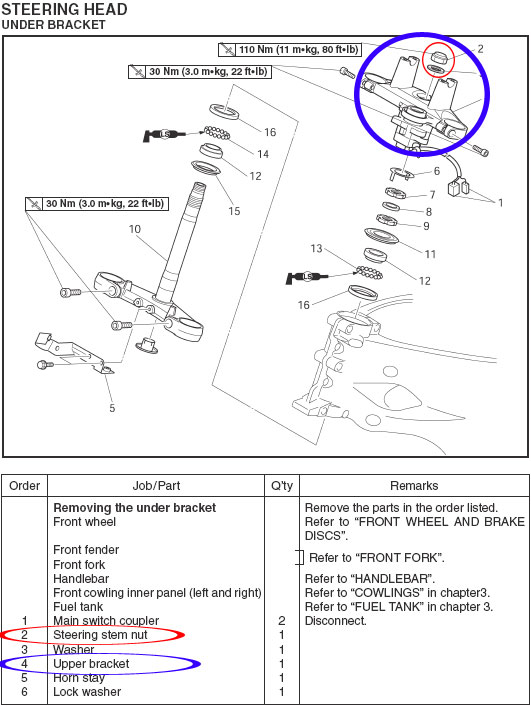
Assemble the upper bracket and the rest is the reverse of removal and pretty obvious if you got this far! The upper and lower pinch bolts that hold the forks in are to be torqued to 22 ft lbs and the upper stem chrome nut to 80 ft lbs, per the FSM.
CONGRATS!!!
This is the procedure to replace your head bearings yourself using All Balls Item #22-1004 tapered roller bearing kit and home tools.
Steering Head Bearing Removal:
Remove the fairing, front wheel and forks to make things easy:
#1: Remove the seat. Remove the rear gas tank pivot bolt and the 2 allen bolts at the front edge of the tank, slide tank back, raise tank, support tank and replace pivot bolt.
#2: Remove inner fairing pieces (6 stainless round head allen bolts and 2 plastic screw clip under the mirror rubber bases).
#3: Disconnect the (2) wire harnesses on the LEFT side of the fairing. Note, you may need pliers to get the smaller harness disconnected. There is only 1 tab that has to be pried up and then the 2 halves of the connector will pull apart. If it's difficult I found it easier to remove the fairing and set it on a stand to the left of the forks and then disconnect the connector.
#4: Remove the (2), 12mm bolts that hold the fairing bracket to the triple-tree mount. Carefully remove the fairing.
Ignore the gray boxes mounted inside my fairing. Those are my HID ballasts for my dual bi-xenon projector headlights.
#5: ONLY IF YOU WILL BE REPLACING STEERING HEAD BEARINGS: Cut the zip ties holding the cables and brake line to the upper forks . Break the upper fork clamps bolts loose but do not remove bolts yet.
(Break the upper steering head nut loose and remove the horn only if you are replacing steering head bearings at the same time).

#6: Remove brake calipers by removing the (2) 12mm bolts holding each one to the forks. Hang the brake calipers on the bike using bungees or wire to keep them from hanging on the lines.

#7: Remove pinch bolt for front axle from right fork. Use a 19mm male hex drive or the back end of a 19mm spark plug socket with 19mm wrench to loosen axle. Do not remove axle or wheel until you have supported the bike under the exhaust headers!

#8: Remove front fender. (1) Philips screw bolt and (1) 8mm bolt on each side. Set fender aside.

Now on the Steering head
#1: If you elect not to fully disassemble the bars and cables, be sure to prop them up on something solid to prevent straining the cables or wires.

#2: With the bars removed you will expose the steering head shaft. The shaft has 2 olive green lock nuts on top. There is a chrome lock not holder that must be slid off first. The upper lock nut is probably easy to remove. The lower lock nut is the one that will be tight. Use a spanner wrench to grap the nut and turn counter-clockwise or use a large flathead screwdriver and a hammer to tap it as shown until it loosens up. BE CAREFUL as you remove this nut as the steering head shaft can fall out the bottom! Support it from under as you remove the lock nut.

#3: With the lock nuts out of the way, carefully remove the upper dust seal from the bearings. You will want to reuse this seal! There is an inner race here that may or may not be loose. Slide it off and then you can slide the upper bearing assembly off.

Be sure you continue to support the steering stem from below or it will fall out!
Once the bearing and inner race up top are removed, slide the steering stemp out the bottom and examine:


Remove the lower bearing to expose the dreaded LOWER RACE! This will likely need to be cut off with a dremel or angle grinder. If you get lucky you can hit it with a blow torch and smack it with a hammer a few times but I wasn't so lucky.

#4: Before dealing with the lower race on the stem, I decided to remove the races on the frame side of things. You will use a long flat head screwdriver or pry bar as I did, stick it through the opening in the steering headto hammer out the 2 frame races. See pictures below.


#5: Lower stem race removal. Chances are it's not coming off easily. I used a dremel and cutoff wheel to put a slice in it almost all the way through and then used a large cold chisel in the slice and a mallet to crack the race. Once cracked it should pull right off!
Once the lower stem race is off, clean the shaft well and slide the new dust seal down the shaft. make sure it's the right side up. It should match up to the bottom of the new bearings. I forgot to install the dust seal on mine as you can see. I'm not concerned enough with the lower dust seal to warrant buying a new set of bearings and re-doing the entire thing since the bottom bearing is protected from water spray on the road by the fairing and I almost never ride in the rain anyway. I put extra grease on the bottom of my bearings to serve as a sort of dust seal once the grease solidifies a bit.
Once the dust seal is in place. slide the new bearing down the stem. Narrow side up!
Turn the old race upside down and use it to chase the new bearing down the stem. You will then use a steel or iron rigid pipe with an Inner diameter of about 1.25" to drive the new bearing down the stem! Here's what this process should look like:
Duct Tap protects the stem from damage by the pipe
Drive the bearing down the stem using a heavy hammer and a steel pipe that is the same outer diameter as the old race. I used a sledge hammer and just tapped the pipe to slowly work the bearing down the stem. Worked great. You need to rest the steering stem on something solid (like concrete) for this to work well.
Once you get the bearing seated carefully pry the old race back off using screw drivers
Make sure the new bearing is seated fully against the bottom of the steering stem seat!
Some people pack the bearing with grease prior to driving the stem bearing down. I don't do this because the grease attracts dirt and grit so you don't want to be hammering on a greased bearing. It's better to wait until final assembly to pack the bearings with grease after making sure they are good and clean!
Press in inner races using a draw bolt assembly or a large socket that fits exactly over the race and a hammer to slowly tap it in, going VERY slow and making sure to keep the racing going in square especially for the first bit.
I used the old races to protect the new races and a lead allow hammer to drive the races home. Be sure both races are fully seated before assembling the steering head!
Fully seated:
With upper bearing packed with grease and laid into the upper race and dust seal in place:
pack the lower stem bearing with bearing grease well and then install the steering stem through the bearings. Use one of the olive green lock nuts to hold the stem in place by hand tightening on top for now.
Tighten the lower of the 2 lock nuts on the stem using a spanner wrench. I could not find a torque spec on this lower nut so I just tightened it till I tool all play out of the steering stem and then 1/8 turn more. If you go too tight you may feel binding when you turn the steering stem by hand from lock to lock.
Next install the rubber washer, then the second lock nut and tighten snug, then install the chrome lock nut holder through the grooves in both nuts!
Make sure you put everything back on in the same order and orientation it came off!
Assemble the upper bracket and the rest is the reverse of removal and pretty obvious if you got this far! The upper and lower pinch bolts that hold the forks in are to be torqued to 22 ft lbs and the upper stem chrome nut to 80 ft lbs, per the FSM.
CONGRATS!!!
Last edited:
