How to: Replacing rear brake seals and fluid

Nelly

International Liaison
Elite Member
Joined
Jul 8, 2007
Messages
8,945
Reaction score
125
Points
63
Location
Co Offaly, ROI
Visit site
Just a reminder, check your rear brake light adjuster switch, especially when adjusting the lever. You don't want it illuminated all the time or not coming on when it should. There's a plastic nut tucked in on the switch (kind of a PIA to get to) to adjust the switch..

If the bedding in doesn't get any better, I have/used a Mity Vac (don't know if its available down below) when I replaced my rear line with SS braided.

If not, you might have some some air where the brake line rises from the caliper . A fix for getting it out, pull off the caliper, block the piston so it can't COME OUT, hold the caliper higher than the master cylinder, so the air rises to the caliper and can be sucked out or pump/bleed (normal, no fancy tools bleeding). That's the only place air can be left, between the caliper and the rear brake pump..
Thanks, the rear brake light is fine and only comes on when the lever is pressed.
I went for a bit of a burn 120km and the rear brake is now perfect.
Cheers
Neil
 

TownsendsFJR1300

2007 FZ6
Site Supporter
Joined
Feb 7, 2009
Messages
12,531
Reaction score
1,176
Points
113
Location
Cape Coral, Florida, USA
Visit site
Thanks for the tutorial, will help me a lot here in Brazil.

I read a lot but do not post much

My brakes are locking after bleeding, it may be the seal? Or incorrect installation?

Item 5 was discontinued

which stamp is valid?

look

2009 FZ6 (DARK PURPLISH BLUE METALLIC X) (CA ED.) - FZS6YL Yamaha Motorcycle REAR BRAKE CALIPER Diagram and Parts


Sorry my english

Were the rear brakes taken apart already? (Or incorrect installation?)

I would at least pull the pads and the two retaining bolts that hold the caliper on.

The rear caliper FLOATS and centers itself on those two bolts. They do get sticky with normal wear and tear and if run in very wet conditions and not serviced, will rust and can seize. Get BRAKE SPECIFIC GREASE, pull those bolts and make sure they move inside the caliper very easily. Grease inside where the holes are after cleaning out any old grease/goo.

Clean any grit off the caliper while its apart, specifically around the single piston. Once that's nice and clean, try pushing it back in gently. A "C" clamp, C style vise grip, etc, SHOULD allow the pistion to return back in the caliper.

If its super sticky, yes, its likely due for new seals. Its very rare for the rear seals to stick as yours are, but possible. I would focus on those two bolts.


BTW, I checked also for those rear seals for an 07 on Partzilla (same as boats.net) and it does show the part obsolete. (the part # just changed, not unusual)


Go to the Yamaha parts site:

My Yamaha Prompt - Parts Catalog)

The part # is superceded and is indeed available ( 5SL-W0047-00-00 CALIPER SEAL KIT ). Just go to another website or your local dealer if you need to order seals...


Please post your results
 
Last edited:

Kadu

Junior Member
Joined
Dec 9, 2011
Messages
8
Reaction score
0
Points
0
Location
Brasília/Brasil
Visit site
thanks for help TownsendsFJR1300!

In weekend i go disassembly and observe your recommend.

Then posting hither

In Partzilla or boat.net the shippment for Brazil is $ 44. Very expensive!
 

TownsendsFJR1300

2007 FZ6
Site Supporter
Joined
Feb 7, 2009
Messages
12,531
Reaction score
1,176
Points
113
Location
Cape Coral, Florida, USA
Visit site
thanks for help TownsendsFJR1300!

In weekend i go disassembly and observe your recommend.

Then posting hither

In Partzilla or boat.net the shippment for Brazil is $ 44. Very expensive!

Yep, unfortunatly, shipping oversea's they hammer you. The seals would fit in a friggin envelope (and can' get hurt, their rubber!).

I have to doubt its your seals (for the rear brakes, fronts, yes) but those slider bolts are likely rusted or gooed up. Again, clean them really good, brake grease so it slides nice and easy and re-check..

Good luck..:thumbup:
 

Kadu

Junior Member
Joined
Dec 9, 2011
Messages
8
Reaction score
0
Points
0
Location
Brasília/Brasil
Visit site
Yep, unfortunatly, shipping oversea's they hammer you. The seals would fit in a friggin envelope (and can' get hurt, their rubber!).

I have to doubt its your seals (for the rear brakes, fronts, yes) but those slider bolts are likely rusted or gooed up. Again, clean them really good, brake grease so it slides nice and easy and re-check..

Good luck..:thumbup:

those slider bolts are likely rusted or gooed up. Again, clean them really good, brake grease so it slides nice and easy and re-check..

I cleaned them sliders bolts, are not rusty and grease a lot

Thanks for help!
 

Kadu

Junior Member
Joined
Dec 9, 2011
Messages
8
Reaction score
0
Points
0
Location
Brasília/Brasil
Visit site
How the position of Brake pad spring?
I think this my problem.
currently, is mounted as picture 1. But, continues locking.
Brake1.jpg


Today, i changed position of brake pad spring, apparently not locking.
I mounted as picture 2
Brake2.jpg


what position is correct? The picture 2?

Thanks for help!
 

Kadu

Junior Member
Joined
Dec 9, 2011
Messages
8
Reaction score
0
Points
0
Location
Brasília/Brasil
Visit site
seeing better a picture 5 of Nelly in the first page

The correct is the picture 1 with the position of brake pad spring
 

TownsendsFJR1300

2007 FZ6
Site Supporter
Joined
Feb 7, 2009
Messages
12,531
Reaction score
1,176
Points
113
Location
Cape Coral, Florida, USA
Visit site
seeing better a picture 5 of Nelly in the first page

The correct is the picture 1 with the position of brake pad spring

Yes, picture #1 is correct because the pad on THAT SIDE DOES NOT MOVE. The pad closest to the piston will move outward with wear AND needs that larger surface area of the spring...

Please post you final results

:thumbup:
 

Kadu

Junior Member
Joined
Dec 9, 2011
Messages
8
Reaction score
0
Points
0
Location
Brasília/Brasil
Visit site
After a few weeks waiting for the stamps to arrive, he arrived

A mechanic that installed in saturday, he passed lightly grease in the piston

However, still have locking!

I no longer know what to do. Can the hose? Or ripple in the brake pad pin?

Has a step I'm not doing it right.....

Today I thought of something. If I complete the brake fluid and after closed cap for to give pressure when bleed, it is possible the piston back?

See the picture
Pin%25C3%25A7a+de+freio+FZ6.JPG


Sorry my english!
 

TownsendsFJR1300

2007 FZ6
Site Supporter
Joined
Feb 7, 2009
Messages
12,531
Reaction score
1,176
Points
113
Location
Cape Coral, Florida, USA
Visit site
If I understand correctly, the caliper is rebuilt but is still NOT releasing? Your mechanic, if he did the rebuild, SHOULD be able to trouble shoot this...

Anyway, You should be able to stick a slim flat head screwdriver between the disc and the pad (or pad and the piston) and PUSH THE PISTON BACK INWARDS without issue.

If its not going back in, its possible you have a bad brake line (swelled shut-not nearly as likely) or a master cylinder that's NOT releasing the hydralic pressure to the piston (and pads).

If releasing (turning CC) the bleeder valve, at the top of the brake cylinder releases the brakes, you have something holding the hydralic fluid from moving back towards the MC. NOTE: releasing this valve will likely introduce air into the system and require some bleeding.


Some basics to check:

The 2 caliper bolts (the mounting bolts) have to be able to move FREELY inside the caliper. Can you check those, make sure they have brake specific grease on them and do indeed slide in and out easily?

I'm assuming you didn't have the rear wheel off prior to the caliper dragging and potentially put the assembly(specifically the main bracket the caliper bolts to) back together incorrectly??
 

Kadu

Junior Member
Joined
Dec 9, 2011
Messages
8
Reaction score
0
Points
0
Location
Brasília/Brasil
Visit site
After some month and changer caliper seals, my problem continues.

TownsendsFJR1300, I followed your tips but no results :(


Today in Brazil is day of workman and is holiday.

I disassemble brake caliper and wheel

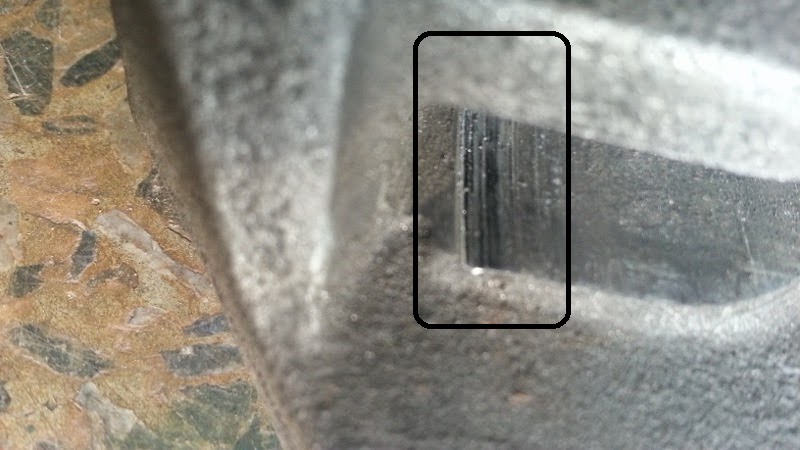
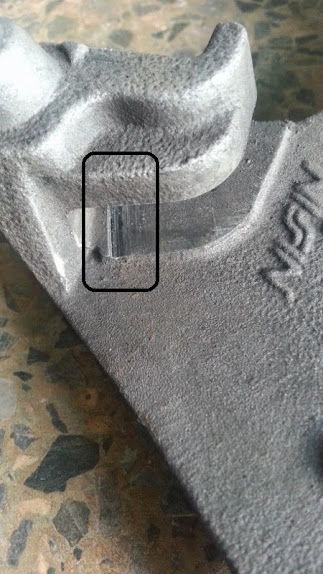
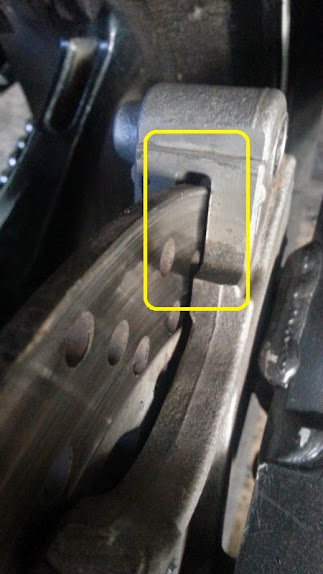
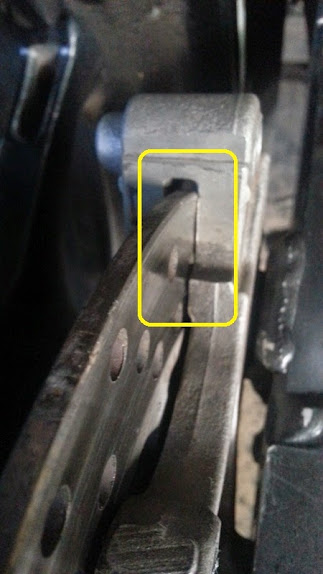
support touches the brake disc, look the picture

20140501_163757.jpg


20140501_163719.jpg


Before tighten the wheel screw has space between disk and support. Look the picture

20140501_171808.jpg


After tighten the wheel screw, look the distance

20140501_171824.jpg


I think the support has a problem, its possible? :(
 

LERecords

Member
Elite Member
Joined
Mar 28, 2008
Messages
2,526
Reaction score
34
Points
48
Location
Shelburne, VT
Visit site
yea.. that definitely looks a bit like a problem.. might be good to email some Yamaha techs to ask if that is normal (and hopefully have them send you some parts!!).. good luck!!
 

TownsendsFJR1300

2007 FZ6
Site Supporter
Joined
Feb 7, 2009
Messages
12,531
Reaction score
1,176
Points
113
Location
Cape Coral, Florida, USA
Visit site
Last edited:

Tailgate

Senior Member
Joined
Jan 12, 2008
Messages
2,086
Reaction score
26
Points
0
Location
Sacramento, CA
Visit site
I'd bet the slot on the swing arm and that bracket wasn't inserted. Once the axle was tightened down, it would have bent that main bracket/support, but yes, it'd be nice to know the final fix..

That or part # 19, wasn't installed
Yamaha Motorcycle Parts 2009 FZ6 (DARK PURPLISH BLUE METALLIC X) (CA ED.) - FZS6YL REAR WHEEL Diagram


I'll PM him..

Yeah, ("Scott," right?) I was kinda thinking the same thing. Have had to go through aligning (and making sure it remains aligned while tightening) the hardware that positions on the rear wheel/swing arm several times. Yeah, probably related to that. I'm replacing my rear caliper seal today and always like it when others post up about their experiences.
 

TownsendsFJR1300

2007 FZ6
Site Supporter
Joined
Feb 7, 2009
Messages
12,531
Reaction score
1,176
Points
113
Location
Cape Coral, Florida, USA
Visit site
Yeah, ("Scott," right?) I was kinda thinking the same thing. Have had to go through aligning (and making sure it remains aligned while tightening) the hardware that positions on the rear wheel/swing arm several times. Yeah, probably related to that. I'm replacing my rear caliper seal today and always like it when others post up about their experiences.

Yep, Scott.

You can just remove the caliper and NOT have to touch that bracket/axle etc. Just the two slider bolts/pin's and lift the caliper straight up. Remove the pads, and pump the brake pedal. It'll spit the piston right out for ya(and make a mess)..

When re-assembling, make sure that pins are nice and clean and lubed up with brake specific grease. You probably got a packet of pink grease with seal from yamaha.
 

FinalImpact

2 Da Street, Knobs R Gone
Site Supporter
Joined
Mar 16, 2011
Messages
11,137
Reaction score
184
Points
63
Location
USA, OR
Visit site
After some month and changer caliper seals, my problem continues.

TownsendsFJR1300, I followed your tips but no results :(


Today in Brazil is day of workman and is holiday.

I disassemble brake caliper and wheel

support touches the brake disc, look the picture

After tighten the wheel screw, look the distance

20140501_171824.jpg


I think the support has a problem, its possible? :(

Agreed - looks like the caliper bracket never dropped into the slot in the swing arm. It has a HUGE GAP... its in the past now.... So, with no where to go, and the axle bolt getting tight, it forced the caliper mount into the rotor. :(
 

FinalImpact

2 Da Street, Knobs R Gone
Site Supporter
Joined
Mar 16, 2011
Messages
11,137
Reaction score
184
Points
63
Location
USA, OR
Visit site
A couple of take aways from reading this:
•• Using grease is not necessary during piston install. The FSM calls out brake fluid as the product of choice and because people SCAN PAGES and DON'T READ the DETAILS, odds are someone will throw PETROLEUM GREASE in there and RUIN ALL OF THE RUBBER IN THE WHOLE HYDRAULIC SYSTEM!!!! << DON'T USE PETROLEUM PRODUCTS!
I personally would not use grease on the pistons as it gets trapped and turns to sledge plus it holds air bubbles.

From FSM:
• Before installation, all internal brake components should be cleaned and lubricated with new brake fluid.
• Never use solvents on internal brake components as they will cause the piston seals to swell and distort.
• Never try to pry out the brake caliper piston.
• Whenever a brake caliper is disassembled, replace the brake caliper piston seals.

Clean the slides and pins removing ALL GREASE and GRIM! DRY Assemble caliper and pins to bracket and confirm there is minimal freeplay in the pins and body by lifting and sliding the caliper on the caliper bracket. If the pins are loose in the caliper replace them.

***************************
Rear Brake pad lining thickness:

6.0 mm (0.24 in)
Discard Limit:
1.0 mm (0.04 in)
***************************

BRAKE BLEEDING:
Unless you have speed bleeders for pumping, I would advise against pumping the MC repeatedly as this will likely induce air into the brake system. Please follow the FSM or Close the BLEEDER EVERY TIME the pedal is depressed. Release lever, depress lever, Open Bleeder and let the air out. REPEAT!

Pumping an open bleeder simply moves the fluid back and forth without forcing the fluid out of the bleed port.

Also, confirm the the MC returns 100%. If it doesn't return completely, the fill port will not allow new fluid in and it can lock the caliper out and cause brake drag.


***********************************
BRAKE BLEEDING, CALIPER AND PAD INSPECTION
***********************************

FROM: http://www.600riders.com/forum/showpost.php?p=593693&postcount=13

The process I use to bleed brakes:
Tip number one - buy a syringe and some soft tubing. Preferred is silicone as it can stretch to any size. Then when it comes time to do a brake flush, suck out the old fluid, clean out the reservoir and dump in the new DOT 4 fluid. Note: A turkey baster will work to remove old fluid.

  • NOTE: Always use Fluid from a NEW UNOPENED CONTAINER!!!
    The reason being, once the seal on the container is broken, the fluid begins absorbing moisture. If possible, perform brake repairs/bleeding on low humidity days so moisture is NOT trapped in the system!
  • Crack the bleeders to insure they can be loosened. Fit a long section of hose to bleeder and into drain pan.
  • Clean MC lid, remove it, remove old fluid (clean inside and seal if dirty).

    •• Fill MC w/FRESH FLUID, install cap/lid.
  • Pump lever/pedal and hold lever down with pressure.
  • Crack the bleeder and continue applying pressure to lever. When the lever bottoms, seal the bleeder.
  • Repeat above steps until clean fluid is coming out. WATCH THE FLUID LEVEL! Don't allow the level to get low or it will force air into the lines!
  • Do both sides if applicable.
  • On the final bleed (both sides), seal the bleeder before the lever reaches bottom. This prevents air from entering the system.
  • Fill MC to correct level, install lid and clean everything spotless!
  • Repeat once a year using NEW DOT 4 fluid!
AFTER REPAIRS and/or NEW LINE INSTALL:
If you've installed new lines and have allot of air in the system, use the syringe and open a bleeder. Connect the syringe and pull back on the plunger to pull fluid through from the reservoir.
- BEGIN AT DOUBLE BULLET SECTION above to obtain a firm lever!

Use a syringe to remove old fluid! It's way better than pumping it through!
[URL="http://www.600riders.com/forum/showpost.php?p=593693&postcount=13]
52450d1395683362-who-wants-make-buddy-img_20140323_172548_313-jpg
[/URL]

If you have a long hose, run it straight into a pan or bottle. Here I was in pinch and just let it fill up the syringe.
[URL="http://www.600riders.com/forum/showpost.php?p=593693&postcount=13]
52451d1395683362-who-wants-make-buddy-img_20140323_174410_150-jpg
[/URL]


  • Do not get brake fluid on anything as it eats paint and will/can dull powder coated items too.
  • ** DO NOT LET THE MC reservoir go empty and suck air or your brakes will be all mushy and you'll have to start the bleeding process over!! **

***********************************

Additional Tips:
IMO Vacuum bleeding never gives a solid feel. Pressure bleeding forces the trapped air under pressure to condense into larger bubbles. As the bubbles increase in size, they often move to the top where the bleeder is and can be removed.
To assist the trapped air bubbles in making their way out of the brake system, use a dead blow hammer or a firm block of wood and tap on the caliper striking towards the ground. DO NOT TAP INLINE WITH THE CALIPERS PISTONS ESPECIALLY on FLOATING CALIPERS! If you choose to tap that way, do so gently you can damaged the disc and induce air into the system. This small shock (hammer tap) can remove trapped air bubbles. The momentary shock helps them condense and make their way out of the caliper. Don't leave marks or damage anything. Your tapping too hard if this occurs!

Note: The rear of both S1 and S2 FZ6's are floating calipers. The front of the S2 models are fixed 4 piston calipers. S1 front calipers are floating calipers.
 
Top