Naked Conversion

jtsharps

New Member
Joined
Apr 5, 2016
Messages
33
Reaction score
0
Points
0
Location
WI
Visit site
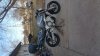
My 05 got naked today! I like this look & ride waaaaaay beter!

I got the kit from China on Ebay. Overall I'm satisfied. There's couple things that were a little cheap but not bad.
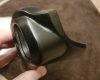
20170219_155320.jpg
 

jtsharps

New Member
Joined
Apr 5, 2016
Messages
33
Reaction score
0
Points
0
Location
WI
Visit site
Looks nice, do you have close up photographs?

I don't at this current juncture. I posted the first pic from my phone and it's not a very good representation...and I h ave no idea why it turned it?? I'll try to get some closer pics tonight.

FZ6N.png
 

Attachments

  • 20170219_155320.jpg
    20170219_155320.jpg
    154.1 KB · Views: 65
Last edited:

iBeef

Member
Joined
Feb 19, 2017
Messages
37
Reaction score
1
Points
8
Location
UK
Visit site
It looks like you've done a really good job with that! I've got mine coming tomorrow hopefully; how did you find fitting it?

Anything in particular that was difficult?

Also how did you sort out the low beam situation? Did you just borrow the plug from the other side? I'm tempted to do the dual headlight method and use that for the low beam so they work individually.
 

jtsharps

New Member
Joined
Apr 5, 2016
Messages
33
Reaction score
0
Points
0
Location
WI
Visit site
It looks like you've done a really good job with that! I've got mine coming tomorrow hopefully; how did you find fitting it?

Anything in particular that was difficult?

Also how did you sort out the low beam situation? Did you just borrow the plug from the other side? I'm tempted to do the dual headlight method and use that for the low beam so they work individually.

The most difficult part really was that I chopped off all of the connectors on the wiring harness as there's no way to fit all that wire behind the headlight. I just basically hard wired everything in. Not ideal at all but this is my cheap, 3rd bike so for me, I'm not too concerned about that. If it's more of a "this is my baby type situation," you might want to find a slightly better way of doing that. I've heard some say they took the battery housing out and the air box and pulled the wires back inside. I flat out was too lazy to do that to be honest. I might end up doing that at some point though when I have time/get bored. I actually left a little too much wire there, I should have made them a little shorter. Right now I have the wires and turn signal relay kinda zip tied up on the top hole where the stock bracket bolted on. It looks decent but it does restrict turning the handle bars all the way to the left. I can't actually lock my steering because of it. I didn't think it'd be a big deal but turning around in the driveway and in parking lots, it has been kinda annoying. Having said that, it really wasn't that hard, just tedious and time consuming. I popped a fuse (twice) so that took some time to figure out. The gauges would come on but there was no reading on the display. It was the 10A fuse labeled "Backup" that was blown. Also I didn't realize that the headlight doesn't come on 'til you start the bike. I kept turning the key and wondering why the heck the headlight wasn't working. So I kind of went round and round with that until I figured that out. What I did was move the black & green wire over from the low beam side on the stock wire harness, over to the high beam harness. My kit came with a headlight but there's actually a dual filament bulb in the stock setup that you can use too. It worked really slick. The stock harness actually has a 3 prong setup, it just doesn't use it. So that makes it much nicer. Then I just cut the stock low bean off & tied up the wires. One thing to watch for is the plug that comes out of bike, the one with more wires than the other, the wires aren't the same color on each side of the connectors. If you're going to do like I did and eliminate the connectors, just look at them and make match them up as they are on the stock setup.

Otherwise, as far as the kit goes it fit up pretty nicely. Once you get in there, you can figure out fairly easily how it goes in. One thing I struggled with is how the heck the meter/gauge cover was supposed to go on while it was screwed into the bracket. I ended up cutting some of the cover off, then using some grommets from the stock setup (the ones that were on the gauge cluster before) then screwing the back plate on that. It's really confusing to explain, maybe it'll make sense once you start working or maybe you'll figure out the actual way it's supposed to go on. What I did works, looks good, & I'm happy with it. I did have to bend that part back a little bit to make the gauges easier to read. It was a tad too upright to see it real well. That's one thing too that I noticed since the conversion is that the gauges are a tad harder to see now in the sunlight, since they aren't shaded by the fairing/windscreen.

One thing too is that i saw everyone talking about relocating the horn. All I did was bent the little bracket thing that the horn is connected to down a little and it fits & looks just fine right where it was.

After all that though I'm soooooooooooo happy I did this. I love riding this bike now. I'm more of a full sportbike kinda guy and this thing just felt "old grammpaish" to me. I didn't really enjoy riding it at all. Now, I absolutely love it!!!
 

iBeef

Member
Joined
Feb 19, 2017
Messages
37
Reaction score
1
Points
8
Location
UK
Visit site
The most difficult part really was that I chopped off all of the connectors on the wiring harness as there's no way to fit all that wire behind the headlight. I just basically hard wired everything in. Not ideal at all but this is my cheap, 3rd bike so for me, I'm not too concerned about that. If it's more of a "this is my baby type situation," you might want to find a slightly better way of doing that. I've heard some say they took the battery housing out and the air box and pulled the wires back inside. I flat out was too lazy to do that to be honest. I might end up doing that at some point though when I have time/get bored. I actually left a little too much wire there, I should have made them a little shorter. Right now I have the wires and turn signal relay kinda zip tied up on the top hole where the stock bracket bolted on. It looks decent but it does restrict turning the handle bars all the way to the left. I can't actually lock my steering because of it. I didn't think it'd be a big deal but turning around in the driveway and in parking lots, it has been kinda annoying. Having said that, it really wasn't that hard, just tedious and time consuming. I popped a fuse (twice) so that took some time to figure out. The gauges would come on but there was no reading on the display. It was the 10A fuse labeled "Backup" that was blown. Also I didn't realize that the headlight doesn't come on 'til you start the bike. I kept turning the key and wondering why the heck the headlight wasn't working. So I kind of went round and round with that until I figured that out. What I did was move the black & green wire over from the low beam side on the stock wire harness, over to the high beam harness. My kit came with a headlight but there's actually a dual filament bulb in the stock setup that you can use too. It worked really slick. The stock harness actually has a 3 prong setup, it just doesn't use it. So that makes it much nicer. Then I just cut the stock low bean off & tied up the wires. One thing to watch for is the plug that comes out of bike, the one with more wires than the other, the wires aren't the same color on each side of the connectors. If you're going to do like I did and eliminate the connectors, just look at them and make match them up as they are on the stock setup.

Otherwise, as far as the kit goes it fit up pretty nicely. Once you get in there, you can figure out fairly easily how it goes in. One thing I struggled with is how the heck the meter/gauge cover was supposed to go on while it was screwed into the bracket. I ended up cutting some of the cover off, then using some grommets from the stock setup (the ones that were on the gauge cluster before) then screwing the back plate on that. It's really confusing to explain, maybe it'll make sense once you start working or maybe you'll figure out the actual way it's supposed to go on. What I did works, looks good, & I'm happy with it. I did have to bend that part back a little bit to make the gauges easier to read. It was a tad too upright to see it real well. That's one thing too that I noticed since the conversion is that the gauges are a tad harder to see now in the sunlight, since they aren't shaded by the fairing/windscreen.

One thing too is that i saw everyone talking about relocating the horn. All I did was bent the little bracket thing that the horn is connected to down a little and it fits & looks just fine right where it was.

After all that though I'm soooooooooooo happy I did this. I love riding this bike now. I'm more of a full sportbike kinda guy and this thing just felt "old grammpaish" to me. I didn't really enjoy riding it at all. Now, I absolutely love it!!!

Thanks for the reply! I'm not going to lose the connectors if I can help it but because I'm going to wire in the low beam from under the seat so they work independently I will try to tidy it up with the tank up. Luckily I've bought a second wiring loom so I don't have to fiddle around making my own spade connectors. Thanks for the info, I'm deffo gonna try the horn idea, it'll save me relocating it :). It looks like you got a really good kit, I received mine today and although it's OK, it certainly has some blemishes (See below) I'm half tempted to give the seller an email and try to get a partial reimbursement. I'm sure at some point though I will paint the side brackets the same shade of black as the bike is.

20170222_173557_zpswhxvarv8.jpg

I do have one question, when you attached the headlight to the side brackets, did you use rubber bushes in the places the arrows are pointing to in the picture below? I've seem people using bushes on the top where it bolts in but it seems like the bottom should have them also to reduce excessive vibration (My kit came with neither but I'll have a look online for some.)

20170222_173839_zpslcoqwhta.jpg
 

Attachments

  • 20170222_173557.jpg
    20170222_173557.jpg
    61.4 KB · Views: 52

jtsharps

New Member
Joined
Apr 5, 2016
Messages
33
Reaction score
0
Points
0
Location
WI
Visit site
Thanks for the reply! I'm not going to lose the connectors if I can help it but because I'm going to wire in the low beam from under the seat so they work independently I will try to tidy it up with the tank up. Luckily I've bought a second wiring loom so I don't have to fiddle around making my own spade connectors. Thanks for the info, I'm deffo gonna try the horn idea, it'll save me relocating it :). It looks like you got a really good kit, I received mine today and although it's OK, it certainly has some blemishes (See below) I'm half tempted to give the seller an email and try to get a partial reimbursement. I'm sure at some point though I will paint the side brackets the same shade of black as the bike is.

View attachment 67639

I do have one question, when you attached the headlight to the side brackets, did you use rubber bushes in the places the arrows are pointing to in the picture below? I've seem people using bushes on the top where it bolts in but it seems like the bottom should have them also to reduce excessive vibration (My kit came with neither but I'll have a look online for some.)

View attachment 67640

Mine had just one spot where you could tell it got scratched and they put some touch up paint on it, not a big deal for me. Dealing with the Chinese peeps isn't always the easiest thing to do, trying to explaining what exactly you're saying. I try not to unless it's something big that really needs to be fixed. It's always interesting so good luck on that. Certainly worth a try though.

My kit did came with some rubber grommets but I also took some off the my stock setup. I did use grommets on those holes that you're talking about, yes, & I think I used the ones from the stock setup for those. The ones with the kit were a little stiff and I couldn't get them in that hole nicely. The stock ones were softer and easier to get in. I believe I used the grommets that came with the kit to mount the top of the headlight & they worked nicely for that. If you're kit didn't come with any I'd just raid the stock ones. If you need more, you can maybe pull the stock ones and run to the hardware store to try to find some that match them. Also the ones I used for the gauge were from the stock setup. One more thing that I used from my stock setup is the turn signals. The ones that came with the kit matched exactly but they were a little stiff, like the grommets mentioned above. I couldn't quite get them in that hole. They are the exact same ones as what's on the fairing on our bikes so I just pulled those off and used them instead. They are in really good shape a were a little more pliable, worked in, so they went right in. Plus, they have the stock connector on them so that meant I didn't have to do any splicing of wires, which was awesome!

Good luck! I'll try to keep checking this thread for any questions that you might have and to see your finished product.
 
Last edited:

iBeef

Member
Joined
Feb 19, 2017
Messages
37
Reaction score
1
Points
8
Location
UK
Visit site
Mine had just one spot where you could tell it got scratched and they put some touch up paint on it, not a big deal for me. Dealing with the Chinese peeps isn't always the easiest thing to do, trying to explaining what exactly you're saying. I try not to unless it's something big that really needs to be fixed. It's always interesting so good luck on that. Certainly worth a try though.

My kit did came with some rubber grommets but I also took some off the my stock setup. I did use grommets on those holes that you're talking about, yes, & I think I used the ones from the stock setup for those. The ones with the kit were a little stiff and I couldn't get them in that hole nicely. The stock ones were softer and easier to get in. I believe I used the grommets that came with the kit to mount the top of the headlight & they worked nicely for that. If you're kit didn't come with any I'd just raid the stock ones. If you need more, you can maybe pull the stock ones and run to the hardware store to try to find some that match them. Also the ones I used for the gauge were from the stock setup. One more thing that I used from my stock setup is the turn signals. The ones that came with the kit matched exactly but they were a little stiff, like the grommets mentioned above. I couldn't quite get them in that hole. They are the exact same ones as what's on the fairing on our bikes so I just pulled those off and used them instead. They are in really good shape a were a little more pliable, worked in, so they went right in. Plus, they have the stock connector on them so that meant I didn't have to do any splicing of wires, which was awesome!

Good luck! I'll try to keep checking this thread for any questions that you might have and to see your finished product.

I am tempted to spray mine the same black as the tank and fairings, it shouldn't take long to sand down and paint tbh. Yeah I know what you mean but like you said it's worth a try, I've seen a genuine Yamaha bracket on Ebay for £60 so if I can get some money back I'll use it to buy that which may fit a little better.

I didn't realise there were so many bushes in the stock fairing tbh, I'll see what I have when I strip it down and take it from there. Mine didn't come with turn signals but I was going to use the stock ones as you did so it's nice to know they fit.

I won't be fitting it for a while as I'm a little busy atm. When I do fit it however I'll be sure to let you know how I got on.

Thanks for answering all my questions :)
 

Majest1k

New Member
Joined
Oct 22, 2016
Messages
4
Reaction score
0
Points
0
Location
Florida
Visit site
Can you link me to the kit you used? I am having some major trouble sourcing the parts I need for my '05 fz6 naked conversion =(
 

upshiftoverdrive

Junior Member
Joined
Sep 2, 2011
Messages
188
Reaction score
1
Points
18
Location
Ridgeland, SC
Visit site
A few closer pics.
Can I ask where you got the little plugs for the bar clamps? I have the same clamps and want to get some plugs like that.

Has anyone of you found a parking light/socket that fits into this kit?
I got these two items when I had that kit. Worked pretty well.

https://www.superbrightleds.com/mor...d-tower-miniature-wedge-retrofit-car/206/923/

https://www.superbrightleds.com/moreinfo/empty-bases-sockets/t325-wedge-base-socket-wired/1150/2737/
 

Mad_Max

New Member
Joined
Mar 30, 2017
Messages
4
Reaction score
0
Points
0
Location
Scandinavia
Visit site

iBeef

Member
Joined
Feb 19, 2017
Messages
37
Reaction score
1
Points
8
Location
UK
Visit site
Hi mate, I started my conversion today and have a question. What did you to when bolting the headlight stay to the upper triple clamp? The stay has 3 holes but the upper triple only has the one. Did you just bolt the one in and leave it at that? If so do you have any vibration etc from the side that isn't fixed??

Thanks

Sent from my SM-G935F using Tapatalk
 
Top