Positive wire (12V) for heated grip install

Johnson

New Member
Joined
Sep 19, 2016
Messages
99
Reaction score
0
Points
0
Location
NY
Visit site
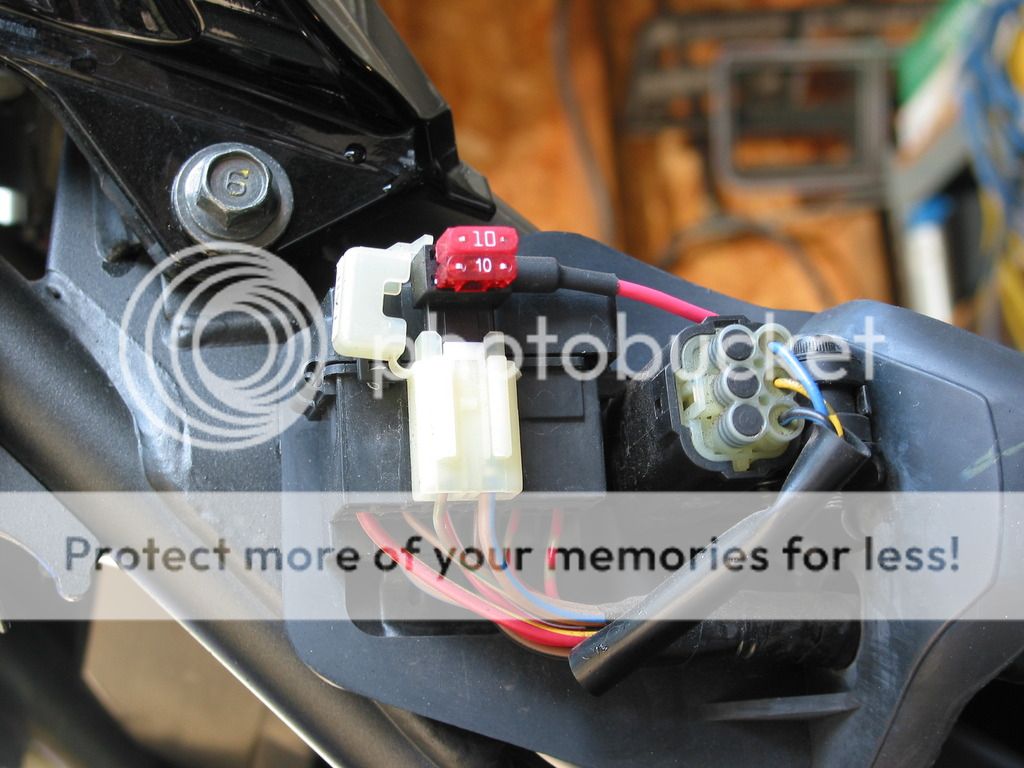
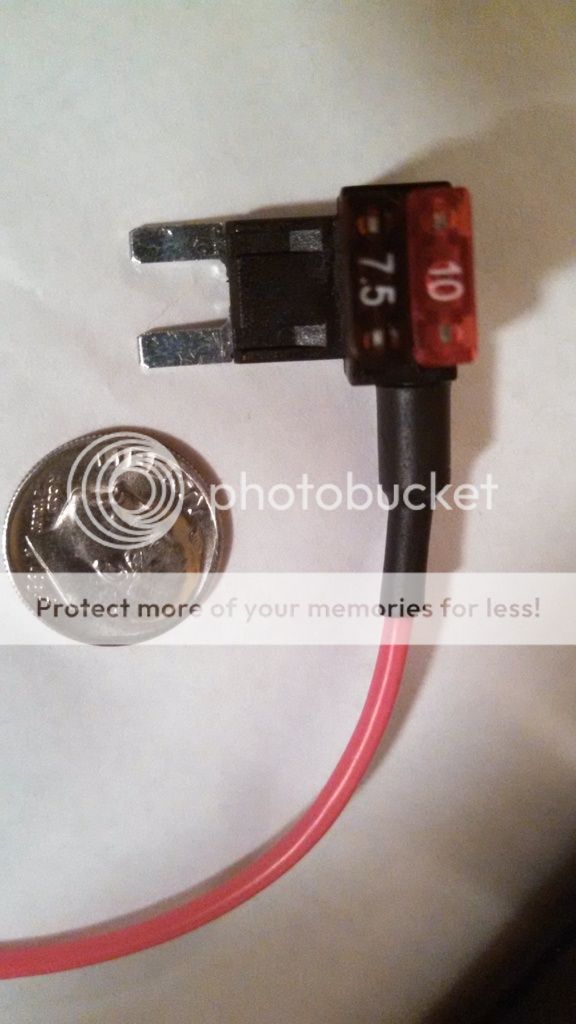
I have these grips installed. I used a fuse tap like others suggested, but I also just used the inline fuse they provided as well. So I assume that's okay? So the positive wire from the grips goes from the controller, through the provided inline fuse, and then into the fuse for the 'tail'.
The negative is another story. Unless you want to run the negative cable all the way back to the battery(Which I guess is correct procedure) I just bolted the terminal to the frame right there by the fuse box with a nut and bolt.

These grips definitely do not need to be glued on. At least not with a G2 Throttle Tamer. It takes quite a bit of brute force to get it on the throttle tube, and the handlebar on the clutch side. Hairspray or soapy water help.

Make sure to take note that they have made each grip specifically for each side of the bike! I almost sent them back because I didn't realize there was a difference between the two and was trying to put the throttle side grip over the bare bar. The throttle side is wayy too big to go over the bar, each side is made to fit. These are not squishy rubber grips, they're rigid grips, no expanding to fit like a normal grip.

Where is exactly is the fuse for the tail?
 

TownsendsFJR1300

2007 FZ6
Site Supporter
Joined
Feb 7, 2009
Messages
12,538
Reaction score
1,185
Points
113
Location
Cape Coral, Florida, USA
Visit site
The fuse is under the right side pod,(the cover below the seat that sticks out a little bit), adjacent to the tip over switch...

There's a small black box with a cover, the fuses are under there...

Double click to enlarge:
 
Last edited:

upshiftoverdrive

Junior Member
Joined
Sep 2, 2011
Messages
188
Reaction score
1
Points
18
Location
Ridgeland, SC
Visit site
Also you may want to do this yourself or have someone with experience wire this up and do the connections. The power relay can be used with pretty much any accessory you might add to your bike. The power relay is a common type that is carried by every auto parts store.

Have fun, be safe! :)

Here's a diagram...

Can I only run one accessory off of this relay? I assume I can run as many as I want as long as they don't exceed a peak draw of over 30amps?

I don't understand why it needs a source from the running light circuit? Is this just so when the ignition is killed the relay is killed as well?

Because if not, wouldn't just running the grips(or whatever accessory you're trying to use) directly to the battery with a fuse inline be the easiest option?
 

TownsendsFJR1300

2007 FZ6
Site Supporter
Joined
Feb 7, 2009
Messages
12,538
Reaction score
1,185
Points
113
Location
Cape Coral, Florida, USA
Visit site
The ONLY reason to use the taillight, ft running light is that your using it ONLY as a trigger..
IE, lights come on with ignition, the relay is now activate and will NOW allow the grips to work

With the relay, your drawing all the power needed from the battery, thru the relay, to the grips. No chance of burning out
the tail lights or anything else, simply a trigger..

The grips wired direct (with the included fuse) IS the easiest BUT should you leave the grips on by accident, they stay on..
 
Last edited:

FinalImpact

2 Da Street, Knobs R Gone
Site Supporter
Joined
Mar 16, 2011
Messages
11,137
Reaction score
184
Points
63
Location
USA, OR
Visit site
Where is exactly is the fuse for the tail?

Its right here in the pic! The factory fuse is under that lid that is now open.
IMG_0203_zps4qacform.jpg


I think the whole bike runs on 30A so taking more than 6 to 8 for occasional use will get a dead battery as the charging system can not support the added load.

Yes, you can go direct from the battery but we are trying to save you from the despair of a dead battery.

In the info about the product it says it draws 2.5Amps max on high. If you buy the piggy back here, a 3.5Amp fuse and some wire, you get a switched source, a fuse protecting the wire to the controller. The controller has a fuse and worst case is starting the bike with heaters on which if doesnt start from that tiny load you have far bigger issues....

In a pinch I would do this, but if you plan to add more load, add the relay direct to the battery and switch it from here OR the Black/Green trace of the low beam head light. This install would take longer to install the grips than routing one wire safely under the tank. Should you do this, protect the wires in heat shrink tubing. Its cheap insurance.


JM2C
 

FinalImpact

2 Da Street, Knobs R Gone
Site Supporter
Joined
Mar 16, 2011
Messages
11,137
Reaction score
184
Points
63
Location
USA, OR
Visit site
I guess you need to take your bike apart more often! Blah

In the pic above, notice the size of the brown/blue trace wire going into the tail light fuse? Its a monster...

IMO this is a no brainer solution for loads under 10 Amps... certianly easy for keeping a USB charger hot. Anyway, Id guess the only time my data logger and fuel controller get near max is Amps is when the wideband O2 sensor has the heater on to warm up. Its been running on a 7.5Amp fuse and never popped it.

Also, the kit comes with an asortment of fuses. I bought that at Napa auto, but Amazoo sells them too!

IMG_20150206_192719_035_zpsd3tgvhx6.jpg
 
Last edited:

Johnson

New Member
Joined
Sep 19, 2016
Messages
99
Reaction score
0
Points
0
Location
NY
Visit site
Ok you've all convinced me to get the relay. As much as I like to believe that I will always switch the grips off when I am done, I do realize I've left my keys and/or phone on more than one occasion.

Do you guys have a link to a relay I can order off Amazon or Autozone?

Despite the amazing instruction/guidance provided, I still don't feel confident setting up the relay. Plugging directly into battery seemed doable but even tapping into the fuse seems difficult but perhaps I can dig around and find some detailed YouTubes as it doesn't seem that complicated but at this point looking at seeing how much the shop would charge or trying to find a knowledgeable friend in that realm but that is a stretch as no one I know rides.
 

Motogiro

Vrrroooooom!
Staff member
Moderator
Elite Member
Site Supporter
Joined
May 8, 2008
Messages
15,007
Reaction score
1,178
Points
113
Location
San Diego, Ca.
Visit site
Ok you've all convinced me to get the relay. As much as I like to believe that I will always switch the grips off when I am done, I do realize I've left my keys and/or phone on more than one occasion.

Do you guys have a link to a relay I can order off Amazon or Autozone?

Despite the amazing instruction/guidance provided, I still don't feel confident setting up the relay. Plugging directly into battery seemed doable but even tapping into the fuse seems difficult but perhaps I can dig around and find some detailed YouTubes as it doesn't seem that complicated but at this point looking at seeing how much the shop would charge or trying to find a knowledgeable friend in that realm but that is a stretch as no one I know rides.

The relay is a common relay toy can obtain at any local auto parts store. They are generally 30 rated and will have a 12 vdc coil. :)
 

FinalImpact

2 Da Street, Knobs R Gone
Site Supporter
Joined
Mar 16, 2011
Messages
11,137
Reaction score
184
Points
63
Location
USA, OR
Visit site
Find a place where the Relay will fit. Either under the tank or near the battery. Figure out if the wires from the relay will reach this location. Less connections is better.

Use the Diagram Cliff posted to make the following connections.

1) Relay #30 connects to fuse and then to Battery Positive using a ring connector (14-16 Gauge). Keep the fuse as close to the battery as possible. Insert a 10 Amp fuse and holder. Wires should be 14/16 gauge into Relay #30. You have 10 Amps on tap.
2) Relay #87 Connects to Controller Positive wire. Use a butt connector to splice this to relay harness.
3) Relay #85 connects to chassis or battery ground. This completes the circuit that controls relay on off. Use an eyelet from the kit.
4) Relay #86 Insert fuse holder into Brake light circuit under the left pod. Use 0.5A ATC fuse for this and install 10 Amp fuse back in circuit for brake light. Route 18 gauge wire forward and into #86. This controls relay on off. I would protect the wire with Shrink tubing but that's just me. You could use a 1 Amp ATC fuse if needed.

When crimping: Crimp so as to deform the metal onto the wire. The wire should nearly stick out of the terminal side of the connector but should have NO Bare Wire exposed on the wire side. Wire stripping only needs enough exposed wire to fit the length of terminal crimp area. The metal part not the overhanging plastic.

** VERY IMPORTANT ** After Crimping PULL with 10 to 15 lbs of force, the Wire should NOT PULL FROM CRIMPED TERMINAL. If it does, throw the terminal away and try again.


Below is a quick search so it may not be the best prices, quality or shipping locations. This is the basics and you may have tools and wire at home?? IDK!

ATC 10 Amp Inline fuse Holder // this is what the bike uses. Use this so you have spare fuses. Yes, I know your grips have a fuse, we need a fuse right off the battery before the relay.
3 feet 1/4 in ID Shrink tubing. Use this to protect wires. 3/8" could be used to go over butt connections. A search will find these...

Relay and Harness
12 Volt 30 Automotive Relay with Socket 30 amp and Relay
Relay and Harness

Fuse holder
BUSSMANN BP/HHH-RP

Terminal Kit and Crimper
Terminal Assortment kit 14 and 18 gauge wires

Wire Stripper This is a great Tool. Everyone should have one!
Wire Stripper Automatic Wire Stripper

Wire 18 gauge
Wire 18 gauge

That should get you started. Like Insaid, getting the grips on will be the time consuming part of this. The relay come with a harness. Follow the directions for the install with the only change being your cotroller or bar switch now go to the output of the relay vs the battery positive. The ground for your controller does not interact with the relay you added. Just the +12v power.
 

upshiftoverdrive

Junior Member
Joined
Sep 2, 2011
Messages
188
Reaction score
1
Points
18
Location
Ridgeland, SC
Visit site
In the info about the product it says it draws 2.5Amps max on high. If you buy the piggy back here, a 3.5Amp fuse and some wire, you get a switched source, a fuse protecting the wire to the controller. The controller has a fuse and worst case is starting the bike with heaters on which if doesnt start from that tiny load you have far bigger issues....

The grips in question do not turn back on when you turn the key on if they are wired to turn on and off with the key. They do have a memory function where once they are turned off with the key whilst they were still on and you turn them on again after turning the key back on, it will remember your last heat setting. Which is pretty cool. You would have to deliberately press the controller to turn them on before starting the bike. Not sure if that's what you were talking about but I thought I would throw that out there.
 

Motogiro

Vrrroooooom!
Staff member
Moderator
Elite Member
Site Supporter
Joined
May 8, 2008
Messages
15,007
Reaction score
1,178
Points
113
Location
San Diego, Ca.
Visit site
The grips in question do not turn back on when you turn the key on if they are wired to turn on and off with the key. They do have a memory function where once they are turned off with the key whilst they were still on and you turn them on again after turning the key back on, it will remember your last heat setting. Which is pretty cool. You would have to deliberately press the controller to turn them on before starting the bike. Not sure if that's what you were talking about but I thought I would throw that out there.

That's a nice control setup but since manufacturers get cheaper and cheaper with components to meet investors board room meeting to squeeze more $$ for profit it is a good idea to be safe and protect your battery if that solid state switching fails to an on state. Power relay = key off = accessory off. :)
 
Last edited:
Top