Fixing Throttle Chop, snatch, rewet, response time. Cheap!

FinalImpact

2 Da Street, Knobs R Gone
Site Supporter
Joined
Mar 16, 2011
Messages
11,137
Reaction score
184
Points
63
Location
USA, OR
Visit site
A guide on how to fix that off idle snatch! There are many complaints about off idle transition when getting back on the throttle to pull out of turn. Some would say its that little dead zone or jerk felt when getting back on the throttle which unloads the suspension upsetting the bike. This guide may help remove that throttle response issue.

Here is an option and you need to decide if its right for you. The expense is minimal and the return is great as it makes the bike a pleasure to ride. Also, it can be undone as its not permanent. That said, its not for everyone. THIS IS A GUIDE ONLY! USE YOUR BEST JUDGMENT!

BASICS:
Advance ignition timing, Add fuel via CO adjust, install AIS block off plates, install test type mid-pipe (CAT-Delete).
- Everything except the CO adjust requires basic wrenching skills.

In my case, I did each item separately over time. Each appeared to individually reduce the "off to on throttle" transition issue. However, this does not solve it 100%. It does reduce it to a point that most will be completely satisfied. Also this was a by-product of another goal which was to get better throttle response from the FZ and maybe a little more pull. These items were accomplished! :thumbup: The bikes runs great!

MOST BANG PER BUCK:
+ Advance ignition 4.0° to 5.0° // Cost = $0.00
+ Add fuel via CO adjust ~ 25 point increase. // Cost = $0.00 (stopped at 38/38)
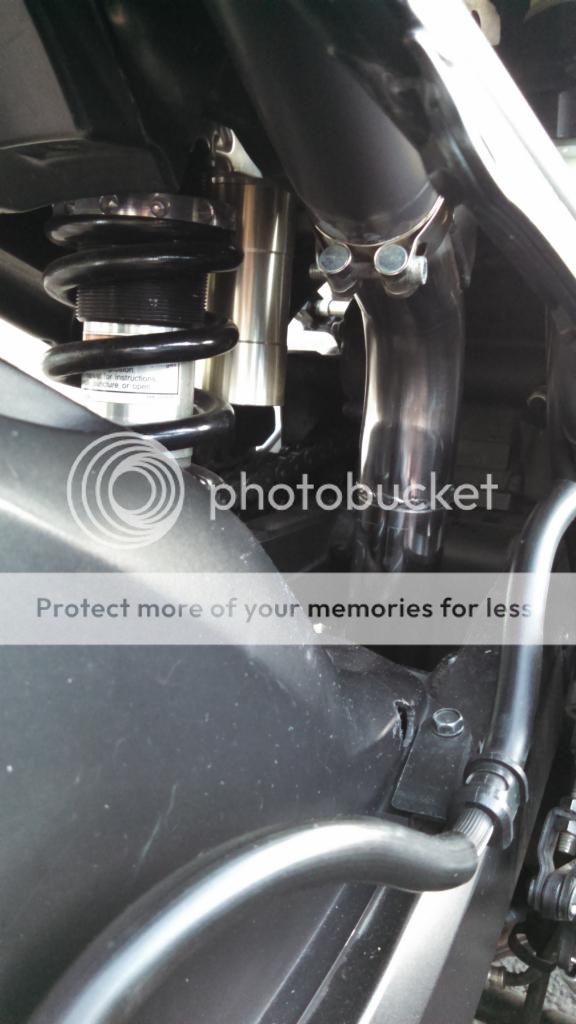
+ Install Mid-pipe / test pipe // Cost = $6.00 for SS pipe and some beer!

- Install AIS block off plates // Cost = $22.00, this is NOT required and it won't help this! It's needed for dyno runs only.
Note: Adding fuel seems like it will hurt the MPG's but if the ignition is advanced, its a wash. Instead you get great running engine.


Skills required:
- able to wrench, do basic math, measure, cut, weld, disassemble and reassemble. Although $$$ can be thrown at the welding part and you can buy an "off the shelf" CAT-Delete pipe.
- pay attention to detail!

Time required:
- depends as it could be done all at once or a piece at time.
- figure 8 hours if your slow.
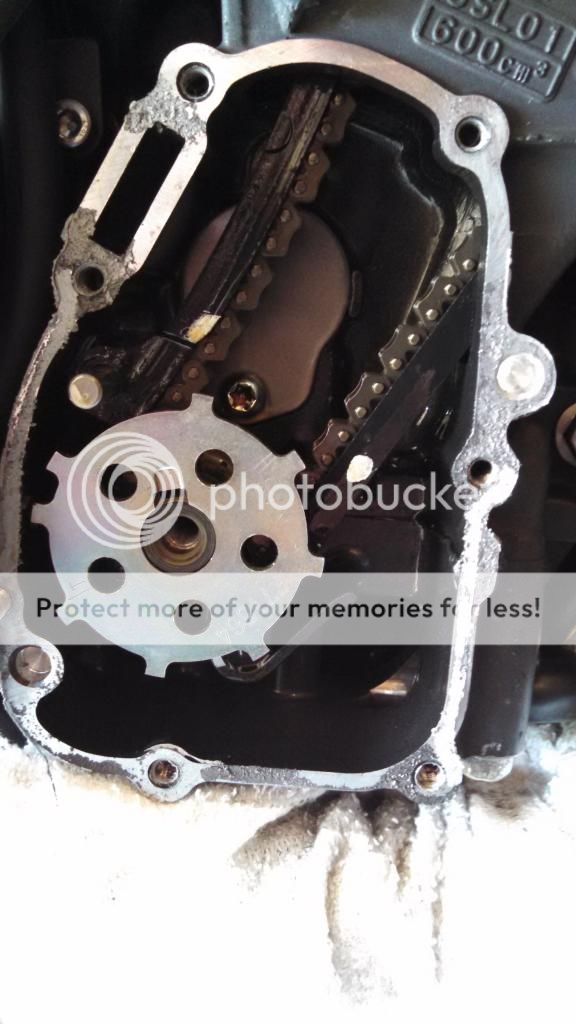
+ 1.5 hrs for trigger wheel mod and install.
+ 0.75 hr install CAT-Delete pipe (must pull tail apart).
++ to cut and weld your own pipe. TIG gun needed. 1.75" OD, 0.062" thick.
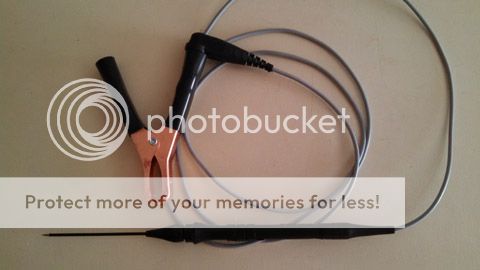
+ 0.75 hr CO mod. (lift tank, insert wire, hold buttons, record values, change values, reassemble)
+ 1.5 hr install AIS block off plates. You can buy or fab these.

Tools:
- basic tools
* Exceptions / special tools:
+ Veneer Calipers with 0.001" resolution
+ Dial indicator with 0.001" resolution (can be done with veneer calipers)
+ AIR Impact gun much easier to remove bolt at trigger wheel
+ Small Files
+ Vise
+ Patience!

Expense:
- depends on your skills and materials available.
- spare trigger wheel, although its not required unless you want to put it back.
- may work with stock muffler but I never tried. Bike has 2 bro pipes on it. I bought some SS pipe and cut out an unwanted section of the mid-pipe and welded it back together. A 12" section of 304SS 1.75" X 0.062" is required or buy a complete one and drop it in.
- AIS Block off plates (purchased)


DRAWBACKS:
- TO BENEFIT FROM ADVANCING THE IGNITION TIMING, BETTER FUEL IS REQUIRED! In the US, that means 91 octane fuel! YOU MUST RUN A HIGHER GRADE OF FUEL OR YOU WILL DESTROY THE ENGINE!
- YOU MUST COMMIT TO THIS CHOICE!

- Adding Fuel via CO adjust may require TB Sync to correct idle stability. A quick fix is to turn each sync screw counter clockwise 1/2 to 3/4 turn (4 total). The amount will vary with how much you offset the original CO values.

Application:
- Track Bikes and perhaps others....
- Bikes that currently have no driveability complaints. Fix these issues first.
- Specifically it worked well on a US deployed 2008 bike.

GUIDE:
- I'm not going to hold your hand as all of the information is on this site.
- Most will be pulled from existing threads.

08 FZ6 Condensed Build thread ~Final Impact~ * Post # 10
-> 08 FZ6 Condensed Build thread ~Final Impact~

Final Impact Winter project; playing w/trigger * Post # 10 & 19
-> Final Impact Winter project; playing w/trigger

Enable Co Adjustment USA Only (Lean / Richen) * Post # 1, 7, 13
-> Enable Co Adjustment USA Only (Lean / Richen)

My journey went like this: Trigger wheel mod, CO mod, AIS plates, and then the test pipe. The test pipe was the kicker that really woke the whole thing up. It pulls better, sounds better, has great throttle response, pulls more evenly, and of course the topic of this post!


TAGS:
Throttle Response, Throttle Transition, Re-wet, Throttle Tamer, Ignition Advance, Timing Advance, CAT-Delete, Test Pipe,

lol --> "You may add 25 tag(s) to this thread." Ya, right! Which will be modified and/or deleted by stupid software.....

EDIT LIST: 2015-03-19, typo and clarification about sync screws
 
Last edited:

FinalImpact

2 Da Street, Knobs R Gone
Site Supporter
Joined
Mar 16, 2011
Messages
11,137
Reaction score
184
Points
63
Location
USA, OR
Visit site

First off:
Remove the right side cover and using an impact gun, remove the bolt securing the trigger wheel. Its a conventional right hand thread:
IMG_20140802_174641_023_zps19c1e2b4.jpg


Now measure it and confirm your values are the same as these posted below.
If so, file the side indicated as squarely as possible. You do not want a pie shape. I suggest you measure more than you file and DO NOT NIC UP the TRIGGER! Only file the NUB! I clamped it in cardboard and locked it firmly in a bench vice.

PLEASE READ THE ENTIRE THREAD BEFORE PROCEEDING ^^ link is above ^^. This is an excerpt from that thread.

Some basic calculations:
**************************


The OD of the trigger wheel is 2.475" (outer edge of humps)
Dia * Pie/360 = In/per degree
2.4750" * 3.14159 = circumference/360 = 0.021597" per degree (OUTSIDE EDGE).

To advance 5 degrees from its original location the outside must rotate:
0.021597"/deg * 4.0 degrees = 4.0 deg = 0.0863"
0.021597"/deg * 5.0 degrees = 5.0 deg = 0.1079"
^^ YOU NEED TO KNOW THIS TO VERIFY YOUR WORK! ^^ i.e. set the finished trigger on the crank. Rotate CCW and measure to the engine case forming a 90°. Right down your number. Rotate fully CW and measure to the case forming the same 90° angle. A dial indicator is best, but veneer calipers will work.

How much to file off calculation:
**************************

To determine amount to remove I broke it into 3 sections; the hole (ID1), the slot (ID2) and the nub (ID3) to determine the diameter to solve for. This is because we have no actual center or I'd to solve for the radius.

ID1 = 0.6305" dia HOLE } measure hole w/calipers "direct"
ID2 = 0.1050" X 2 SLOT } Distance - ID1; X 2, "indirect"
ID3 = 0.1955" X 1 NUB } measure length of nub "direct"
=======================
Dia = 1.036" to the center of the nub and an equal distance opposite.
Meaning, it matters which section of the nub we solve for, inner, middle or outer edge AND we are solving for a circle or the diameter ~ the red lines.

55341d1412632359-final-imppact-winter-project-playing-w-trigger-trigger_s320-backside-solved-jpg


Apply formula:
1.036" * 3.1415/360° = 0.0090"

4.0° * 0.0090"/deg = 0.036"
4.5° * 0.0090"/deg = 0.040"
5.0° * 0.0090"/deg = 0.045"

4 deg adv: 0.197" - 0.036" = 0.161" final width
5 deg adv: 0.197" - 0.045" = 0.152" final width

Locater nub is 0.0197" wide OEM uncut. File the leading edge to obtain final thickness.


There ya go. Use a dial indicator to verify amount rotated. Weld up the unused portion once you meet your desired amount of rotation. Although I will say that I ran around for months w/out welding it up.

MOST IMPORTANT: Measure OFTEN, REMOVE LITTLE and VERIFY amount of rotation!

** THIS IS A GUIDE ONLY! ** Results will vary!

Assemble:
**************************

Clean and install trigger and bolt. Torque to 25 ft/lbs. Trans in 1st gear, rear brake applied. Use Loctite if it makes you feel better.
Clean and install RS cover. Use a new gasket if you think it needs it. Use sealant at the rubber to prevent leaks.
Tighten bolts in criss-cross pattern to torque spec.

Proceed to CO Adjustment:
**************************


Good luck!
Do acknowledge that I am NOT RESPONSIBLE for ANYTHING YOU DO TO YOUR VEHICLE!!!
 
Last edited:

FinalImpact

2 Da Street, Knobs R Gone
Site Supporter
Joined
Mar 16, 2011
Messages
11,137
Reaction score
184
Points
63
Location
USA, OR
Visit site
How - To CO Mod.... Follow the original link... Click -> CO Adjust...
Credit to:
Zanch / Krid80

1) Lift the tank and pull the main power from the top of the battery by removing this connector.
53519d1401665676-enable-co-adjustment-usa-only-lean-richen-img_20140601_143526_764-jpg


2) Pull the clear connector apart.

3) Push out rubber plug from the inside. We just need to make a one time change and preserve the integrity of the water tight connector. Insert the black plug back into the connector when done.

4) Insert test lead into socket.
53520d1401665676-enable-co-adjustment-usa-only-lean-richen-img_20140601_143548_758-jpg


5) Plug socket together. Confirm connection.

6) Reconnect main harness power. Follow process, of key on, holding and pushing buttons 8 sec etc. --> Click -> CO Adjust...
Display will reward you with dAIG and C0. Go into C0.

7) Record values C:01/C:02. Zero was displayed on the 08 for both.
53523d1401665676-enable-co-adjustment-usa-only-lean-richen-img_20140601_144814_288-jpg


8) Change values adding ~ +25 to +30 to the existing ##. So, I set the values to 25/25 later bumped it to 35. Both times the ECM responded as expected.

9) Remove probe and insert plug to keep moisture out. FWIW: PS - if you leave the plug hanging out just a little its easy to remove should you need to insert the probe or ground wire later.

TOOL:
IMG_20140601_173515_096WEB_zps527d3fce.jpg
 
Last edited:

ChanceCoats123

Junior Member
Joined
May 16, 2014
Messages
668
Reaction score
2
Points
0
Location
Chicago Suburbs
Visit site
If this post is in your way, I'll go ahead and delete it (or have a mod do so).


I've read through your guide here and the other thread about playing with the trigger and it really seems like something that would liven up my bike with just a bit of work and some time. That said, I'm a little unsure from your pictures and explanations of exactly what to file. Granted, my bike is at home where I can't get to it, and it might all become clear once I see it in person. I'm just wondering if you have a picture of your actual trigger, or a picture with a slightly different explanation. :cheer:
 

FinalImpact

2 Da Street, Knobs R Gone
Site Supporter
Joined
Mar 16, 2011
Messages
11,137
Reaction score
184
Points
63
Location
USA, OR
Visit site
Yes, once the crank bolt is off, you'll know what needs done as you'll feel the little bit of rotational free-play it has from stock parts.

You have to keep in mind you're looking at the back side of the trigger wheel and this raised nub fits into the slot in the cranks end:
55341d1412632359-final-imppact-winter-project-playing-w-trigger-trigger_s320-backside-solved-jpg


Flip it around ^^ and take into account the engine turns clockwise (CW) as viewed from the right side (pic above). So, knowing we want to "Advance it" or move it ahead in time, means the leading edge (edge parallel to the blue line), needs material removed to allow the trigger to rotate CW.

Plus if you put some calipers to nub you'll know which is which! :thumbup:

Closing thought; I ran mine for a couple months with it just filed. Meaning when the bolt is loose, you can rotate the wheel fore and aft 5.0° (its how you check your work). Once I was happy with the value, I pulled the trigger wheel and welded the nub returning it to its original thickness (had to file some too). What you remove from the leading edge, you add to the trailing edge so its snug in the cranks slot again.
Locktite held it for months so I may be fine that way.

Here is one way to check rotation: Roughly 0.100" rotation at the outer edge = 5.0°
Rotate full CCW and Zero the caliper. Then Rotate full CW and read the value.
Repeat several times to confirm its not >5.0° To far and you hurt performance plus you'll need race gas!
 

ChanceCoats123

Junior Member
Joined
May 16, 2014
Messages
668
Reaction score
2
Points
0
Location
Chicago Suburbs
Visit site
Ahhh! Seeing the back of the trigger wheel was throwing me off. That makes perfect sense now. It also makes sense how you're checking the advance as well (using radius of the trigger and finding inches per degree). This seems much easier than I picked up from my first read through. I'll have a buddy of mine put a bead on the opposite side and I'll file it smooth. That's perfectly explained! That you very much!

Edit: I always use 93 octane as is, so the fuel grade shouldn't be an issue. [emoji6]
 

rk8950

Junior Member
Joined
Aug 27, 2014
Messages
17
Reaction score
0
Points
0
Location
KY
Visit site
I did only the trigger wheel on mine and added 6 degrees. The bike is so much better behaved. It has a lot more pull down low into the mid range. It did calm down the throttle transition from off to on, was the first thing I noticed. Thanks to Finalimpact as he helped me with it a while back.
 

FinalImpact

2 Da Street, Knobs R Gone
Site Supporter
Joined
Mar 16, 2011
Messages
11,137
Reaction score
184
Points
63
Location
USA, OR
Visit site
Go ahead and finish up with the Test pipe!
I bought a 2' length of 304SS cut and welded it for $6.00. Install was a snap, pulled the 2bro back, loosened the clamps, unbolt from right side and it slips out with everything else in place. It was installed in 45".
  • One thing I will add is that I loosened the header where it bolts on at the rear and it moved about 1/4" so it was under strain for some reason. Little things like this induce vibrations into the chassis. Removing stress reduces vibrations so yet another layer of vibes are gone! So if you get nothing from any of this, aligning your exhaust will reduce vibrations. Start by removing the tail, and loosening all the clamps. Then loosen the rightside mid-pipe bolt to the chassis, and then the rear header mount to the chassis. Let it move to a natural position. Reassemble taking note that nothing should be under stress or forced into position.
I'm guessing the 04 - 06 gang will really notice a difference as the early CAT is pretty restrictive while the header lacks "PRE-CAT's" and its exit has a nice smooth radius unlike the 90° on the 07 - 09. All of these little things help performance. See pic below....

De-CAT installed:
IMG_20141003_183214_889_zpsfa78cc79.jpg


55336d1412525287-08-fz6-condensed-build-thread-final-impact-img_20141003_175156_936-jpg


AISS removal:
Not a must but I do believe it helps. With the air box off there is easy access and the bike doesn't check for the solenoid so no CEL.
53226d1400389582-08-fz6-condensed-build-thread-final-impact-dsc_7711-jpg


That sums it up.... The 07 - 09 will respond nicely w/out a fuel controller added. Just read the voltage directly from the O2 sensor and thats what the ECM is getting (I'll talk about this later). Although fueling is not optimal for max power (12.8:1) it is suitable for canyon carving now that the chop is gone and throttle response has improved!

***********************
Differences:
S1 to S2 Heade
Notice that nasty sharp angle at the O2 sensor. Futures mods will likely include an early header and shorter mid-pipe.
55895d1421036767-08-fz6-condensed-build-thread-final-impact-img_20150111_162921_158-jpg

55884d1421012735-08-fz6-condensed-build-thread-final-impact-img_20150111_131521_294-jpg


S1 vs S2 CAT / Mid-Pipe:
53707d1402330661-catless-mid-img_20140529_204643_900-jpg
 
Last edited:

FinalImpact

2 Da Street, Knobs R Gone
Site Supporter
Joined
Mar 16, 2011
Messages
11,137
Reaction score
184
Points
63
Location
USA, OR
Visit site
A friendly bump and to add that there are bene's from going back in time and using S1 headers on the S2 chassis. Its not a direct fit, but it does fit.

Work involves a pan swap (or weld) and you must be able to fit the shorter S1 mid-pipe. The bike has the S1 style hanger mount on the chassis so its a parts swap and the bike really gains throttle response and pull. Its simply unfair what the S1 folks have already! :Flip::Flip:

NOTE: Flow is improved enough, one should have a fuel controller added. It needs it!
 
Last edited:

FinalImpact

2 Da Street, Knobs R Gone
Site Supporter
Joined
Mar 16, 2011
Messages
11,137
Reaction score
184
Points
63
Location
USA, OR
Visit site
Ya gotta wonder how close they are (different ECU's) but with ONE person posting their MAP, there will be no trending... :(
 

ChanceCoats123

Junior Member
Joined
May 16, 2014
Messages
668
Reaction score
2
Points
0
Location
Chicago Suburbs
Visit site
Ya gotta wonder how close they are (different ECU's) but with ONE person posting their MAP, there will be no trending... :(
That's true, but what I'll do is compare the fuel added values from your map to the fuel added values in the Two Brothers map that I run and see if they have a general trend. If so, it might be a good starting point for tweaking my ride.
 

seansi

Junior Member
Joined
Feb 16, 2015
Messages
63
Reaction score
0
Points
0
Location
USA
Visit site
Will the CO mod work on the first gen?
Also if you if you have a power commander or a similar fuel controller you wouldn't need to do the CO mod, right?
 

FinalImpact

2 Da Street, Knobs R Gone
Site Supporter
Joined
Mar 16, 2011
Messages
11,137
Reaction score
184
Points
63
Location
USA, OR
Visit site
All true.
Well if your controller will fuel from idle up. This is the lost cost option as written. Fuel controller should work fine on an S1 with the advance mod. :thumbup:
 

ZünRob

Junior Member
Joined
Jul 29, 2010
Messages
16
Reaction score
0
Points
0
Location
Netherlands
Visit site
Love this topic and all the things invested by you FinalImpact!
My European FZ6 S2 2008 also suffers from this throttle response. The CO values were both set at zero.
I won't be advancing ignition, as I'm not technical and confident enough to do that. I also probably won't block AIS. What I've been trying is the following:
1) I set both C1 and C2 to +15. Throttle response didn't really improve. It did however run at higher temperature...
2) I uncoupled the O2 sensor: I figured it would be running in some kind of open loop which would be richter than the closed loop. This also doesn't make a huge difference.

As for 1, I don't know what exactly happens when increasing the CO values, and up to what number is safe. As for 2, I don't know what exactly happens, and if it's okay to run the bike with the O2 sensor uncoupled.
My bock is completely stock, and I don't have any plans for changing it. Perhaps I might add a PowerCommander (but I don't know if this will solve it either), but I hope to find a cheaper solution. I am looking forward to suggestions!
 
Last edited:

FinalImpact

2 Da Street, Knobs R Gone
Site Supporter
Joined
Mar 16, 2011
Messages
11,137
Reaction score
184
Points
63
Location
USA, OR
Visit site
If a fuel controller and tune are too much expense, it was the combination of all things that helped mine. So you have to commit to something more. Note: adding fuel to the point that it lopes and messes up the idle means you're getting close; get to that edge and you may feel a slight improvement. Obviously address any throttle cable slack too.

I think its laid out pretty clear. A combination of the above will yield the best results. However, the test pipe was the kicker that moved it forward. I have since added a fuel controller, reverted the CO numbers to near stock as the controller offers better resolution, and the S1 header. There is no Chop Chop now! :D

KEEP IN MIND - I was seeking a LOW cast solution. Objective was met!
 

ZünRob

Junior Member
Joined
Jul 29, 2010
Messages
16
Reaction score
0
Points
0
Location
Netherlands
Visit site
Thanks for your post. If I understand you correctly, adding a properly tuned PC5 without any of the other changes would also solve the abrupt throttle? :)
 

FinalImpact

2 Da Street, Knobs R Gone
Site Supporter
Joined
Mar 16, 2011
Messages
11,137
Reaction score
184
Points
63
Location
USA, OR
Visit site
It should help it a great deal but I can not personally comment as I don't have that model and my bike is not stock. Plus its running a different fuel controller.

Someone else will have to answer that. Hopefully in another thread as this one was created a viable low cost solution so it may not be the best place for details of this nature.
 

ZünRob

Junior Member
Joined
Jul 29, 2010
Messages
16
Reaction score
0
Points
0
Location
Netherlands
Visit site
It should help it a great deal but I can not personally comment as I don't have that model and my bike is not stock. Plus its running a different fuel controller.

Someone else will have to answer that. Hopefully in another thread as this one was created a viable low cost solution so it may not be the best place for details of this nature.

Oops, I thought I read somewhere you had a FZ6 S2 from 2008 as well, my bad! I've created a new thread with the specific question for the PC5.
Perhaps it would be even better to replace the catalytic converter, and add the PC5. :)
 

ChanceCoats123

Junior Member
Joined
May 16, 2014
Messages
668
Reaction score
2
Points
0
Location
Chicago Suburbs
Visit site
Figured I would post in this thread so everyone can have more reason to advance their timing. I had ordered a second trigger plate so I could always keep a stock trigger plate in case I wanted to go back. I filed the plate and got it installed tonight. I'm letting the thread locker set for over 24 hours, but I took it out for a quick and easy ride after about an hour of curing. This is easily the best modification I've done to the bike so far. The throttle response is spot on, and the bike revs MUCH happier. I advanced approximately 4-5 degrees and I'm VERY happy with the result. I can't wait to really get on the bike and see how she runs once the thread locker is really set up.

I couldn't remember the torque number for that retaining bolt so I went with 40 ft-lbs as it really felt like anymore was pushing it and the last thing I want is a split bolt in my crank and a parked bike.

Edit: After reading the initial post, I see that the bolt is supposed to be torqued to 25 lb/ft. I used loctite and torqued to 40 so I figure I should probably (definitely) pull that bolt and reassemble at 25 lb/ft otherwise I'll risk that bolt working it's way out, stripping threads (on the crank), or just shearing at the threads. Stupid me, I should have checked on here before just going and tightening the bolt down. I would imagine that is grade 8 hardware, no? If so, then I don't believe I torqued past the stress point, but I'd feel better if it was torqued at or closer to 25 lb/ft.

Edit 2: Just went ahead and ordered an OEM replacement flange bolt and a new cover gasket so I'll change those both when I get them in the mail and then I'll have peace of mind. :)
 
Last edited:
Top