Vibration! A cure for bad vibrations, Spark Plug Caps!!

AdamFZ

Junior Member
Joined
Aug 27, 2012
Messages
134
Reaction score
1
Points
18
Location
West Sussex, UK
Visit site
ADDITIONAL TESTING:
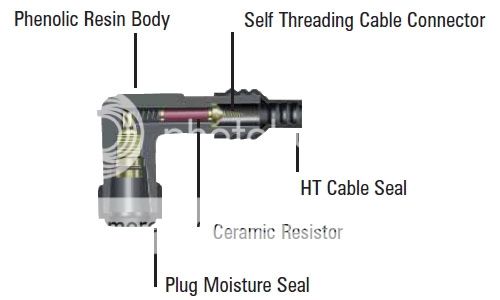
The SPC is composed of several parts which should be verified by testing and visual inspection during spark plug replacement or if they are suspect of causing a misfire or vibration. Because these connections are subject to high voltage (15,000+ volts) bad connections can burn and arc damaging components.
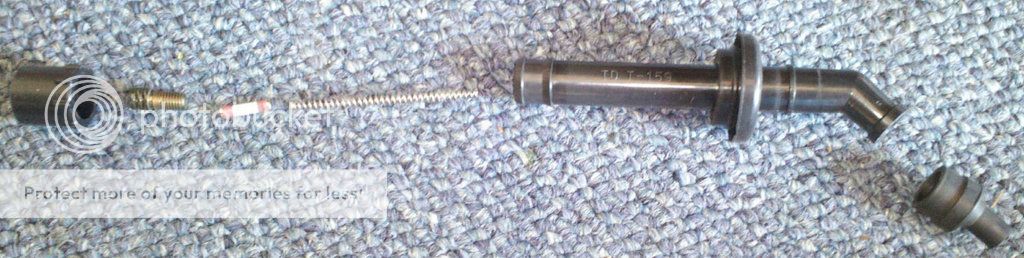
With an ohm meter set to K ohms, insert the test leads into each end of the cap. It should measure 10K ohms. Internal to the cap is a resistor, spring, plug lock, and self threading cable connector. If any of these component have corrosion, arcing, or burning, they should be replaced. Also, the FSM does not list a limit. Mine all measured 10.7 ~ 10.8K ohms.
The resistor spark plugs are supposed to measure 5.0K ohms. My used CR9EK's measured ~ 4.0K ohms each.

I've just measured my caps and 2 were 10.5k and 1 was 9.3k and one was 8.4k, is it worth replacing the lower 2 ?
 
Last edited:

FinalImpact

2 Da Street, Knobs R Gone
Site Supporter
Joined
Mar 16, 2011
Messages
11,137
Reaction score
184
Points
63
Location
USA, OR
Visit site
I've just measured my caps and 2 were 10.5k and 1 was 9.3k and one was 8.4k, is it worth replacing the lower 2 ?

You might try taking the higher value ones apart and cleaning them. If they come down to 9.X that would be better. Match up the pairs of caps - group lower values on one coil set and higher values on the other coil set.

Although the resistance is different its to limit current which reduces electrical noise emitted into the surrounding electronics. i.e. reduce the Electromagnetic interference (EMI).

Q? Were the center caps loose on the HTL?
 

MaxRyan

Junior Member
Joined
Jan 11, 2010
Messages
92
Reaction score
4
Points
0
Location
Coquitlam, BC
Visit site
Thanks OP, what a difference! I had a set of plugs sitting around for about a year but thought I would wait because I have less than 10000 miles/15000 km on my bike. After seeing this though I pulled on a wire and it fell right off! So I thought whatever I will pull the plugs too, all had some wear and were over spec on gap because of it. Anyway, every one of my plug wires pulled out of the end with very little pressure so I am very glad i looked at it. The smoothness and power delivery is so much better, to the extent that it surprised me when the front end came up under power in second. The other benefit is that my exhaust sounds better and my idle is significantly better. I say to anyone that has not checked this to do so now.
 

G0ld3nb3ar

New Member
Joined
Aug 5, 2014
Messages
2
Reaction score
0
Points
0
Location
South Delta, BC, Canada
Visit site
I am a recent add to this forum. I was searching for some information to see what the consensus was on grips, bar weights or any other solutions for eliminating the annoying vibration my FZ makes.

I bought my bike used last year with about 22,000KM. At the time, I didn't know if I was going to keep this bike or fix it up and flip it. Once I got all the issues sorted, the big one was the TPS sensor, I have been really impressed with the FZ.

I checked the spark plug caps yesterday and found two of that #1 and #3 were both a little loose. I retightened them both and treated the bike to a new set of NGK Iridium plugs. All I can say is WOW! I wished that I would have done this prior to a 2,000KM bike trip that I took two weeks ago.

The vibration that I was feeling is 90% gone. I think the plugs I pulled out could have likely been the original set on this bike. I now have just over 30,000KM on this bike.

I am glad that I came across this site and specifically this thread. It has made my bike even more of a joy to ride.

Thanks!!! :thumbup:
 

FinalImpact

2 Da Street, Knobs R Gone
Site Supporter
Joined
Mar 16, 2011
Messages
11,137
Reaction score
184
Points
63
Location
USA, OR
Visit site
<< SNIP >> So I've had the chance to ride about 50 miles so far and the amount of vibration has definitely been reduced - another success!

<< SNIP >> This spark plug cap fix solved a horrendous year long saga of buzzing for me! I was It started over a year ago when the buzzing crept in...the worst vibrations were limited to 6k to 8k rpm, and nothing before 5k. Ironically FinalImpact posted a link to this thread last year on my problem thread, but I must have resigned to live with it by that point...I was very frustrated and had checked a lot of other potential issues

http://www.600riders.com/forum/garage-mechanical-help/48537-loud-buzzing-7000rpm-up-video.html

A year ago I didn't fully grasp how the coil>spark plug>engine process worked, and I couldn't associate it with causing vibrations outside of something mechanical being broken. The harmonic nature of the vibes could have been a clue...it wasn't clunking, rattling, but vibrating.

<< SNIP >> Thanks OP, what a difference! I had a set of plugs sitting around for about a year but thought I would wait because I have less than 10000 miles/15000 km on my bike. After seeing this though I pulled on a wire and it fell right off! The smoothness and power delivery is so much better, to the extent that it surprised me when the front end came up under power in second. The other benefit is that my exhaust sounds better and my idle is significantly better. I say to anyone that has not checked this to do so now.

<< SNIP >> I checked the spark plug caps yesterday and found two of that #1 and #3 were both a little loose. I retightened them both and treated the bike to a new set of NGK Iridium plugs. All I can say is WOW! I wished that I would have done this prior to a 2,000KM bike trip that I took two weeks ago.

The vibration that I was feeling is 90% gone. I think the plugs I pulled out could have likely been the original set on this bike. I now have just over 30,000KM on this bike.

I am glad that I came across this site and specifically this thread. It has made my bike even more of a joy to ride.

Thanks!!! :thumbup:

These past few entries seem to speak volumes about what this CAN DO in terms of reducing vibrations! Thanks for the positive comments and sharing that it "DOES MAKE A DIFFERENCE!!!"
 

SandyN

Junior Member
Joined
Aug 13, 2014
Messages
114
Reaction score
1
Points
18
Location
Deneysville, South Africa
Visit site
Re: A cure for bad vibrations, spark plug caps!!

Can you give us some details? When where, what RPM, At Speed, under load, etc ??? This WILL NOT FIX - drive train vibrations like:
- dry chains / worn chains
- kinky chains / over tight chains
- out round/out of balance tires
- bent wheels

For the most part, if you have ran a couple treatments of injector cleaner, have new plugs, the spark plug caps are tight, air filter is mostly clean, and the valves are adjusted properly; this will help ALL RPM's! If your vibe is MOST prominent below 4000 RPM - Do all of this and then Sync the throttle bodies.

Other items to consider:
- Valve adjustment / compression test
- Bad coils/Bad wires
- Bad spark plug caps. Take them apart from the plugs end and examine the spring.
- Bad Gas
- Engine to the frame bolts are tight BUT the FRAME is stressed (loosen all bolts, blip starter, tighten all bolts).

Hi, when I got my bike 5 months back there was a faint buzz in the seat at about 5000-5400 rpm and a soft rumble which started at 6500. In between it is smooth as silk. The vibes started getting worse about 2 months ago so I looked for an answer, and that is how I found this Forum. :rockon:

I immediately tried your cure. The bike is a 2004 model and I got it with 11,700 km on the clock so I checked the plugs at 17,000 and discovered that they were still the original Denso plugs! These were changed with NGK's at 18,000km when I checked the leads as well. They were still tight but I spread the wires in the leads as suggested. This did not help.

Now, I must say I am a maintenance fanatic so the chain is always well lubed and has only required 1 adjustment. The engine mounting bolts are all tight. I tried a throttle body sync with an analogue vacuum gauge one cylinder at a time. For the record it does not work at idle as the needle jumps around too much but at 4000 rpm they all give the same reading. Still no difference. :( I am looking for a decent manometer and will check this again.

I am busy with the first tank doctored with injection cleaner and will see what happens after the second tank.

Gearing down and running against compression seems to aggravate the vibes.

My only hope is to carry on checking things one at a time until I find the cure.
 

FinalImpact

2 Da Street, Knobs R Gone
Site Supporter
Joined
Mar 16, 2011
Messages
11,137
Reaction score
184
Points
63
Location
USA, OR
Visit site
Re: A cure for bad vibrations, spark plug caps!!

Hi, when I got my bike 5 months back there was a faint buzz in the seat at about 5000-5400 rpm and a soft rumble which started at 6500. In between it is smooth as silk. The vibes started getting worse about 2 months ago so I looked for an answer, and that is how I found this Forum. :rockon:

I immediately tried your cure. The bike is a 2004 model and I got it with 11,700 km on the clock so I checked the plugs at 17,000 and discovered that they were still the original Denso plugs! These were changed with NGK's at 18,000km when I checked the leads as well. They were still tight but I spread the wires in the leads as suggested. This did not help.

Now, I must say I am a maintenance fanatic so the chain is always well lubed and has only required 1 adjustment. The engine mounting bolts are all tight. I tried a throttle body sync with an analogue vacuum gauge one cylinder at a time. For the record it does not work at idle as the needle jumps around too much but at 4000 rpm they all give the same reading. Still no difference. :( I am looking for a decent manometer and will check this again.

I am busy with the first tank doctored with injection cleaner and will see what happens after the second tank.

Gearing down and running against compression seems to aggravate the vibes.

My only hope is to carry on checking things one at a time until I find the cure.

What did you gap the new plug too? With the high compression ratio keeping the plug gap under 0.028 is required or it can induce misfires under load. Spec is (0.024–0.028 in) 0.6–0.7 mm

Because I don't mind inspecting more often I threw in the CR9E's which have the conventional end ground strap. Because they are NOT precious metal plugs they will wear and increase the gap so they went in at 0.027".

Have you inspected the TB to Cylinder head rubber flange for cracks or damage? Some of these are beginning to dry and crack I suspect.

Check the valve lash make sure it is in spec. If out of spec it alters cam timing and power delivery per cylinder. That's why its done before TB sync so it evens out the vacuum from the mechanical aspect (the engine is a big vacuum pump, that's what the throttle bodies see).
What are you compression numbers per cylinder? Are they within 5-10 psi?

I know some will scowl but even today, not all engine oils are equal. There 3 active members here now who dumped Mobil 1 4t as it caused extra vibes in the engine. I'm one of them.

This is abstract but have you loosened all of the exhaust hangers past the header and let it align itself? Loose the pipe clamps too, tighten the supports and then the pipe clamps last.
 

SandyN

Junior Member
Joined
Aug 13, 2014
Messages
114
Reaction score
1
Points
18
Location
Deneysville, South Africa
Visit site
Re: A cure for bad vibrations, spark plug caps!!

Thanks FI. As I've said, I am a maintenance nut; the first thing I did on the bike was to change the brake fluid within a week of owning it; I doubt it had ever been changed in 10 years. I also changed the coolant after it turned brown during a week of cold commuting temperatures (-3 to -8 degrees C).

Apparently the bike had been serviced at 10,000 km before I bought it so I changed the oil and filter at 17,000 km using Castrol Acteveo 10w40. On my previous bike I thought that vibes increased after using this oil so next time I'll try Motul 5100 and see if it makes a difference.

I have also replaced the air filter as I suspect the original one was still in.

I must still buy a decent wire gauge to check the plug gaps (CR9EK's) properly though, the electrodes are difficult to bend. The plug caps are still shiny new but I must still check their resistance.
 
Last edited:

FinalImpact

2 Da Street, Knobs R Gone
Site Supporter
Joined
Mar 16, 2011
Messages
11,137
Reaction score
184
Points
63
Location
USA, OR
Visit site
Re: A cure for bad vibrations, spark plug caps!!

Thanks FI. As I've said, I am a maintenance nut; the first thing I did on the bike was to change the brake fluid within a week of owning it; I doubt it had ever been changed in 10 years. I also changed the coolant after it turned brown during a week of cold commuting temperatures (-3 to -8 degrees C).

Apparently the bike had been serviced at 10,000 km before I bought it so I changed the oil and filter at 17,000 km using Castrol Acteveo 10w40. On my previous bike I thought that vibes increased after using this oil so next time I'll try Motul 5100 and see if it makes a difference.

I have also replaced the air filter as I suspect the original one was still in.

I must still buy a decent wire gauge to check the plug gaps (CR9EK's) properly though, the electrodes are difficult to bend. The plug caps are still shiny new but I must still check their resistance.

Just a reminder: even after trimming the high tension leads I had one loosen in just 2000 miles (3.2Km) so it never hurts to recheck them.
Also - if you install new plugs I personally would opt for the conventional end strap of either a precious metal plug or carbon like CR9E NO "K". Plus they're cheaper, easy to gap, and its the only way the non-carbon plugs come.
Plugs are burning clean, perhaps a tad lean...
54700d1408318486-final-imppact-winter-project-playing-w-trigger-img_20140817_-4-jpg
 

SandyN

Junior Member
Joined
Aug 13, 2014
Messages
114
Reaction score
1
Points
18
Location
Deneysville, South Africa
Visit site
Re: A cure for bad vibrations, spark plug caps!!

Bought myself a multimeter and pulled all the plugs and SPC's again on Sunday. All the connectors were within spec - 9.7 to 10.3 ohms, the plugs were all just over 4.0 ohms.

Made myself an electrode bender from an old screwdriver cutting a slot with a hacksaw and reset all the gaps to a tight 0.63mm. No. 3 plug looked a little wet in comparison to the others, possibly because the gap was way too big.

The vibration is still there. My weekend project is to build a manometer as per FJ1300 specs and check the throttle body sync properly. Will see what happens.
 
Last edited:

FinalImpact

2 Da Street, Knobs R Gone
Site Supporter
Joined
Mar 16, 2011
Messages
11,137
Reaction score
184
Points
63
Location
USA, OR
Visit site
Re: A cure for bad vibrations, spark plug caps!!

Bought myself a multimeter and pulled all the plugs and SPC's again on Sunday. All the connectors were within spec - 9.7 to 10.3 ohms, the plugs were all just over 4.0 ohms.

Made myself an electrode bender from an old screwdriver cutting a slot with a hacksaw and reset all the gaps to a tight 0.63mm. No. 3 plug looked a little wet in comparison to the others, possibly because the gap was way too big.

The vibration is still there. My weekend project is to build a manometer as per FJ1300 specs and check the throttle body sync properly. Will see what happens.

You meant:
<<SNIP>> within spec - 9.7K to 10.3K ohms, the plugs were all just over 4.0 K ohms.

If you have a dial type vacuum gauge you could look at each sync port for stability. That is, move the vacuum gauge to each port and verify they all fluctuate about the same amount (they may read a different value). This would be a good indication of "valve timing" being similar from cylinder to cylinder showing that each can do the same amount of work if the timing event match.

Each cylinder is a big pump. Each should pull the same vacuum and/or fluctuate about the same amount regardless of sync. If you see no fluctuations, increase the size of the restrictor orifice until the needle dances. Then track the difference.

Again - don't exclude a Compression Check if you've been chasing this vibration for a while! It may indicate you need to knuckle down and perform a valve lash adjustment (replace shims), to balance out the engine mechanically. i.e. Its like having a 4 person choir with 2 people out of note.

I used a vacuum gauge to spot check mine... Fluid dampened gauges really slow it down when the signal is strong.
picture.php
 

SandyN

Junior Member
Joined
Aug 13, 2014
Messages
114
Reaction score
1
Points
18
Location
Deneysville, South Africa
Visit site
Yesterday I bought some 6mm OD clear tubing, 2 "T" connectors, 2 "L" connectors and 4 straight connectors from a Pet Shop and built a manometer for about $4. This I mounted on to a piece of 10mm ply into which I routed 6mm slots and siliconed the tubing into the slots. I filled the tubes to the 1/2 way mark with ATF. (photo was taken before ATF was added)

View attachment 54780

After attaching all tubing and starting the bike it was immediately obvious the no.4 was a problem as the fluid was rapidly making it's way up the tube. I switched off and turned the adjusting screw a full turn out. I started the motor again ready to make immediate adjustments to no. 4 which required a 1/2 turn in to stabilize the levels before the fine tuning could commence.

I hit a glitch when one of the connectors at the bottom started letting air into the system, throwing the readings out, and had to rectify this by applying silicone to the joints. :(

From there on it was easy provided you understand which cylinder requires less or more suction to balance things out. I was able to get the levels reasonably equal and to stay reasonably equal when revved up to 4000rpm after 3 or 4 attempts.

On the test ride the motor immediately felt smoother (one wonders how much of this is psychological!!) but although the tickle through the saddle was still there at 5200rpm it seemed to be less, the motor was super smooth from 5800 to 6400 before the rumble through the foot pegs is felt which transfers to the bars at 8000.

All in all, I am very satisfied with what was achieved.:)

The compression and valve check can wait for later.
 

FinalImpact

2 Da Street, Knobs R Gone
Site Supporter
Joined
Mar 16, 2011
Messages
11,137
Reaction score
184
Points
63
Location
USA, OR
Visit site
Anyone wanting to try I new lube here is an option. I'll give it free bump as its the first product used which removed a layer of drivetrain vibrations.

Its holding on at 425 miles traveled and just starting to disappear from the rollers.
From: DUMONDE Tech, BHP Chain Lubrication & O-Ring Conditioner
http://www.600riders.com/forum/prod...bhp-chain-lubrication-o-ring-conditioner.html

Forewarning - I need more miles before making a statement about long term durability but in the interim I have this to share.

If you have done everything in your power to reduce vibrations like:
* New plugs of proper gap 0.028" max
* Trimmed Spark Plug wires at the caps insertion point
* Engine oil is fresh
* Valve adjust & TB sync
* Rear wheel is properly aligned (sprocket) and tires balanced & true

As a final measure, try this product!
DUMONDE Tech, BHP Chain Lubrication & O-Ring Conditioner

Pros:
+ Drive Chain vibration has been neutralized to ZERO!
+ It feels like free horsepower!!! Never before I have seen a lube that had this effect!
+ Its in a squeeze bottle. It goes where you put it.
+ It smells good when it burns on the header! lol (Excess application)

Cons:
- Its easy to apply too much from the manufactures bottle.
- In excess, it runs off chain and swing arm.

Thoughts:
Transfer it to a smaller container with tip allowing better control of volume dispensed.
I'll post again with a follow up regarding durability and miles before applying, dirt cling and all that. Its currently at 180 miles.

Filler comments:
I'd really like to say my bike is vibration free and runs like a top (it does), but when this chain lube removed an invisible layer of vibrations that I assumed to be inherent in the bike - I was shocked and impressed!!! If it goes 300 running as smooth (vibration free) I'll be sold. If its still hanging on at 400 miles its WIN over all products I've tried to date!

FWIW: I've been using the "top rated/reviewed" spray lubes which all failed to go an honest 300 miles without succumbing to noise, vibrations, and the obvious "dry chain" indicating they don't stand a prayer of going 500 miles. So after every product is gone, I try something new in hopes it will hold up better.
Again, I was shocked to find a product which really removed another layer of vibrations! Its like coasting in a car now with no perceivable change from power applied to coasting. Its just smooth and queit!

It looks like this!
54630d1407816024-rpm-idle-warm-hot-img_20140809_164505_671-jpg
 

FinalImpact

2 Da Street, Knobs R Gone
Site Supporter
Joined
Mar 16, 2011
Messages
11,137
Reaction score
184
Points
63
Location
USA, OR
Visit site
lol - my bike sure love me... Pulled the caps again. #3 loose this time. But I needed to inspect the plugs anyways!

PS - Ziptied the boot to the wire as my theory is the twisted wire "wants to UNSCREW itself" This time it has to loosen the whole boot on the cap. ODO is 19,9XX! Lets see how long this lasts!
 

FinalImpact

2 Da Street, Knobs R Gone
Site Supporter
Joined
Mar 16, 2011
Messages
11,137
Reaction score
184
Points
63
Location
USA, OR
Visit site
Re: A cure for bad vibrations, spark plug caps!!

90% is from the right side and no need to lift the tank or pull the air box. The caps are very tight coming out as they are long and hit the frame but they do come out.

Remove two bolts and allow radiator to settle....


Remove TWo Bolts and allow Radiator to settle for Access:
IMG_20140916_182001_128WEB_zps7ff26abf.jpg


Don't let this mount poke into the Radiators core! Blue arrow!
IMG_20140916_182027_574WEB_zps9abf2b92.jpg


These TWO bolts out and there is plenty of room:
IMG_20140916_182334_833WEB_zpsf3c8becc.jpg

Added some pictures... to beginning of thread.
 

Koissu

Junior Member
Joined
Oct 20, 2014
Messages
121
Reaction score
1
Points
18
Location
Northfield, VT
Visit site
I've got pretty heavy vibrations under my ass when I get above 6k rpm and it increases as they rpms increase. I may have to take a peak at this and inspect my spark plugs at the same time.

This is my first bike so it'll be a good learning experience..most of my mods have been on the aesthetic side, good to learn some basic maintenance! I've got an '04 with 7500 miles that I bought with 7000 miles, so according to the maintenance chart it would be worth looking at them. Might make the switch to the iridiums based on another thread..
 

Koissu

Junior Member
Joined
Oct 20, 2014
Messages
121
Reaction score
1
Points
18
Location
Northfield, VT
Visit site
So I pulled out #4 just to take a gander, can you confirm this for me (I'm a visual learner..)

In my attached picture, does the red arrow point to the HTL wire that I hold, and the orange arrow point to the cap that I spin clockwise (to tighten)?

Is the other picture the end of the HTL wire (the one the red arrow points to?) that is within the cap?
 
Last edited:

FinalImpact

2 Da Street, Knobs R Gone
Site Supporter
Joined
Mar 16, 2011
Messages
11,137
Reaction score
184
Points
63
Location
USA, OR
Visit site
So I pulled out #4 just to take a gander, can you confirm this for me (I'm a visual learner..)

In my attached picture, does the red arrow point to the HTL wire that I hold, and the orange arrow point to the cap that I spin clockwise (to tighten)?

Is the other picture the end of the HTL wire (the one the red arrow points to?) that is within the cap?

Red arrow yes. Cap arrow seems to be pointed at cap boot vs cap body. NOTE: boot is not identified in drawing below, but is show in 2nd pic down removed and far right.
YOU HAVE to PULL THE LONG SPC Assembly from the head and spin the WHOLE assembly.

Spark Plug Cap (SPC) Drawing:
2NGKPhenolic-resin-spark-plug-cap_zpsfbc4aed7.jpg%7Eoriginal


Actual components internal to cap:
Note: use a flat head screw driver to remove the locking insert.
3SPCExplodedView_zpsca1dcd90.jpg%7Eoriginal


The wires comes from the coil(s) and thread into the the phenolic body.
The two rubber boots simply help seal out moisture. Placing a Ziptie around the one has shown to reduce it from coming loose a second time.
 

Koissu

Junior Member
Joined
Oct 20, 2014
Messages
121
Reaction score
1
Points
18
Location
Northfield, VT
Visit site
Red arrow yes. Cap arrow seems to be pointed at cap boot vs cap body. NOTE: boot is not identified in drawing below, but is show in 2nd pic down removed and far right.
YOU HAVE to PULL THE LONG SPC Assembly from the head and spin the WHOLE assembly.

Spark Plug Cap (SPC) Drawing:
2NGKPhenolic-resin-spark-plug-cap_zpsfbc4aed7.jpg%7Eoriginal


Actual components internal to cap:
Note: use a flat head screw driver to remove the locking insert.
3SPCExplodedView_zpsca1dcd90.jpg%7Eoriginal

I'm not sure what 'YOU HAVE to PULL THE LONG SPC Assembly from the head ' means. The spark plug head? if so, I did do that. Am I spinning the whole assembly, grasping the PRB? Sorry - I just don't want to go twisting the wrong thing..

Edit: Found this earlier in the thread. Third time through is the charm. '3. You won't be able to actually grab the STCC, you'll need to grab the HTL with one hand, and spin the resin body clockwise on the wire.'
 
Last edited:
Top