Hayabusafiend
Junior Member
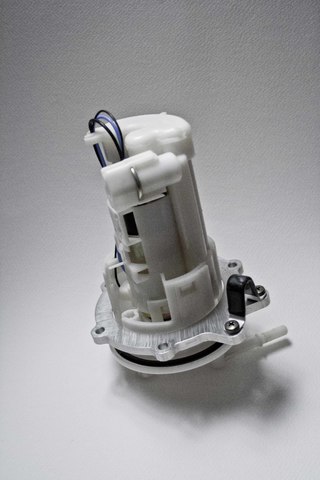
The dreaded fuel pump failed on my 2004 FZ6. The replacement assembly 5VX-13907-01 is a stunning $650.
I found some thread posts about using the R6 pump assembly but none specified which *year* R6. I believe I can swap the pump out of the assembly, or move the fuel level float.
Ideas?
Edit #1: I bought the correct fuel pump assembly (5VX-13907-01) from Fazil.
Edit #2: In the meantime, here's the reverse electrolysis I'm using to remove the red rust. I consider Kreem, POR-15, or any other coating as a temporary repair. Moving text from page 3 to this first post.
Edit #3 May 30 2013: The used pump Fazil sold me is defective. (I'm not mad at Fazil. There's no way he could have known). A new pump has the bike running flawlessly. I was really hoping the dealer tech troubleshooting was wrong and it wouldn't cost me $800 (pump+install) or Fazil a pump. I'm headed to the dealer now to pick up the FZ6 and ride it home.
I will be doing reverse electrolysis to remove the red rust which accumulated from sitting 5 years 1/4 full of fuel. I have successfully used reverse electrolysis before on Honda Sabre tanks that were left sitting for 15 years partially full.
Reverse electrolysis procedure from FuelSystem/FuelTankRust - SabMagFAQ that I've used:
Jason’s de-rusting method
Hi all, I've gotten a few requests for the magical gas tank derusting process. Wonder if it deserves space in the faq?
You need:
1 rusty gas tank
1 small container of sodium carbonate (aka soda ash or PH+ for pool/spa), chemical compound Na2CO3
1 4-amp or better battery charger
1 sacrificial steel bolt approx 3/8 x 1.5. *DO NOT USE A STAINLESS BOLT*
1 short length of copper wire, ~12 awg
1 qt naptha
1 qt denatured alcohol
1 sock
1 handful of nuts and bolts
Empty out all the gas, take out the petco ck and remove the fuel cap. Remove any old fuel residue and varnish with a good rinse of naptha, make it petroleum free and then drain / dry. Using a sock with a handful of small nuts/washers etc, add a little water and shake this all around inside the gas tank to loosen the big chunks, rinse with clear water scrub well. In a decent pail (not oil drain bucket), dissolve some of the sodium carbonate in water, 1/3 cup for say a Magna, ½ cup for a Sabre in a gallon of clear water, when its dissolved all the way stir it a bit more!
Seal up all ports except the filler cap opening on top. Pour in the well stirred 1 gallon mix using a funnel. Fill the tank right to the top with water. Set the tank so that the cap opening is the highest part, burp out as much air as possible and keep the tank full for the process. Some water will evaporate. Keep the tank topped off with water.
Wrap a half dozen or so turns of the wire around the bolt to hold it secure, twist it tight so the bolt won't fall off. Attach the (-) lead of the battery charger to the outer shell of the tank, attach the (+) to the other end of the copper wire or the sacrificial bolt, suspend the bolt in the solution. The bolt SHOULD NOT touch the tank! Turn on the battery charger to a fairly high rate, an amp or two flowing is good, then wait.
Time to process is ~48 hours and it won't overdo itself. The longer you wait, the more red rust gets removed.
The steel bolt gets nasty after a day, I cleaned mine now and again to remove the crud but not sure it helps. After a couple days, remove the leads, discard the bolt, save the wire, drain and rinse the tank well, drag out that sock and slosh it all around to remove any loose material. Rinse a few more times until the rinse water seems clean, shake well and then use a lot of alcohol to absorb the remaining water.
Once the tank is dry, you're all set to put it back into service. More coating not required.
Science: The process by which rust forms is electrochemical in nature so this method employs a reverse current flow in an alkaline bath at a higher voltage to reverse the process at a quicker rate. There are actually two forms of rust: iron III oxide (red oxide Fe2O3) and iron II, III oxide (black oxide (Fe3O4)(FeO)). Black oxide is a smaller molecule. The electrolytic process converts red rust to black rust and in the process the black rust becomes weakly bonded to the base metal. The black rust that takes the place of the red rust can be easily wiped, washed, or brushed off leaving rust free base metal. Any pitting that has occurred will remain, this method will not repair damage, but the pits will be rust free.
This is an alkali process and not acid, so you don't have a lot of pits in the steel filled with stray hydrogen ions which would just love to start rusting immediately instead of a much less active coating of black oxide.
Theoretical:

Here are pictures of me actually doing it (rubber stopper used to plug fill hole):

Tank innards before any work done:

Tank innards after MECHANICAL cleaning with a handful of bolts:

Rusty sacrificial anode after 6 hours:

14 days later, sacrificial anode after a 12 hour cycle. Note how little red rust is accumulating. This indicates the tank is nearly void of red rust.

Final result after 14 days of reverse electrolysis:

After replacing the failed fuel pump with a used one from Fazil, the bike only runs for a few seconds before stalling. All 4 exhaust headers get hot, so I suspect fuel delivery. Forum members recommending testing the injectors. Fuel injection rail after the airbox is removed.

Use vice grips and a screwdriver to remove these extremely tight screws. A FOURTH screw is horizontal and covered by an aluminum tube. You can see it at my pinkie finger.

Fuel injection test jig. 30 PSI air. Fuel hose filled with water. 12VDC switched power source on the yellow/black wires. I thought the #1 injector was fouled. It was actually perfectly fine like all the others. Each has 4 injector holes and they atomize the water nicely.

I found some thread posts about using the R6 pump assembly but none specified which *year* R6. I believe I can swap the pump out of the assembly, or move the fuel level float.
Ideas?
Edit #1: I bought the correct fuel pump assembly (5VX-13907-01) from Fazil.
Edit #2: In the meantime, here's the reverse electrolysis I'm using to remove the red rust. I consider Kreem, POR-15, or any other coating as a temporary repair. Moving text from page 3 to this first post.
Edit #3 May 30 2013: The used pump Fazil sold me is defective. (I'm not mad at Fazil. There's no way he could have known). A new pump has the bike running flawlessly. I was really hoping the dealer tech troubleshooting was wrong and it wouldn't cost me $800 (pump+install) or Fazil a pump. I'm headed to the dealer now to pick up the FZ6 and ride it home.
I will be doing reverse electrolysis to remove the red rust which accumulated from sitting 5 years 1/4 full of fuel. I have successfully used reverse electrolysis before on Honda Sabre tanks that were left sitting for 15 years partially full.
Reverse electrolysis procedure from FuelSystem/FuelTankRust - SabMagFAQ that I've used:
Jason’s de-rusting method
Hi all, I've gotten a few requests for the magical gas tank derusting process. Wonder if it deserves space in the faq?
You need:
1 rusty gas tank
1 small container of sodium carbonate (aka soda ash or PH+ for pool/spa), chemical compound Na2CO3
1 4-amp or better battery charger
1 sacrificial steel bolt approx 3/8 x 1.5. *DO NOT USE A STAINLESS BOLT*
1 short length of copper wire, ~12 awg
1 qt naptha
1 qt denatured alcohol
1 sock
1 handful of nuts and bolts
Empty out all the gas, take out the petco ck and remove the fuel cap. Remove any old fuel residue and varnish with a good rinse of naptha, make it petroleum free and then drain / dry. Using a sock with a handful of small nuts/washers etc, add a little water and shake this all around inside the gas tank to loosen the big chunks, rinse with clear water scrub well. In a decent pail (not oil drain bucket), dissolve some of the sodium carbonate in water, 1/3 cup for say a Magna, ½ cup for a Sabre in a gallon of clear water, when its dissolved all the way stir it a bit more!
Seal up all ports except the filler cap opening on top. Pour in the well stirred 1 gallon mix using a funnel. Fill the tank right to the top with water. Set the tank so that the cap opening is the highest part, burp out as much air as possible and keep the tank full for the process. Some water will evaporate. Keep the tank topped off with water.
Wrap a half dozen or so turns of the wire around the bolt to hold it secure, twist it tight so the bolt won't fall off. Attach the (-) lead of the battery charger to the outer shell of the tank, attach the (+) to the other end of the copper wire or the sacrificial bolt, suspend the bolt in the solution. The bolt SHOULD NOT touch the tank! Turn on the battery charger to a fairly high rate, an amp or two flowing is good, then wait.
Time to process is ~48 hours and it won't overdo itself. The longer you wait, the more red rust gets removed.
The steel bolt gets nasty after a day, I cleaned mine now and again to remove the crud but not sure it helps. After a couple days, remove the leads, discard the bolt, save the wire, drain and rinse the tank well, drag out that sock and slosh it all around to remove any loose material. Rinse a few more times until the rinse water seems clean, shake well and then use a lot of alcohol to absorb the remaining water.
Once the tank is dry, you're all set to put it back into service. More coating not required.
Science: The process by which rust forms is electrochemical in nature so this method employs a reverse current flow in an alkaline bath at a higher voltage to reverse the process at a quicker rate. There are actually two forms of rust: iron III oxide (red oxide Fe2O3) and iron II, III oxide (black oxide (Fe3O4)(FeO)). Black oxide is a smaller molecule. The electrolytic process converts red rust to black rust and in the process the black rust becomes weakly bonded to the base metal. The black rust that takes the place of the red rust can be easily wiped, washed, or brushed off leaving rust free base metal. Any pitting that has occurred will remain, this method will not repair damage, but the pits will be rust free.
This is an alkali process and not acid, so you don't have a lot of pits in the steel filled with stray hydrogen ions which would just love to start rusting immediately instead of a much less active coating of black oxide.
Theoretical:
Here are pictures of me actually doing it (rubber stopper used to plug fill hole):
Tank innards before any work done:
Tank innards after MECHANICAL cleaning with a handful of bolts:
Rusty sacrificial anode after 6 hours:
14 days later, sacrificial anode after a 12 hour cycle. Note how little red rust is accumulating. This indicates the tank is nearly void of red rust.
Final result after 14 days of reverse electrolysis:
After replacing the failed fuel pump with a used one from Fazil, the bike only runs for a few seconds before stalling. All 4 exhaust headers get hot, so I suspect fuel delivery. Forum members recommending testing the injectors. Fuel injection rail after the airbox is removed.
Use vice grips and a screwdriver to remove these extremely tight screws. A FOURTH screw is horizontal and covered by an aluminum tube. You can see it at my pinkie finger.
Fuel injection test jig. 30 PSI air. Fuel hose filled with water. 12VDC switched power source on the yellow/black wires. I thought the #1 injector was fouled. It was actually perfectly fine like all the others. Each has 4 injector holes and they atomize the water nicely.
Last edited: