bigborer
Site Supporter
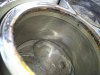
Here is what remained after filtering the oil through the paper coffee filter- some black, maybe plastic particles, and some silver and golden metal particles. I've also gutted the oil filter and it looked very similar. The oil had about 1500km.
I've never inspected the insides of an oil filter, so I don't know it that is normal or not.
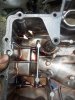
Next things I'll remove and check:
-clutch
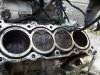
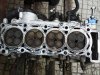
-oil pan
-engine head
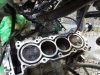
Hopefully it will be able to check for any unusual play at the piston rods from down under, where oil pan is.
I've never inspected the insides of an oil filter, so I don't know it that is normal or not.
Next things I'll remove and check:
-clutch
-oil pan
-engine head
Hopefully it will be able to check for any unusual play at the piston rods from down under, where oil pan is.
") ) .
) .