Rear Brake Super Soft After Wheel Removal & Brake Work

FinalImpact

2 Da Street, Knobs R Gone
Site Supporter
Joined
Mar 16, 2011
Messages
11,137
Reaction score
184
Points
63
Location
USA, OR
Visit site
Re: Rear Brake Super Soft After Wheel Removal & Brake Work

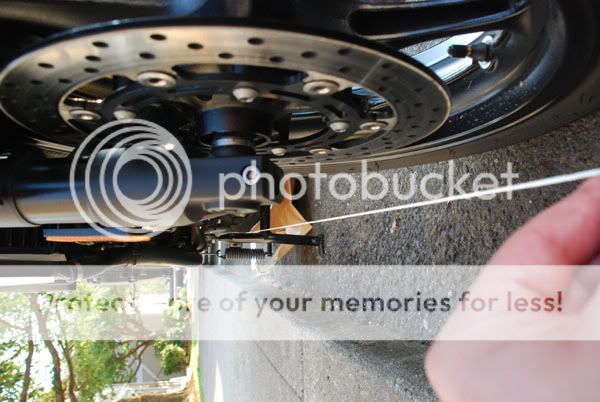
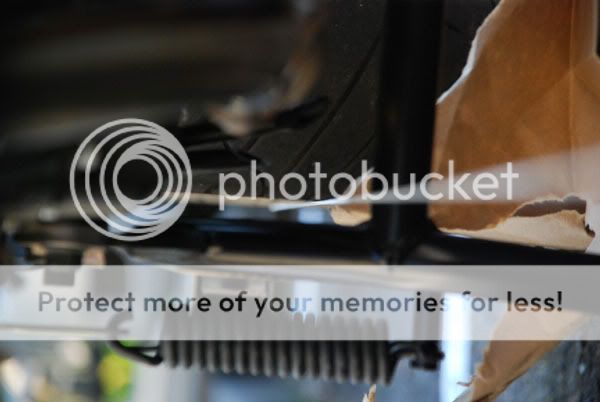
^^Where this bolt goes into the main brake bracket assembly....^^If the bolt does not pass through that hole and bottoms out in the hole it would c0ck the caliper in the main brake bracket when threaded in. Could this hole have crap in it? The end of that bolt should not bind in that hole and should either pass through it (if not a blind hole) or be able to pass to full depth of the hole. I don't see a washer or spacer in the diagram that would limit the thread travel of the bolt at the head. If there was a spacer/washer it would not allow the bolt to travel as deep. When the bolt is in the hole the problem occurs.... :)

Thats what I've been hinting at; dig all the grease and and make certain the caliper floats and centers over the rotor before putting pads in it.

- either it can't float / too much grease in that ^^ hole!
- brackets bent
- wheel is not aligned

Hydraulic lock induced by grease.. .. ..
 

durty3

2004 Yamaha FZ6
Joined
Apr 21, 2014
Messages
39
Reaction score
0
Points
0
Location
Chicago
Visit site
Re: Rear Brake Super Soft After Wheel Removal & Brake Work

Thats what I've been hinting at; dig all the grease and and make certain the caliper floats and centers over the rotor before putting pads in it.

- either it can't float / too much grease in that ^^ hole!
- brackets bent
- wheel is not aligned

Hydraulic lock induced by grease.. .. ..

The picture above was actually intended to show the majority of the bolt, however it is not fully seated. If I push the bolt in, it will bottom out in the hole and seems quite happy.

As far as cleaning grease from that hole, short of getting out a pipe cleaner, that hole is clean as a whistle, see below.
06329933d6da393a9a85607253fab788.jpg


Really pointing towards misalignment of the wheel and rotor!
 

TownsendsFJR1300

2007 FZ6
Site Supporter
Joined
Feb 7, 2009
Messages
12,538
Reaction score
1,185
Points
113
Location
Cape Coral, Florida, USA
Visit site
Re: Rear Brake Super Soft After Wheel Removal & Brake Work

Just a basic side note I forgot about.

Before you tighten the axle, get the rear brake pumped up AND APPLIED, THEN torque the axle.

That helps get the pads nice and flat to the rotor.
 

durty3

2004 Yamaha FZ6
Joined
Apr 21, 2014
Messages
39
Reaction score
0
Points
0
Location
Chicago
Visit site
Well it finally happened, thanks to all of your help!

Last night I went back to the bike and took a measurement at the rear wheel. Approximately 7/8" at the rear of the rotor to swingarm, but about 1 1/8" at the front of the rotor--bad alignment! I immediately loosened the adjusters and crudely twisted the wheel in the direction that should correct the alignment and boom! Firm pedal!

OK, first time aligning the rear wheel was a definite bust. So I went to grab my string and realized--damn--it's not there, I left it at home. It was late, we were tired and so we didn't get to align the rear wheel.

Hopefully I will get everything aligned in the next couple of days and be riding by memorial day! I am going to print FinalImpact's instructions to have in the garage with me when I do it.

Thanks again and a final update to come after it's aligned and riding!
 

FinalImpact

2 Da Street, Knobs R Gone
Site Supporter
Joined
Mar 16, 2011
Messages
11,137
Reaction score
184
Points
63
Location
USA, OR
Visit site
So for a wheel change, why did the adjusters get moved?
Glad you found the source!
 

durty3

2004 Yamaha FZ6
Joined
Apr 21, 2014
Messages
39
Reaction score
0
Points
0
Location
Chicago
Visit site
Great question ^^^^!

Obviously, in the future, don't touch the adjusters. If the chain is adjusted to spec's, there's plenty
of room to remove the wheel. .

That's why I dismissed chain / wheel alignment, it was fine BEFORE. ......

I can only say I am an idiot for touching the chain adjusters to remove the wheel. Although, the front wheel was scalloped, so maybe it needed an adjustment anyway!


Sent from my iPhone using Tapatalk
 

Monica A

Junior Member
Joined
Feb 1, 2012
Messages
567
Reaction score
5
Points
0
Location
Reno, NV
Visit site
Well it finally happened, thanks to all of your help!

Last night I went back to the bike and took a measurement at the rear wheel. Approximately 7/8" at the rear of the rotor to swingarm, but about 1 1/8" at the front of the rotor--bad alignment! I immediately loosened the adjusters and crudely twisted the wheel in the direction that should correct the alignment and boom! Firm pedal!

OK, first time aligning the rear wheel was a definite bust. So I went to grab my string and realized--damn--it's not there, I left it at home. It was late, we were tired and so we didn't get to align the rear wheel.

Hopefully I will get everything aligned in the next couple of days and be riding by memorial day! I am going to print FinalImpact's instructions to have in the garage with me when I do it.

Thanks again and a final update to come after it's aligned and riding!

Congrats!!!! Good perseverance and problem solving (sorry, I'm a teacher). In my class when someone makes a mistake (including me), we say, "It's cool". So, it's cool. The important thing is you learned from this experience. Now, keep the rubber side down and throttle on.
 

FinalImpact

2 Da Street, Knobs R Gone
Site Supporter
Joined
Mar 16, 2011
Messages
11,137
Reaction score
184
Points
63
Location
USA, OR
Visit site
Here is the link. The process will get you pretty close.

How-To: String-align-your-rear-wheel.. .. ..


<<PASTE>>
After a 200 mile ride I saw a consistent contact pattern on my chain rollers that indicated the rear wheel was not centered as perfect as I thought it was (see picture below). According to the contact pattern on the chain, it showed that there was not equal loading across rollers surface. This made me question if the rear wheel was aligned properly. Previously I'd used the hash marks at the adjuster and some veneer calipers to measure from the wheels edge to the swing arm on both sides. The marks were on and the calipers showed an equal distance to the swing arm. Sadly, this doesn't mean the wheel is aligned to the bikes frame and front wheel.

There is an explanation for the pattern shown. Because the chain pulls from the top of the rear sprocket and the greater contact patch is on the left outer edge, it implies the rear hub may be turned to the right. Because I'd taken a good deal of time to get it right the last time, I needed another way to verify if the rear wheel was aligned to the chassis properly.


Take a look:
DSC_4255chainpattern.jpg


Because the chain gave me hint, lets find another way to check the rear wheels alignment.
oh that's about 550 miles since last cleaning and lube and it is due right now. Luckily, dirty chains tell stories! :)


HOW TO STRING ALIGN YOUR REAR WHEEL!!
  • You need tape, A piece of string twice as long as the bike, and ruler/tape measure or set of veneer calipers.
  • Center stand the bike and point the front wheel dead ahead.
  • From the seat and the front of the bike, confirm the bars and head are straight.
  • With a large chunk of tape, find the center of your string and tape the string to the rear tire at about 5-O'clock position as viewed from the right side of the bike. The string will go around the back of the tire and both ends will head to the front of the bike through the center stand.
  • Now pull the string towards the bikes front disc (rotor) avoiding touching the center stand (rotate rear wheel to achieve a nice working height). The goal here is to watch the string as it just "barely" touches the leading edge of the rear tire. Do this by moving the string closer and further from the front disc and just as the string touches the leading edge of the tire, you have a straight line revealing the thrust angle of the rear tire.
  • Notice the distance between the disc and the string. Measure the distance and write it down on paper. If you have veneer calipers, flip them over and use the long slide to measure with.
  • Repeat on the other side and compare the values recorded
  • Hint: When holding the sting taunt, flick it with you finger. If the long section ahead of the rear tire vibrates but the section within the tires rim does not, you likely have the string too close and are bending it slightly. Pull the string outward away from the bike and flick it again. You want to just barely make contact but not so much as to bend the string around the tires edge.
  • If the rear wheel is properly centered, the strings distance from the front wheels discs will be the same on both sides. Take your measurement directly under the Axle bolt. This way if the head is turned a small amount it will have the least effect on your measurement. Take three readings on each side to confirm you get the same value each time!
  • If the two sides show a different distance, loosen the axle nut and make a small adjustment until chain has the proper slack AND the angle is corrected. Tighten the axle nut!
  • A greater value on the right means you need to move the rear wheel left. A greater value on the left, means you need to move the rear wheel right. The width of one hash mark is allot. A minor adjust of 1/2 the width of the hash mark can make a change of an 1" (inch) at the front wheel 56 inches away!
  • Once adjusted, Repeat string measurement being certain to center the bars again!!! Confirm the distance is equal when measured under the front axle bolt. If it is, your work is done! Double check your work and be done!
  • - Lastly; you can use a longer string and fix the ends to a heavy yet easily movable objects in front of the bike. Remember you'll need to be able to adjust the height, width, and tension with some degree of precision. Rotate the rear tire as needed to avoid the center stand and hoses under the bike.

- Also, depending upon your Rear Tires Tread Design; pick equal grovers, valleys, depressions and/or bumps to route your string through on both the back and front of the tire. This string is acting as a straight edge so pick symmetrical points to measure from on both sides or your results will be off!!!


Tape the string to the tire like so! Hint - blind cord is thick and white, easy to see and handle.
06-DSC_4283.jpg


Rout it through like so!
01-DSC_4273.jpg


Avoid touching anything but the rear tire!
02-DSC_4270.jpg


Eagle Eye the string. Just BARELY touching the rear tires edge!
03-DSC_4274.jpg


Determine the distance to the front disc. Measure and compare to other side!
04-DSC_4272.jpg


The other side! These should be the same distance!
05-DSC_4277.jpg


Bottom line: the hash-marks will get within a 2~4 degrees of dead ahead. A tiny movement of less than 1/2 the width of a hash-mark can be a couple of degrees. In my book, its worth it to take a few extra minutes and dial it in.

- Example: My bike had twice the gap on the right side as it did the left. This means the rear tire was pointed to the right and needs to be shifted left a very small amount. Doing the math on this I had an angle of 1.01 degrees offset while still being perfect on the hash-marks. Sadness -> Lets say that angle was projected for 1 mile. How far would away would my rear tire be if allowed to follow its own path? 93 Feet! Any chance that would make my front tire wear funny? Yea, likely it would! ;)

It was hard to get the camera angle the same to show the equal distance at the front discs but this gives you a general idea of how to string it. Just don't allow the string to bend around the tire as that is NOT a Straight Line and it will not give you proper results.
FYI: with the stock OEM rear tire, the distance from the rotors to the string was 1.100" on my 2008 FZ6

Hey, NASCAR does this for cars that go 200mph. It'll work on you're FZ too!

UPDATE 2012-07-06: http://www.600riders.com/forum/how-tos/45292-keep-simple-chain-adjustment-made-easy.html USE THIS to quickly adjust the chain slack without having to Re-String the chassis. Very Simple!

I hope this helps some of you!

Oh and money has it, my front tire won't scallop or razor on the left side again making the saw blade feel when you run your hand against the direction of rotation when the bikes thrust angle is Zero!
{Some say its the road crown, but you all check your bike and tell me the rear thrust angle is perfect before you ever mention road crown causing this and I'll report back now that I verified the angle to be near Zero}.
 

KHarper4289

New Member
Joined
Feb 26, 2016
Messages
67
Reaction score
0
Points
0
Location
San Diego, CA
Visit site
Well it finally happened, thanks to all of your help!

Last night I went back to the bike and took a measurement at the rear wheel. Approximately 7/8" at the rear of the rotor to swingarm, but about 1 1/8" at the front of the rotor--bad alignment! I immediately loosened the adjusters and crudely twisted the wheel in the direction that should correct the alignment and boom! Firm pedal!

OK, first time aligning the rear wheel was a definite bust. So I went to grab my string and realized--damn--it's not there, I left it at home. It was late, we were tired and so we didn't get to align the rear wheel.

Hopefully I will get everything aligned in the next couple of days and be riding by memorial day! I am going to print FinalImpact's instructions to have in the garage with me when I do it.

Thanks again and a final update to come after it's aligned and riding!

String method is my "double check"

I began aligning the rear wheel by using the sprocket teeth in the chain. There is a bit of wiggle room, I just adjust it until the teeth are tracking dead center of the chain. Then I bust out the ruler + string and the most i've ever been "off" was 1/32" from front tire to rear tire. Given the inherent margin of error in this practice, I said "that's good enough for me".

Using the notches on the swingarm - mine are about 3/4 of a notch off. Definitely cannot trust them.
 

TownsendsFJR1300

2007 FZ6
Site Supporter
Joined
Feb 7, 2009
Messages
12,538
Reaction score
1,185
Points
113
Location
Cape Coral, Florida, USA
Visit site
I've never checked with the string method and just use the stock by the notches on the S2 swing arm.

The chain tracks dead center on the rear sprocket, (you can see by the lube and slight wear), tire wear
has always been minimal.

I guess my swing arm was welded up mid week, not on a Friday :)....
 
Top